As an additional equipment, LADA vehicles can be equipped with a towing device (trailer hitch or towbar). The towing device is designed for articulated coupling of a vehicle with a towed trailer. The design of LADA vehicles provides for the possibility of installing a trailer hitch without additional mechanical influences (drilling holes, welding) on the vehicle body. The following are instructions for installing and connecting a standard towbar on cars of the Lada Priora family.
For each LADA car model, several trailer hitch options are offered for installation, differing in design, but identical in the method of attachment to the car body.
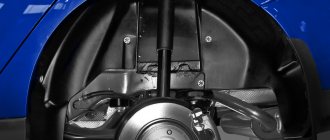
The trailer hitch, regardless of the model and design of the device itself, is attached to the rear power elements (side members) of the car body.
Tightening torques for threaded connections
:
- M6 – 9.8 Nm (0.98 kgf/m);
- M8 – 24.0 Nm (2.4 kgf/m);
- M10 – 47.0 Nm (4.7 kgf/m);
- M12 – 81.0 Nm (8.1 kgf/m).
A Question of Choice
Today, the problem when choosing a towbar for a Priora, as well as for other cars, is not a shortage of auto parts, but an excess of them. For Lada, which is the hero of discussion today, experienced motorists distinguish three brands. This:
- AutoS. A Russian company that has earned a calling not only at home, but also abroad, for the quality of its products. Offers a clutch for Lada Priora at a low price, but meets the standards and does not cause problems during installation.
- Leader Plus. Also a Russian manufacturer, producing copies for domestic cars and not only. Drivers highlight only the advantages, because the towbar costs little, but it has no problems with installation on the car.
- Trailer. The quality of this Russian company is also maintained at a high level, as is the opposite price level for Russian cars. The towbar on the Priora from the Trailer fully justifies the stated parameters.
And although there are other manufacturers of couplings, it is not known whether they offer models adapted for Priora. This can only be found out by contacting the company, the official website, or when searching for a car accessory in a store. As for foreign products, these are not worth taking for Russian cars. It's expensive and unjustified. Find out which companies produce the best towbars from this article.
Towbar on Priora station wagon
Special attention should be paid to the type of ball design, because there are three options:
- Quick release tow bar.
- Conditionally removable.
- Welded.
Model selection
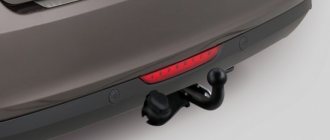
First we need to decide how we will look for a tow bar for ourselves. It’s not difficult to find any on a Priora, and it makes no difference whether it’s a hatchback or a sedan. We will need a towbar based on a tow ball, standard for our country and all neighboring countries. It is very simple, but fully capable of satisfying those who want to drive their car with a trailer. Externally, in the back of the car we can only see a pipe and a ball sticking out on it. In the part of the car that is invisible to us, there also remains a frame with brackets that secure this entire structure to the car’s subframe.
When a towbar is made, the mounting frame is first made, and therefore, depending on the depth of the subframe, the ball itself and the pipe on which it is attached are brought to the visible part. Everything is done simply on the Priora – it’s a standard car. The ball in this entire structure plays the role of a fixed hinge around which the trailer drawbar moves. Due to the perfectly smooth shape of the trailer, it turned out that the trailer can move both horizontally and vertically without causing any inconvenience to the driver.
There are also the following types of trailed equipment:
- Based on a trailer bracket.
- With tow hook.
Towbar Lada Priora
By the way, the towbar usually created a lot of inconvenience when driving. Usually, when making a sharp turn, the trailer could suddenly jerk the car to the side due to the fact that it is not firmly fixed. It often happened that the hook was torn off by the trailer. This happened because after long use the hook slowly wore out and the weld simply came off.
Installation diagram
If the towbar on the Priora is chosen correctly, then there will be no problems with installation. And the standard installation sequence includes the following steps:
- Dismantling of some auto parts.
- Installation of the metal structure of the coupling device.
- Installation of electrical wiring.
- Reassemble the car in reverse order.
- Carrying out a road test in conjunction with a trailer. Including testing of lighting equipment.
Due to the importance of the installation stage of metal structures and electrical equipment, we will analyze these stages in more detail.
Preparing for towbar installation
Installation
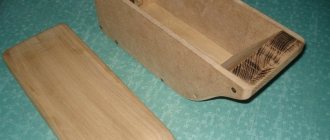
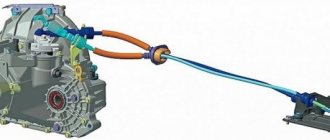
Figure 2-20 shows the main version of the trailer hitch installed on the LADA PRIORA
Figure 2-20 – Design and delivery set of LADA PRIORA trailer hitch: 1 – mounting plate; 2 – rod assembly with brackets; 3 – socket box; 4 – hook
In the right 2, Figure 2-21, and left 1 rear side member, drill out the technological hole 4 to a diameter of 23-25 mm (drill, drill bit).
Through the modified hole, insert the embedded strip from the delivery kit into the spar.
Align the threaded hole of the strip with the rear hole 3 in the spar, screw the bolt from the delivery kit into the strip 2-3 turns.
Install the trailer hitch bar onto the screwed-in bolts with the rear open grooves.
Figure 2-21 – Preparation for installation of the trailer hitch: 1 – rear left side member; 2 – rear right spar; 3 – hole for fastening the trailer hitch rod; 4 – technological hole
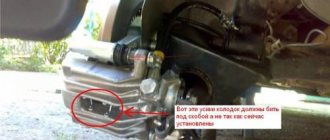
Align the threaded hole of the strip with the hole in the spar and the rod bracket, screw the bolt from the supply kit into the strip (replaceable head 17, knob).
Tighten the rod fastening bolts (replaceable head 17, knob).
Install hook 4 on the rod, see Figure 2-20, and socket 3 (wrench 19, replaceable head 19, knob).
Install and connect the electrical equipment of the trailer hitch.
Treat the modified holes with an anti-corrosion compound.
Installation work
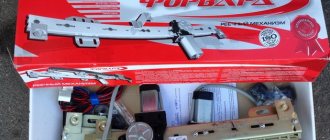
More often, the towbar is equipped at the factory with a pad for the platform, stiffening plates and rubber shock-absorbing inserts. Although professionals advise installation at service stations, more often drivers are interested in how to install a tow bar on a car with their own hands. In answering this question, we will list the necessary equipment and tools. It will include:
- Drill with drills.
- Multi-grade sandpapers.
- Water with a cloth to remove dirt.
- Degreaser.
- Rags.
- Anti-corrosion composition.
- Jack or inspection hole.
- High quality lighting.
Video about installing a tow bar
The mechanical installation sequence is simple. To begin with, the driver drills holes in the appropriate places, but not in contact with the electrical wiring. We clean them with sandpaper and treat them against corrosion. Afterwards it is necessary to apply a sealant for waterproofing.
Manufacturing and installation of welded model V-10
To make a car towbar with your own hands, you will need to remove the bumper from the Priora. Holes are made in the eyes. The structure is welded to a pipe 1 m long. The central installation site is marked. When trying on, the mark should be between the crossbars. A piece of metal structure is welded to it.
The next step is to attach the angle to the middle part of the welded device. This process is necessary to increase the rigidity of the structure and create a removable unit. Nuts are welded to the beam. The first element is docked with the central part.
To supply electricity to the trailer, it is recommended to extend the line through the rear optics. Upon completion of installation, the tow bar is primed and painted. If AytoS products are installed on Priora, then you will need anticorrosive protection and keys. Models V-10 and VAZ-05 do not have a negative impact on the functionality of the standard parking sensors.
Such devices are easily mounted on various modifications of the VAZ-2110 car, including the Lada Priora. Experts recommend that car owners buy welded towbars, as they are considered more reliable than removable structures. First check the reliability of the fastening. This will require reinforcing plates. Holes in the body are made to fix the towbar. Its diameter should be 12.5-13 mm.
The next stage involves treating the hole with an anticorrosive agent. The product prevents rust from appearing in the hole. To secure the structure you will need nuts, bolts and a washer. Then the towbar is connected. If necessary, the rear bumper can be removed. To prevent moisture from getting on the wires, they are insulated.
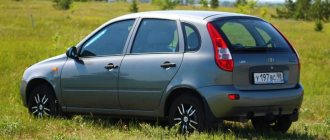
Lada Priora is almost the most common car on the road today. They make it here, quite efficiently, fully maintaining the entire technological regime, and the machine is quite capable of satisfying the average resident of our country, who only needs a car to go to work and back, and sometimes to go on vacation to the nearest forest. The car is available in three body styles: sedan, hatchback and station wagon.
So everyone can choose a Priora according to their taste and needs: for some, a large and voluminous trunk is important, while others strive for compactness and maneuverability on the road.
Electrical wiring installation
It is better to entrust the connection to professionals to prevent electrical wiring damage. When installing electrics yourself, the steps are as follows:
- Emptying the luggage compartment, including carpets.
- Opening access to the electrical wiring harnesses of the vehicle's rear optics.
- Turn on the dimensions to search for the corresponding wire on the left lamp using a tester.
- Fasten and mark a 0.6 meter piece of wire in this place.
- Turning off the side lights.
- And turning on the right turn signal for subsequent similar markings.
- Further, the rear lights with brake lights are also determined.
- And then the electrical wiring is connected into one bundle, which is removed through the technological hole.
- Pulling wires to the towbar socket. For information on how to connect a towbar socket, read this article.
- Connecting the marked wires with the coupling electrics according to the diagram.
- Connecting the trailer plug.
- Functionality check.
At the stage of connecting the electrics, it is important to pay special attention to the insulation of the wiring, because if the standards of this stage are not followed, there is a possibility of a car fire.
Thus, choosing a towbar for a Priora is similar to the process for other cars. However, it is worth being familiar with the classification of towing devices, having information about manufacturers that produce devices specifically for this car, and also knowing how to install a towbar on a passenger car with your own hands.
Connecting electrical wiring to the Lada Priora trailer hitch socket
The idea of attaching the trailer hitch and connecting the electrical wiring is extremely similar, no matter what type of body the tow bar is installed on. Priora hatchback, station wagon and sedan have similar rear headlight power supply circuits; some differences are associated only with the design of the car trunk. In order to get to the electrical wiring, it is enough to dismantle the decorative trim (in particular the strip in the corner of the trunk), under which the wiring harness going to the headlight is hidden.
All socket contacts are numbered. It is best to lay the electrical wiring under the bumper of the Lada Priora, for which it will have to be removed. Here's a little cheat sheet for connecting the wires in the harness to the tow bar:
- pink - dimensions (pins 5 and 7 on the socket);
- green/blue - left/right turn signals of Lada Priora (pins 1 and 4 in the socket, respectively);
- red (orange) - brake light (pin 6 of the socket);
- black, according to tradition, is ground (“minus”, contact 3);
- contact 2 sockets - optional, +12 V.
0 0 votes
Article rating
Mechanical part of tow bar installation
First of all, you need to take into account that the ball of the device must be in the center of the rear bumper. It is necessary to achieve maximum accuracy, because otherwise there is a risk of trailer sway. This means that the mounting bolts on the subframe must be installed according to the previously marked marks.
Before installing the towbar, prepare the following:
- Electric drill;
- Metal spacer plates to strengthen the fastening;
- Set of keys, screwdrivers;
- Anticorrosive
Please note that the station wagon received a reinforced rear suspension, so the mounting points will be different.
Pay attention to the mounting points, mark the normal extension of the device beyond the edge of the bumper so as not to scratch it each time you install the trailer. Carry out the work according to the algorithm:
- Remove the rear bumper. To do this, unscrew the mudguard mounting bolt using Torx-20. Use a Phillips screwdriver on both sides to unscrew the screws that secure the bumper to other parts of the body.
- Then unscrew the bolts securing it to the body from below. Having opened the trunk lid, unscrew the remaining bolts with the “10” key.
- Pull the bumper slightly towards you. Disconnect the wires from the parking sensors. Remove the bumper and place it on a soft cloth.
- Mark the mounting locations. Drill holes with a radius of 6-7 mm, make the same holes in the plates to make the device more stable.
- Treat everything with anticorrosive. Place the brackets, securing them with bolts.
- Install the towbar. But don't overdo it to keep the spar intact.
- Connecting electrical wiring to the Lada Priora trailer hitch socket and light alarm.