Correct connection and tweeter installation
During the process of installing a new speaker system, the owner may have the following problem: how to connect tweeters (tweeters) so that they work efficiently and without problems?
The essence of the issue is the complexity of modern stereo systems. For this reason, in practice there are often cases when installed tweeters either work with distortion or do not work at all. By following the installation rules, you can avoid possible difficulties - the procedure will be as quick and simple as possible.
In what places is it recommended to install tweeters?
Manufacturers recommend many places to place tweeters, most commonly at ear level. In other words, aim them as high as possible at the listener. But not everyone agrees with this opinion. This installation is not always convenient. It depends on the specific circumstances. And the number of installation options is quite large.
- Corners of mirrors. During the trip they will not cause additional discomfort. Moreover, they will fit beautifully into the interior of the vehicle;
- Dashboard. Installation can even be done using double-sided tape;
- Podiums. There are two options here. The first is to install the tweeters in a standard podium (which comes with the tweeter), the second is to make the podium yourself. The latter case is more complicated, but it guarantees a better result.
Where is the best place to point tweeters?
When designing car audio, you can choose one of two options:
- each tweeter is directed at the listener. That is, the right tweeter is directed at the driver, the left one is also aimed at him;
- Diagonal installation. In other words, the tweeter on the right is routed to the left seat, while the speaker on the left is routed to the right.
The choice of one option or another depends on the individual preferences of the owner. To begin with, you can point the HF speakers towards yourself, and then try the diagonal method. After testing, the owner himself will decide whether to choose the first method or give preference to the second.
Basic faults
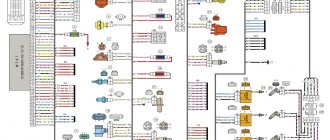
The desire to install 16 cm speakers on the Priora arises due to the poor sound quality of the standard speakers. In addition to the complete lack of music due to faulty wiring, Prior owners with a factory speaker system have to deal with:
- Wheezing.
- Hissing at high volume.
- Not loud enough.
The problem can be solved by installing high-quality audio speakers, primarily in the front. This upgrade significantly improves the sound of the audio system without requiring significant costs.
Manufacturers and prices of analogues
Car audio systems are varied. Popular among Priora drivers:
- Mystery MJ-650, cost 2000–2500 rubles.
- Alpine SXE-1750s – price from 3000 rub.
- Kicx STC 6.3 – price 3000–3500 rub.
- Pioneer TS-A1600C, Price from 4000 rubles.
- Morel Maximo Coax 6 – approximately 4000 rub.
- Hertz DSK 165.3 – about 5,000 rubles.
Prices are for a set of two speakers. Of course, this is not a complete list. The choice of audio system is limited by the desires and capabilities of the car owner.
Connection features
A tweeter is an element of a stereo system whose task is to reproduce sound with a frequency from 3000 to 20,000 hertz. The radio tape recorder produces a full spectrum of frequencies, ranging from five hertz to 25,000 hertz.
The tweeter can only reproduce high-quality car audio with a frequency of at least two thousand hertz. If a lower-frequency signal is applied to it, it will not be reproduced, and if the power for which the mid- and low-frequency speakers are designed is high enough, the tweeter may fail. At the same time, there can be no question of any quality of playback. For long-lasting and reliable operation of the tweeter, you should get rid of the low-frequency components that are present in the general spectrum. That is, make sure that only the recommended range of operating frequencies falls on it.
The first and simplest way to cut off the low-frequency component is to install a capacitor in series. It passes well the high-frequency frequency band, starting from two thousand hertz and more. And does not pass frequencies below 2000 Hz. In fact, this is a simple filter, the capabilities of which are limited.
As a rule, the capacitor is already present in the speaker system, so there is no need for additional purchase. You should think about buying it if the owner decided to acquire a used radio and did not find a capacitor in the tweeter kit. It may look like this:
- A special box to which a signal is sent and then transmitted directly to the tweeters.
- The capacitor is mounted on the wire.
- The capacitor is built directly into the tweeter itself.
Crib
Instead of a conclusion, let's summarize:
- You can plug in budget sound into the Grant for an amount of 20,000 rubles or more.
- Podiums in the front doors = impossible to open the glove compartment.
- 16 cm speakers in the front doors - cut the metal of the door or prepare spacers with the factory facing of the speakers.
- The acoustic shelf covers the ISOFIX mounts.
- Audio preparation pulls wires only in the doors.
- Article numbers for ordering speaker covers and mounts are in the “Installing speakers in rear doors” section.
Spacers for 16 cm speakers for Lada Granta, Lada Kalina 2, Datsun at Lada Tuning Shop★ Low prices ★ Call: 8-919-819-40-37 We guarantee delivery throughout the Russian Federation and high quality goods
Specially designed spacers for standard installation of 16 cm speakers in the front doors of Lada Granta and Lada Kalina2 WITHOUT metal cutting.
1. Easy installation - the back side completely follows the curvature of the door metal. The front completely follows the curvature of the door trim.
2. The spacers fit evenly and tightly between the metal of the door and the door trim.
3. Self-tapping screws for attaching spacers included.
4. The speakers are installed on the door trim. The grids that come with the columns are used. The sound goes into the interior and not under the upholstery.
Delivery set: spacers (left and right) and 8 screws for attaching the spacers to the door.
Sending by Post: YES possible
Sending by transport company: YES possible
When installing new speakers in doors, not all standard places can ensure their correct fit. In such cases, podiums or so-called “spacer” rings help out. But their installation also has its own subtleties:
1. The most correct option for attaching the rings (and speakers) is to the metal of the door. In this case, the rings should be of such dimensions that the speaker does not play under the upholstery (as in the figure). Otherwise, the space between the upholstery and the metal of the door will act as a resonator chamber, and the sound is unlikely to please you. And the upholstery itself will noticeably “play along.”
2. Attaching rings (and, accordingly, speakers) to the upholstery is also not the best option. The upholstery does not have the necessary rigidity and will resonate. The only exception may be the mid-frequency speakers of “variety” systems, but only if the upholstery is made extremely rigid, not subject to vibrations and is securely (not on standard pistons) attached to the metal of the door. Standard partially reinforced upholstery does not provide the speakers with proper acoustic design.
3. Don't be afraid to make the podiums heavy (within reason). This will reduce the vibrations that the speaker transmits to the door; the sound with massive podiums is usually much better.
4. When making podiums, try to avoid creating “tunnels” behind the speaker. This negatively affects the sound and causes resonances at certain frequencies. If it is difficult to do otherwise, cover the inside of the podium with any light porous sound-absorbing material.
5. The most common material for podiums is plywood or MDF. Don't forget that this material can absorb moisture in a car, so be sure to protect such elements. For example, they can be painted with any suitable paint.
Information prepared by the automotive news agency "Avtoline"
Other Features
Today, the most common tweeter option is the electrodynamic system. Structurally, it consists of a housing, a magnet, a coil with a winding, a diaphragm with a membrane, and power wires with terminals. When a signal is applied, current flows in the coil and an electromagnetic field is formed. It interacts with the magnet, mechanical vibrations occur, which are transmitted to the diaphragm. The latter creates acoustic waves, and sound is heard. To increase the efficiency of sound reproduction, the membrane has a specific dome shape.
Car tweeters typically use silk membranes. To obtain additional rigidity, the membrane is impregnated with a special compound. Silk is characterized by its ability to more effectively cope with high loads, temperature changes and dampness.
In the most expensive tweeters, the membrane is made of thin aluminum or titanium. This can only be found on very prestigious speaker systems. They are found quite rarely in a typical car audio system. The cheapest option is a paper membrane.
In addition to the fact that the sound is worse than in the two previous cases, such equipment has an extremely short service life. And this is not surprising, since paper cannot ensure high-quality tweeter performance in conditions of low temperature, high humidity and high load. When the car increases engine speed, an unusual sound may be felt.
Don't forget that you can also set up the tweeter using the radio. Even the cheapest models have the ability to adjust the high frequencies. In particular, mid-price models have a built-in equalizer, which greatly simplifies the task.
After installing the tweeter, you need to configure the audio system, and how to do this, read the article “How to configure a radio.”
Self-installation of tweeters in Lada Vesta
Good acoustics in a car is the dream of not only true music lovers, but also ordinary owners of Vesta and other models. Usually it all starts with installing a new radio and continues with replacing the standard speakers, selecting an amplifier and subwoofer. However, many people completely undeservedly forget about the so-called “tweeters”. But without them it is absolutely impossible to create a full-fledged sound picture!
Installation of speakers (music) - Tuning and repair of Lada Priora
I decided to install this music in my Priora:
- Head Pioneer DVH-3200UB (I took the DVD and thought I’d install a TV... so it’s been more than a year and still no TV, don’t take the DVD, it’s not needed in the car)
- front Auditor rip 165 (a subsidiary of Focal, the sound is decent, they play cleanly)
- rear Auditor RIP 165C amplifier Blaupunkt GTA 470 (tested by me over many years - powerful and reliable for the money)
There were no questions with installing the head unit: I pulled out the plug, connected the power connectors, antenna, tulips and put them in place
The speakers had to be redone, since the standard places are for 13-inch speakers, and I have 16-inch speakers. In the end I decided to install spacer rings.
We cut the metal of the door. It's a shame, but it has to be done
We install the rear shelf, making sure that nothing touches it. and enjoy good music! The wires from the radio go to the amplifier (unfortunately there are no photos), and from the amplifier they are routed to the speakers
Tweeters
This is the name for high-frequency speakers, which are necessary for playing high frequencies. Tweeters in Lada Vesta not only have a positive effect on sound quality, but also make the sound picture more saturated.
Tweeters are installed from the factory in the Lada Vesta, but only in the top-end configurations Comfort Multimedia and Luxe Multimedia, which, however, is not surprising, since these acoustics are usually available in expensive versions, where the closest attention is paid to sound.
Factory tweeters are only available in top versions
However, the lack of such components does not stop sedan owners who install tweeters in the Lada Vesta themselves.
Where can I buy?
If you live in a large city and are not very well versed in such issues, the easiest way is to go to a large car acoustics store and choose tweeters for Vesta there. It would also be a good idea to consult with the seller, who can recommend the best option.
However, many either do not have the opportunity to go to a large store, or initially know what they need. In this case, the smartest thing to do would be to order the product online. Some people use Aliexpress because they can find acoustics cheaper there, but not everyone is satisfied with long delivery times, and therefore sometimes it is much easier to pay a little more and buy everything in a Russian online store.
To watch online, click on the video ⤵
CAR SOUND IN PRIOR BY DESHMAN Read more
Installing tweeters in the front pillars. Acoustic carpet. More details
Stands for tweeters, horns. Priora, VAZ Read more
Installation of 16 cm speakers in the front doors of Lada Priora without podiums Read more
No extra channel for horns! How to connect HF speakers from a GU or in parallel, see Read more
What happens if you connect the tweeter directly? More details
Installing a gong (buzzer) from BMW in a Priora Read more
Car service: “Installation of high-frequency speakers - tweeters - tweeters on the side pillars” More details
Where you can and cannot install tweeters (HF, tweeters) | Car Audio School Read more
Diary of Lada Priora 2. Entry 44. 16 cm speakers in the front doors. More details
Should I put tweeters or a horn? More details
The process of making door cards. Coverings for a loud front on the Lada Priora from [Avtostyle] More details
Audio system for 20,000 rubles - connection and configuration Read more
Large review of horn tweeters (tweeters) Read more
Does the car radio need an amplifier? We test acoustics with and without amplification. More details
How to Install HF tweeter (tweeters) in MAZDA3 test and review. More details
SB: We remove the wheezing of the speakers and set up the radio with our own hands Read more
Assembling a loud audio system in a car. Part 2.2. Installation of acoustics. More details
Car tricks for CAR SOUND!! More details
Acoustics for the front doors of Lada Granta
Installing speakers in Granta doors allows you to be independent of the body type - speakers in the doors do not require an acoustic shelf. This means that you can install speakers in a sedan and a hatchback according to the same principle.
Here we are talking only about acoustics. Read how to install a radio in Granta here.
In non-luxury trim levels, the door cards do not even have holes for speakers - only perforations in the plastic.
Preparatory work
Before we begin the installation itself, let's figure out how to prepare the car. For this:
- We disassemble the door: dismantle the handle (pry up and remove the trim, unscrew 2 screws), the tip of the limit switch, two screws from the bottom of the door, overcoming the resistance of the retaining pins, pull the door card toward you and remove it from the door;
- We soundproof the door: in the warm season or in a heated garage, we cover all accessible parts of the door with vibroplast. Vibroplast StP M2 is suitable; when applying it to the door, be sure to heat it with a construction hairdryer and roll it with a pressure roller;
- If you have Spleen thermal insulation material, we cover the inside of the door card with it. This will further hide noise from the door when assembled;
- We are preparing spacers, if any are required for installing 16 cm speakers - more about them later in the text;
- We replace the factory terminals on the speaker wire in the door with normal ones (usually good terminals are included with the speakers) - to do this, we simply cut off the unnecessary connectors and attach the terminals we need to the wiring. A high-quality twist with heat shrink is sufficient;
- If the door panels do not have holes for speakers, we prepare them. It would be optimal to supply factory acoustic grids, which are installed on luxury versions of Granta and Datsun OnDo.
Item number for nets to order online: front left - 21906102097, front right - 21906102096.
Factory screens are flush with the door panel and allow you to open the glove compartment normally.
Installing speakers in Granta front doors
The standard acoustics in Grant are 13 cm speakers. They do not produce good sound, but they are easily installed in the factory holes for the speakers without unnecessary manipulation. The procedure for dealing with them is simple:
- connect the speaker cables, observing the polarity;
- fix with screws in regular places in the metal of the door or directly on the door card;
- install grids (in common parlance - grills).
An important disadvantage is that the center of the mounting hole and the place under the grill do not coincide. This means that when installed with complete grills, they will look asymmetrical and clumsy.
Standard acoustics most often do not produce a rich sound and, when installed with their own grids, look poor.
How to install 16cm speakers with spacers
In pursuit of sound, it is logical to install 16 cm speakers. This is where all the disadvantages of the AvtoVAZ design appear - the speakers either are not centered, or do not allow the window to roll down, or interfere with the glove compartment lid.
Why are spacers needed? In order not to cut the door, if you do not put the acoustics in the spacer rings, you will have to attach it to the metal of the door. This may result in the need to cut the door itself in order for the speaker to fit in, and is dangerous for the glass.
For this reason, speaker rings made of plywood are attached to the metal of the door, and the speaker itself is attached to them.
If you make your own spacers, remember: NOT the plywood may burst during installation. Too large a thickness (more than 10 mm) will not allow installing standard speaker grilles from Lada.
The procedure is as follows:
- we make or buy spacers for speakers - thickness 10 mm, material plywood;
- cut a hole for the speaker in the card and mark the installation location along it;
- put the spacer on 4 self-tapping screws;
- We install a column in it - observe the polarity!;
- install the map + install the standard mesh so that it doesn’t interfere with the glove compartment.
If the spacer bursts during installation, this may result in a rattling noise coming from the door while driving.
What speakers are better to put in the front doors instead of standard speakers?
We recommend the Pioneer TS-G1733I model. At a price of about 2 thousand rubles, they are freely installed through spacers in Granta doors without cutting metal and do not interfere with the glass. Easy installation will save you nerves and time.
The speakers are easily pumped with a radio without an amplifier and produce medium bass. Not component acoustics!
How to make podiums on a Lada Priora for front doors with 8 and 16 valves
Acoustic podiums at Priora
Acoustic podiums on a Priora are very necessary when the owner is thinking about improving the acoustic characteristics of the car. The fact is that for normal sound reproduction in the cabin, the front speakers play an important role. It would be wrong to install ordinary small speakers in the door panels and trust them to reproduce powerful sound, since they will not cope with their task. And large speakers will not be able to be installed until acoustic podiums are installed on the Priora.
What to make spacers for speakers from
How to properly make spacers in the front doors under the front? I’m interested in what material is better to use, how thick it should be, and if anyone has a drawing, please share. What's the best way to mount them?
ps: I saw that Bloom suggested putting this in the faq on MLC, but no one bothered to do it.
I'll post a small photo report on the spacers
We take plywood (I took 15mm) and outline the outer side according to the standard speaker. Click to view the attached file. The inside side is approximately the template from the box.
Next, take a screwdriver. Drill, whichever one you like. We drill holes in the inner frame. Click to view attached file
I didn’t apply mastic. Didn't impregnate it with anything. Screwed it directly onto the splenium.
Thank you all for your attention. Titus, thank you
PS, I didn’t bother with epoxylin. I screwed them into triangles. Click to view attached file
Titus, thank you. PS, I didn’t bother with epoxylin. I screwed them into triangles. Click to view attached file
I'm happy with the result
But what if..
It turned out beautiful
I hope the audience won’t mind if I post my photos of preparing spacers
I didn't cut it out of plywood right away. I decided to try it on cardboard cats. I drew the outer contour according to the standard column.
The internal contour was successfully outlined along the decorative ring from the new speakers.
I cut out a spacer from cardboard, tried it on the speaker + checked the location of the holes for the screws in the door (everything lined up perfectly)
Now, boldly, without fear in my pants, I did the same thing on plywood. Instead of a knife and scissors - a jigsaw and a drill
cut out
Tried it on
Using a file and then a zero, I processed the “rough” areas. I screwed the speaker to the spacer with 8 self-tapping screws.
More details here
What and what places need to be sealed?
More details here
What and what places need to be sealed?
I sealed the contact areas between the speakers and the wood and the wood itself against the door. This can be done in different ways - even to the point of rolling up the entire piece of wood with a vibrator (tearing off the foil from it), or tearing the resin off the vibrator, rolling up flagella with a diameter of 5 millimeters with your fingers and one flagellum between the piece of wood and the door, with the second “wrap” the speaker at the junction and assemble it all with screws. I did it with flagella
I made some 16mm spacers, but now the trim doesn’t fit into place. Despite the fact that I cut (along with the hand)))) the plastic in a circle from the inside. There is no protruding rib in the front part.
What should I do, thinner spacers or where?
I’m tormented by the question of how to install 8″ “variety” speakers. Does anyone have any experience?
ps I’m wildly sorry that I’m writing in several messages, there’s some kind of character limiter on the PDA)) don’t take it for a flooder or a careerist)))
I made podium spacers for standard mounts. Initially I wanted to make it from 8 mm, but according to the recommendations of Pashka kurd
I found a piece of plywood 16 mm thick
The result of the assembled door and the new speaker, I cut the card under the podium by 5 mm, bitoplast was glued on the door at the place where the speaker was attached (photo was taken at night with a phone)
The terminals are crimped + soldered.
I attached the crossovers near the handle, there is a recess in the door card, well, in general, you need to look where there are such free spaces, I adjusted the crossover a little, removed the caps from the card and tried the whole thing on - it fits, it doesn’t fit.
Thank you! I think there is enough of it there, the plywood is quite smooth. Everything became tight, the sausage was squeezed out in many places.
If you don’t want to trim the card, there is an option to take thinner plywood, 10 mm, as described above.
Modern podiums
Acoustic podiums yourself
Sound organization is a set of measures that includes not only sound insulation or installation of a subwoofer, but also installation in the front doors of the podiums. You don’t have to buy them, although you can find almost any option in stores today. You can make podiums with your own hands if you know the basic nuances of the operation presented in our instructions below. Modern acoustic podiums are not too different from those that came before. Although, this is at first glance, but if you take a closer look, you will see the following:
- Modern podiums are made of high-quality material, which significantly increases their service life. If earlier they were made of plastic, which soon became covered with cracks and delaminated, today podiums are made of more durable material;
Modern acoustic podium
- Acoustically, modern podiums have an excellent and comfortable matte surface that does not leave dirty marks. High-quality plastic or plywood, from which modern podiums are made, is quite difficult to accidentally damage;
- The current podiums are made in such a way that they provide the opportunity to conveniently lay hidden electrical wiring to the speakers;
- Modern podiums are distinguished by a slightly modified configuration, which allows the installation of not one, but several speakers that reproduce different frequencies.
Acoustic podiums for yourself
How to make spacer rings for speakers
You will need: plywood, drill, jigsaw, sealant, varnish.
The thickness, width and other dimensions of spacers for columns are calculated individually in each case, so there are no universal sizes of spacers. The diagrams presented above can act as a template, which will be modified locally.
The total thickness of the spacer is determined individually. Approximately, for a speaker mounting depth of 52 cm, spacer rings 16 mm thick should be suitable.
Procedure:
- Determine the outer and inner diameter of the rings (using a sample or speaker).
- Cut out the spacer slides with a jigsaw, having previously drilled holes for installing the jigsaw blade.
- Fasten all parts of the spacer (if they are composite) using glue or self-tapping screws.
- Try on the door spacers and modify them if necessary. Make sure that the spacers fit tightly to the surface, nothing interferes with the correct positioning of the speaker, and the door trim is installed without problems (modify locally).
- Coat the rings with several layers of varnish.
When installing spacers, make sure that it and the speaker are secured as tightly as possible (stick vibration isolator strips under the ring), this will eliminate the occurrence of vibrations and rattling. Seal all cracks using caulk. It is recommended to combine the installation of spacers with sound insulation of doors.
Let us remind you that new speakers are not the only popular accessory for Lada Priora.
When installing new speakers in doors, not all standard places can ensure their correct fit. In such cases, podiums or so-called “spacer” rings help out. But their installation also has its own subtleties:
1. The most correct option for attaching the rings (and speakers) is to the metal of the door. In this case, the rings should be of such dimensions that the speaker does not play under the upholstery (as in the figure). Otherwise, the space between the upholstery and the metal of the door will act as a resonator chamber, and the sound is unlikely to please you. And the upholstery itself will noticeably “play along.”
2. Attaching rings (and, accordingly, speakers) to the upholstery is also not the best option. The upholstery does not have the necessary rigidity and will resonate. The only exception may be the mid-frequency speakers of “variety” systems, but only if the upholstery is made extremely rigid, not subject to vibrations and is securely (not on standard pistons) attached to the metal of the door. Standard partially reinforced upholstery does not provide the speakers with proper acoustic design.
3. Don't be afraid to make the podiums heavy (within reason). This will reduce the vibrations that the speaker transmits to the door; the sound with massive podiums is usually much better.
4. When making podiums, try to avoid creating “tunnels” behind the speaker. This negatively affects the sound and causes resonances at certain frequencies. If it is difficult to do otherwise, cover the inside of the podium with any light porous sound-absorbing material.
5. The most common material for podiums is plywood or MDF. Don't forget that this material can absorb moisture in a car, so be sure to protect such elements. For example, they can be painted with any suitable paint.
Information prepared by the automotive news agency "Avtoline"
You can install 13 cm or 16 cm speakers in the front doors of the Lada Granta. 13 cm speakers are installed in the doors immediately, without the use of spacers. But to install some 16 cm speakers, you will need to make special spacers, and when installing certain models, you will have to cut the metal of the door.
Dismantling and installation of Priora door trim
To remove door cards you need:
- flat screwdriver;
- crosshead screwdriver;
- door card clips.
The procedure for removing the casing is as follows:
- Unscrew the bolts securing the door handle;
Unscrew the bolts securing the power window control module (on the front doors); remove the power window control module and the mirror adjustment system (on the front doors); disconnect the wires going to the controls (on the front doors);
- remove the door handle;
- unscrew the three screws securing the casing; remove the door lock control button; remove the door card by unclipping the fastening clips.
Important: during the dismantling process, the plastic fastening clips often break. Therefore, you need to prepare new fastening clips needed for subsequent installation of door cards.Installation is in the reverse order.
Priora door panel trim
To cover door cards with leatherette you will need:
- 4 meters of furniture leatherette;
- glue “Moment” or equivalent (0.5 liters per door);
- brush;
- "Super glue";
- stationery knife;
- construction hair dryer;
- fabric gloves;
- White Spirit;
- antenna cable with a diameter of 5 mm.
The covering of Priora door cards is done one by one, one by one. Produced as follows:
- remove door cards;
- clean and wash the surface of the casing;
- cut a piece of leatherette in accordance with the size of the casing (so that they overlap 15 cm over the edges of the casing);
- degrease the sheathing surface with white spirit;
- Using a brush, coat the surface of the door card with glue;
- wait until the glue begins to dry;
- Using a brush, lubricate the underside of the leatherette blank with glue;
Important: the glue on the upholstery and leatherette must be applied in a thick layer!
- wait 10 minutes;
- place the workpiece on the casing in the area of concave areas;
- press the leatherette onto the trim;
- using a hair dryer turned on at low power, warm up the leatherette in the area of the concave areas;
- With a hand wearing a fabric glove, carefully press down and smooth the heated areas of the leatherette;
- move to the convex places of the covering, also heating and smoothing the leatherette;
- last of all, glue the leatherette to the inside of the door card;
- cut pieces of the antenna cable so that it fits in size to the junction of the plastic sheathing elements with leatherette;
- Glue the cable with “Superglue”, hiding the joints.
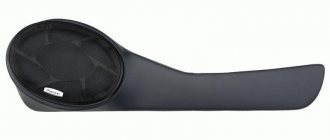
New podiums on the Priora in the front doors: differences and features of the products
Before choosing a podium for Priora tweeters, the buyer needs to determine their appropriate size. This applies not only to the purchased speakers, but also to the free space left for a comfortable stay in the cabin. It is unacceptable to install an element that is too bulky, since it will not allow either the driver or the passenger to sit properly in the cabin.
In addition, the podiums should be conveniently attached to the side pads. The newly acquired elements must lie exactly on the surface of the door, without blocking the pocket. And special podiums for Priora, installed in the upper part of the sidewall near the pillar, will allow you to add new notes to the sound. And also achieve surround sound transmission.
The external design of the podiums also plays an important role. For example, in a car with a classic black and gray finish, you can buy podiums on a Priora in regular black or dark gray. But silver linings will look no less attractive, giving the interior a more modern look.
A car with a brown or beige finish should be complemented with podiums in a coffee or pleasant brown shade.
Small additions should not only be of high quality and convenient. The elements must look stylish in the car where they are installed. That is why only stylish podiums on Priora with tweeters can complement the interior and create really good sound from the media system. And during operation they will not cause any discomfort or noise.
We install size 16 speakers on the Priora
If your Priora has speakers, most likely their size is no more than 13 cm. Will such acoustics be able to satisfy a true music lover? Do they provide high-quality and good sound? It is not surprising that the owner of this particular car, after purchasing the Priora, first of all decided to replace the speakers in it and install 16-centimeter speakers instead of the standard ones.
It turned out to be much easier to buy them than to install them; there were some nuances here. And although there is nothing complicated in such a modification, let's see how this can be done practically. The first difficulty is that the doors of the VAZ model are designed for size 13 acoustics. So we will have to refine them.
Many car enthusiasts solve this problem simply by using additional podiums that are placed on the doors and into which the acoustics are then mounted. But not everyone likes this method; podiums create additional noise, knocking and vibration. Our owner of the Priora decided not to go down this path; he didn’t need unnecessary and extraneous sounds, so he decided to increase the existing places for acoustics.
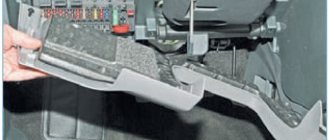
The first step is to remove the door trim
We will not focus on this process, since almost every car enthusiast can handle this. The upholstery has been removed and we have a standard hole in front of us (see
photo). What to do next? You can use a jigsaw. If this tool is not at hand, use a regular drill. We take a compass or ruler, use them to mark points for the 15th diameter, then in these places we drill small holes along the contour. Then, using drills of a larger diameter, we drill out the holes already obtained. Make sure that the edges of the holes are smooth; you can use a file to do this.
When the hole for the new acoustics has been made, we move on to the next stage. We need to make sure that the door plane and the sound device are in good contact with each other. To do this, you can make special spacers from plywood, for example, or wood. If you don’t want to tinker, go to a specialized store and buy ready-made spacers. We fasten them with self-tapping screws or “seat” them with sealant. But remember that this must be done carefully and thoroughly, otherwise the speakers will soon begin to rattle.
Now we need to install acoustics directly in the Priora doors. Before doing this, glue some elastic material onto the spacer. For example, it could be splen. The speakers themselves can be attached with self-tapping screws. Now the final stage of our refinement, we need to thoroughly refine the plastic trim on the Priora doors.
Why is this necessary? So that the sound is of high quality and nothing interferes with it. To do this, remove part of the plastic door pocket using a sharp utility knife as a tool. You can also cut a round opening, and then attach a mesh for the speaker in it.
Now all that remains is to connect the acoustics. I will not dwell on this in detail either, since this is a topic for a separate conversation, although there is nothing complicated about this either.
What will we get as a result? More powerful and solid acoustics fit organically into the doors of the Priora. The sound has become much better quality. We didn’t have to install podiums that spoil the appearance of the interior and can rattle.
Find out what the Priora doors will look like after installation and how such speakers sound in this video.