So, I finally got to the injectors. Mileage 58,000. It is recommended to clean them at this mileage, but I was too lazy and there was another set available. Opening the hood, I realized that I had to remove the receiver to get there. Also lazy...I decided to try to remove the ramps without removing the receiver. Going forward, I want to say that everything was a success. Well, let's start... First, remove the decorative trim of the valve cover, unscrew the Breather and put it aside,
move the air filter to the side. Use a hexagon to unscrew the fuel rail mounting bolts, disconnect the contact chip, unscrew the fuel line nut and move the tube to the side. We slightly pull the ramp towards ourselves by the edges to remove it from its seats. Then we begin to carefully pull it towards the radiator pipes (to the right). I can say right away that you can’t do without dancing with a tambourine, but it’s possible to take it out. To make it easier, I unscrewed two more nuts securing the receiver to the valve cover. They are located at the top. Pulling the receiver slightly towards us, we try to extend the ramp. You don't need to pull too hard, just move it a little. For convenience, you can also unscrew the oil dipstick mount. Just don’t take it out under any circumstances...then it will be difficult to put it back in. Just loosen it and leave it. In general, if you don’t rush and don’t get nervous, then everything will work out.
Well, replacing injectors is not difficult. We simply pull out the retaining rings and the injector is released from the ramp. Insert new ones in reverse order. Just don’t put on the injector of the fourth cylinder. We will insert it when the ramp is almost in place... Otherwise, the nozzle will rest against the radiator pipe. I advise you to unfold the wires that go to the injectors as in the photo so that the chips do not rest against the probe, etc... In general, so that they do not interfere
We also move and carefully insert everything back. By the way, it’s easier to put it in than to take it out. The injector of the first cylinder stuck just short of reaching its intended place. Pressing a little harder, she slipped through. Then everything is simple, we set the injectors in their proper places and carefully insert them back. Next, we assemble everything in reverse order.
For information, the injectors were very dirty and didn’t work as well...
There are no longer carburetors under the hoods of cars that were familiar to old drivers. Now fuel enters the cylinders through the injector system. The jets, diffusers, and floats have disappeared. Everything was replaced by a computer-controlled distributed injection system. Cars, including Priora, are now called cars equipped with an ECM (electronic engine control system). How can the driver now take care of the injectors that have replaced the usual carburetor?
Reasons why the Priora 16 valve engine is tripping. Nothing new
- Supply system;
- Ignition;
- Sensors
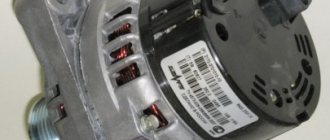
- The most common cause of 16 valves on a Priora is damage to the injector winding. You can check this by removing the cover and manifold. Then measure the resistance on the injector winding; it should be within 15-15 Ohms. If it is faulty, it should be replaced. Read more about how to do this in the article “How to check an injector nozzle”;
- Another reason is a clogged injector. This usually happens when using low-quality fuel. You can also “clog” these engine elements yourself by pouring various cleaners into the tank. They partially destroy sediments. Which, in the form of a suspension, enter the injector, where they get stuck in the nozzles. To fix the problem, you need to flush the injectors. You can do this yourself without removing them from the engine.
- First, let's visually evaluate the candle. It should be brown-sand color. If it is darker, then it may be faulty. It is advisable to check it on a special stand. The spark should be blue and white. If it is yellow or red, then this is a bad sign. You can, of course, try to clean it with sandpaper, but this may not bring the desired effect;
- Try using another spark plug and check how the engine runs. If everything returns to normal, then the cause has been found. Also check the high voltage wire;
- After this, check the ignition coil. It is the weakest ignition part in the Priora. To check, we reset errors from the ECU. And with the ignition off, they swap the supposedly non-working ignition coil with the obviously working one. The engine starts for a couple of minutes. The diagnosis is repeated. If the flash miss “migrated” along with the coil, the problem is in it. Replace it with a new one.
AutoFlit.ru
Checking Lada Priora injectors
As mentioned above, both the fuel system ECU and the injector itself can fail. To carry out a complete diagnosis of the ECU, special software is required, which the average motorist simply does not have. Therefore, the only option is to diagnose the machine at a service center. The program, connected to special equipment, will quickly detect ECU errors and correct them.
A full check of Priora injectors is possible only on a special stand
And if problems arise in the mechanical part of the injector, then the diagnostic program will be useless. The maximum that it can do is indicate which cylinder is not working correctly. After this, the car owner can only replace the failed injector on the specified cylinder, since these devices cannot be repaired.
In order to clean the injectors in VAZ 2114/2115 cars, it is recommended that you familiarize yourself with this material:
Siemens Deka injectors
Lada Priora Station wagon quartz from Morsha Logbook Replacing the heater fan on a Priora without air conditioning
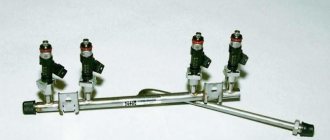
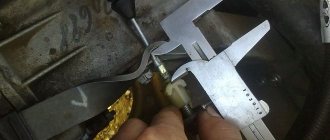
There is no certainty with Siemens injectors, since the plant can install injectors of different markings on the same engine. However, there is a clear difference between the injectors for eight-valve and 16-valve engines.
In the first case, the nozzle
single-flare, in the second - double-flare, that is, it sprays fuel onto each of the intake valves separately.
They are marked as VAZ20734 (orange markings) and 20735 (blue markings). On eight-valve engines, a Siemens 6393 nozzle with a thick torch can be used. Its productivity is 1.662 mg/sec, and the operating pressure is 3 atm. Each of these injectors can be installed on a VAZ-2114 engine.
This video was processed in YouTube Video Editor ()
Failures in the idle speed system (IAC) and ESC
- P0500 - speed sensor is broken.
- P0506 - very low engine speed at idle.
- P0507 - too high speed at idle.
- P0511 - the XX regulator network is faulty.
- P0560 - BS voltage is below the minimum threshold.
- P0562 - very low voltage in the BS.
- P0563 - very high voltage in the BS.
- P0601 - ROM checksum error.
- P0615 - the wires of the additional starter relay are broken.
- P0616 - the same wires are shorted to ground.
- P0617 - they shorted at the BS.
- P0627 - the fuel pump relay wires are broken.
- P0628 - the same wires are shorted to ground.
- P0629 - they shorted it to the BS.
- P0645 - break in the wiring of the air conditioning compressor clutch relay.
- P0646 - the same wiring has shorted to ground.
- P0647 - she shorted to BS.
- P0650 - Malfunction indicator light circuit does not operate.
- P0654 - Tachometer control circuit is faulty.
- P0685 - the main relay electrical wire is broken.
- P0686 - the same electrical wire has shorted to ground.
- P0687 - he shorted it to the BS.
- P0691 - the electrical wiring of the fan control relay is shorted to ground.
- P0692 - the same wiring has shorted to the BS.
Note: in cases where the computer displays error codes that indicate a break in the electrical wiring of a device, before troubleshooting the problem and purchasing spare parts, you must first see if the electrical wiring plug has come out of the connector of the corresponding device. Such incidents happened. Testers and computers are, of course, good, but nothing can replace the eyes of a car enthusiast. Good luck with the repair.
Source expertvaz.ru
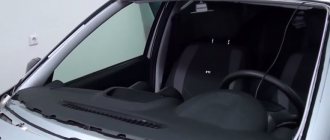
You won’t be able to ride much in the cold season with a non-working stove, so repairing it won’t be shelved. A fairly quick and more or less easy way to get to the heater of a Lada Priora car without air conditioning. Saved.
Priora stove replacement
With the onset of cold weather, the first malfunctions of the Lada Priora heater begin to appear. Situations can be different, in one case there may be problems with the fan, in another with dampers, etc. Today we will tell you how to properly repair a stove on a Priora with your own hands. Replacing the radiator of the Priora stove.
Repair of the Priora interior stove (2 parts) (full)
Replacing the heater radiator on a Priora without air conditioning may make sense if warm air has stopped flowing into the cabin, while the heater itself is working. If, in addition to the above problem, there is also a water leak from under the Priora stove, the motorist will have to remove the poorly functioning unit in order to solder the latter. Sometimes repairs are impractical and you have to replace the old device with a new one. It is told and clearly shown how the stove was repaired, or more precisely the internal control gearbox.
Replacing the Priora stove motor
If the motorist is sure that it is necessary to replace the heater core, it may take a lot of time to eliminate the faulty object, since most likely, in the process it will be necessary to replace not just a blown fuse, but to carry out more serious repair work. True, you should not immediately despair because of your ignorance; the material contains detailed instructions to help everyone understand how to replace the stove radiator in a Priora with and without air conditioning. Replacing the heater fan on a VAZ Priora with your own hands.
Replacing the heater radiator of a VAZ 21072 Priora, in an hour
Today I’ll tell you how to replace the heater gear motor on a Priora at home. This step-by-step photo report will allow you to make such repairs yourself, that is, with your own hands.
how to remove the Lada Priora stove
Thus, we examined all the elements of the Lada Priora stove. Proceed in the order of the article, moving from simple to complex, and then you will certainly be able to repair the Priora heater yourself. remove the windshield frame lining, soundproofing upholstery of the engine compartment, loosen the hose clamps.
Lada Priora. Why doesn't the stove work? Let's solve the problem!
Sometimes the stove does not heat due to a breakdown of the valve designed to regulate cold and warm air flows. If the air flow is very weak, you need to check. The air filter element needs to be changed from time to time, remember this. When the heater is very noisy, the problem is usually a bad bearing. In any case, the bearing device needs to be replaced, since over time it can simply jam the fan, and this, you see, is much more serious than just noise in the cabin. The electric motor does not spin. Let's solve the problem. ===================================================== === I'm on VKontakte.
How to remove the heater radiator on a Priora
Internet resource and are the intellectual property of the site owner (copyright holder). Any copying, publication, use of text or photographic materials is permitted only with the consent of the copyright holder, or in the case where a full active link to the source is provided. Video on how to remove or replace the heater radiator on a Priora, VAZ 2170, 2171, 2172 with Halla air conditioning. Post available.
Priora stove. Diagnosis of heater malfunction
The gasket is installed under the recirculation flap, which, as noted above, is accessible from the storage compartment (glove compartment). The gearbox was disassembled. Everything is fine. The motor axis has become sour. I clamped the axle with a screwdriver and twisted it in different directions.
Replacing the heater gearmotor on a Prior
The old filter stood somehow crookedly askew (diagonally with the right side piled down) and there was also a decent gap into which you can put your hand and thus pick up the filter, as a result there was dust under the filter, I installed a new one - the same garbage. Well, I think I’ll remove it completely, you never know if I installed it crookedly, and even without a filter everything blows as it did before. The heater radiator was replaced last year, the fan does not make any extraneous sounds or anything else. Replacing the gear motor of the Priora stove.
Replacing the heater motor on a Lada Priora with Panasonic air conditioning
There are many different instructions on the Internet on how to do this work easier. Some argue that to replace the gearmotor you do not need to remove the reservoir and wiper trapezoid, others argue that you only need to remove the reservoir. This method involves the complete dismantling of all parts that limit access to the stove gear motor. Replacing the heater motor on a Lada Priora with Panasonic air conditioning.
the fan of the Priora stove is humming
The warm air flow is forced onto the device's radiator thanks to the fan. The speed of the latter varies depending on the temperature inside the car. The ratio of warm and cold air flows is regulated thanks to the valve. The air flow enters directly into the car interior through a filter element designed to clean the air. In the cabin, the car owner already chooses how the airflow will be carried out by adjusting the position of the dampers on the center console. a brief description of why there is a hum from the stove fan. I would love to hear your opinion. Subscribe.
Source esputnik.ru
When to change: self-diagnosis
Lada Priora Sedan 16kl Kvartsukha Logbook REPLACING THE FUEL FILTER
The fuel system of an injection engine has a fairly extensive architecture and faults can only be identified after an accurate diagnosis of each of the system elements. For example, a drop in engine power may be the result of either a malfunction of the injectors, insufficient performance of the fuel pump or a clogged fuel filter.
In addition, jerks and dips, unstable idle and difficult starting, increased consumption, can occur when the injector is simply clogged.
You can check the injectors themselves directly on the engine without removing them. To do this, just start the engine and remove the wires from the connector one by one. If the stability of the engine changes in this case, the engine begins to trip, then the injector
in order. If, when removing the wires from the connector, the stability of the motor does not change, the injector needs to be cleaned or replaced.
How to remove injectors on a Priora with air conditioning
Removing and installing Lada Priora injectors
- Signs of injector failure may include:
- – difficult engine starting;
- – unstable engine operation;
- – the engine stalls at idle;
- – reduced crankshaft speed of the VAZ 2171 at idle;
- – the engine does not develop full power, insufficient engine response;
- – failures in engine operation when driving;
- – increased fuel consumption;
- – increased content of CH in the exhaust gases.
You will need: a 5-point hex key, a flat-blade screwdriver, a 17-point key (two), an autotester.
1. Disconnect the connecting block of the injector wiring harness and the engine harness by pressing the lock.
2. Carry out an initial check of the injector windings of the VAZ 2172. To do this, connect an ohmmeter to the contacts of the pads one by one.
The block has five contacts: four for supplying a control signal to the injectors and one common “+12 V” (a crimson wire with a black stripe is connected to it).
3. In turn, connect the four control contacts to the common contact and measure the resistance in each case. It should be 11–15 ohms. If during one or more measurements the resistance value differs from the specified one, the Lada Priora injectors being tested or their wiring harness may be faulty.
4. For a more accurate check and replacement of injectors, remove the fuel rail from the Priora fret (see “Removing and installing the fuel rail”).
5. Use a screwdriver to pry off the spring retainer of the injector...
Removing injectors on Priora (Lada 2170, VAZ 2112)
Thank you so much for watching my videos, tell your friends, leave comments and subscribe...
Replacing injectors (full technology)
Lada Priora Station Wagon Logbook Towbar and roof rack
Before replacing injectors on a VAZ-2114 of any generation, it is necessary to relieve the pressure in the power system.
To do this, remove the rear seat cushion, open the hatch and remove the contact block from the fuel pump. Now it is de-energized and will not build up pressure.
We start the engine and wait a few minutes until all the fuel in the system is used up. As a matter of fact, I’m interested in which spark plugs are best for Lanos 1.5, I take spark plugs seriously. The car drives every day, 5 thousand a month, so I want it to always start with a half turn and. The pressure has been relieved, now you can safely remove the old injectors and replace them with new ones. We proceed according to the following algorithm:
- We de-energize the car by removing the negative terminal from the battery.
Disconnect the negative terminal from the battery
Remove the hose from the pressure regulator
Disconnect the electrical connector of the throttle position sensor
Disconnect the connector from the idle air regulator
Disconnect the connector block from the injector wires
Unscrew the fuel rail mounting bolts
We dismantle the fuel rail with injectors
Squeeze the spring clip and disconnect the electrical connector of the injector.
Rock the injector and remove it from the fuel rail.
Installation of injectors is carried out in the reverse order. Before installation, it is advisable to check the integrity of the O-rings; if they have lost their elasticity, it is better to replace them with new ones. The injectors are installed and ready for further use. Good luck to everyone!
Replacing injectors without removing the receiver - Community "Lada Priora (Lada Priora Club)" on DRIVE2
Hi all! I hope the information will be useful to someone :) There is also an opinion that it is necessary to remove the injectors and wash the receiver, or that it does not take so long to remove it and so as not to suffer, it is better to remove it. This option is for those who do not want to do this for some reason :) — My story: the mileage was approaching 160 thousand, and I washed the injectors for the last time at about 60,000 km, I wondered about the next wash, but I saw information on the Internet that in theory it was advisable to replace the injectors at 100,000 km. And then I remembered that they fitted me with a fuel rail from the same engine, albeit with a mileage of 20 thousand, and it was Siemens, while I had Bosch from the factory. But as far as we know they are interchangeable. So the question immediately disappeared, the injectors were removed and washed, and the question of installation arose. There is a myth circulating at STOs that removing the ramp without removing the receiver is not realistic. But this is just a myth)) and I decided to check it.
It's actually simple:
0. Remove the block from the fuel pump under the rear seat and start the car until it stalls. This will remove pressure from the fuel system.1. Remove the air filter2. Unscrew the vent and bend it to the side3. We unscrew the dipstick (but do not remove it, it will be difficult to insert) 4. Disconnect the injector cable 5. Unscrew the ramp6. We carefully pull it towards ourselves (it came out without any problems) 7. We pull out the first injector from the ramp in place, and turn the rest with their tail to the right.8. Carefully pull out the ramp to the right (I did it in about a minute and a half)9. We install new ones or our own washed ones, making sure to replace the rings with new ones10. ! Inspect the braid for damage to the wire insulation; my wires have become stiff and the insulation has burst. I had to take a new one11. In order not to stain our clean injectors, it is advisable to stop by a car wash before this procedure and ask them to thoroughly rinse that area, or make do with a bottle of carburetor cleaner and then blow everything out of the compressor (as I did)12. We put everything back together in reverse order. With the new scythe it was more difficult, since I had to carefully press down the wires so that everything lay neatly and did not interfere with the ramp getting into place. The process took about 5-10 minutes. We start it up and check for leaks. If it doesn’t run from nowhere, we rejoice at the result