The main stages of replacing stabilizer bushings:
- We place the car within the perimeter of the repair area and raise it with a hydraulic lift.
- Remove the front wheels.
- Unscrew the upper and lower fastenings of the stabilizer strut (bone).
- Unscrew the bolts and remove the left seal.
- We unscrew the five bolts (at “10”), slide the protective cover of the steering rack, and remove the right one.
- We install new rubber (polyurethane) bushings.
- We assemble the structure in reverse order.
Resource for replacing rubber seals of the front stabilizer
It is difficult to answer unequivocally how much seals cost in each specific case.
The manufacturer indicates an average replacement interval of 60 - 80 thousand km.
The interval varies depending on a number of factors:
- quality of the road surface;
- speed limits;
- driving style;
- quality of spare parts;
- temperature conditions.
How to dismantle the stabilizer
We carry out the dismantling operation in strict adherence to the following algorithm of actions:
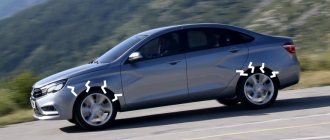
- We lift the Lada Vesta car so that the front wheels are hanging at the same level. This is required to prevent the occurrence of obliquely directed stresses in the stabilizer.
- We dismantle the lower protective casing to ensure easy access to the unit scheduled for repair.
- We unscrew the bolts that hold the stabilizer links to the suspension components. Now we release the racks from their seats.
- Correct installation of new bushings will require complete disassembly of the unit. We unscrew the bolts that secure the fixing brackets.
- We dismantle the stabilizer.
Removing old and installing new products
- We carefully pull the worn elements off the rod (you can cut them off).
- We clean the stabilizer itself from dirt and carefully inspect it to ensure there are no deformations. If any are present, it is recommended to replace the product.
Installing a stabilizer on Vesta
- Lubricate the surface of the stabilizer with the indicated product.
- We put on the elements. We achieve a tight fit. The presence of backlash is excluded.
If such requirements are achieved, then we assemble the unit using the reverse algorithm.
- We mount the stabilizer in its place. To do this, we install brackets that hold the bushings. We “bait” the fasteners.
- We attach the rack to the edges of the stabilizer. Here you can tighten the fasteners to the required torque.
- After this, you can tighten the fasteners of the brackets. The torque should be in the range from 18 to 24 N*m. This restriction is intended to “protect” the owner from the risk of stripping the threads in the fastener holes.
- We return the protective casing to its original place.
Replacing stabilizer bushings on Lada Vesta
Necessary tools, materials:
- Torx wrench with set of sockets;
- ring, ring wrenches;
- knob, heads;
- Silicone based lubricant.
Sequencing:
- We hang the car with a lifting mechanism.
- We turn on the first gear to lock the front wheel drive.
- Unscrew the bolts and remove the wheels and tires one by one.
- We unscrew the nuts of the upper and lower fastening of the stabilizer (bones), use the head at “17”.
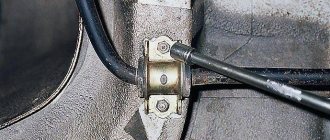
- Using a key set to “17”, release the two bolts securing the metal bracket on the torsion bar on the left side. Access to the rubber bushing is unobstructed.
- To replace the bushing, first remove the steering rack protection on the right side. Fixation of the structure with five bolts, size “10”.
- Unscrew the right bushing.
- We unscrew the two rear bolts securing the metal bracket.
- We clean the surface of the torsion bar from dirt and deposits, and lubricate it with silicone grease.
- We put on new rubber seals.
- We assemble the structure in the reverse order with a tightening torque of 1.8-2.4 kgf.m.
Self-replacement of bushings on Lada Vesta is completed.
Note to the driver! It is not necessary to make a longitudinal cut when installing seals. The presence of an incision contributes to:
- penetration of sand, dirt, moisture into the gum;
- backlash formation;
- deformation of the seal.
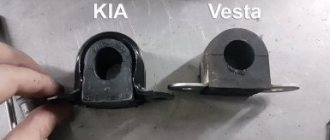
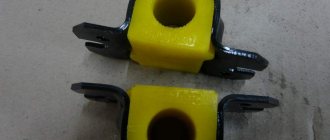
Stabilizer bushings from Niva Chevrolet
_x000D_
Article number of SUV bushings: 2123-2906046 and 2123-2906040 (smaller sizes). The second analogue finds more frequent use. They have a narrower side, but the inner diameter for the bracket is the same.
_x000D_
Stabilizer bushings from Niva Chevrolet
Stabilizer bushings from Niva Chevrolet
_x000D_
We remove the standard rubber bushings of the Vesta stabilizer. Then we make a slot in the bushings from the Chevy Niva, like in the Vesta parts, and grind the sides to standard sizes. If desired, you can place a piece of conveyor belt 1 cm high between the bushing and the subframe.
_x000D_
Stabilizer bushings for Vesta and Niva Chevrolet
Stabilizer bushings from Niva Chevrolet on Vesta
_x000D_
The issue price is 150 rubles for a pair of bushings.
_x000D_
Review of Manufacturer Prices
| Name / Catalog number / Dimensions / Diameter | Price in rubles |
| Original stabilizer bushing | |
| 17012680 (inner diameter 21.5 mm) | From 400 |
| 8450006748 | From 400 |
| High-quality analogues of stabilizer bushings | |
| Polyurethane from Chevrolet Niva 2123 (17012680) | From 350 |
| Polyurethane stabilizer bushings for Lada Vesta from Kia Rio (548132K100, 548141G000) | From 550 |
| 54813-2K100 (diameter 21.5mm) | From 550 – 600 |
| KSBSOULF (diameter 21.5mm) – new sample | From 550 – 600 |
*prices are as of 03/03/2019.
Front stabilizer bushing size for Lada Vesta
_x000D_
Standard bushings have catalog number: 8450006748. Dimensions are shown in the photo:
_x000D_
Front stabilizer bushing size for Lada Vesta
Front stabilizer bushing size for Lada Vesta
Front stabilizer bushing size for Lada Vesta
Front stabilizer bushing size for Lada Vesta
_x000D_
Based on these bushing sizes, you can select analogues. Here are some of them:
_x000D_
Recommendations for selection
Service center technicians recommend purchasing spare parts and components from certified points of sale and official representative offices in order to reduce the likelihood of purchasing counterfeits.
Carefully check the catalog numbers with the dimensions specified in the operating instructions. If you have any doubts about the quality or origin, refuse to purchase.
Conclusion
Replacing the front stabilizer bushings and rods requires careful attention on the part of the repairman. Violation of the technological process will lead to deformation of the structure.
What type of sealing sleeve to purchase is up to the owner to decide on his own, but motorists recommend polyurethane ones. Their service life is 4 times longer than rubber ones. Polyurethane bushings retain their shape better and remain elastic regardless of the ambient temperature, which ensures a high level of controllability of the technical device.
Which bushings should I choose for replacement?
As we found out, the original products are not of decent quality, so you will need to look for analogues. And the main thing is to decide which bushings are suitable.
Here we look at some options for resolving the issue:
- many small manufacturers already produce stabilizer bushings, the material of which is polyurethane (it is less prone to mechanical and chemical stress compared to rubber);
- purchase stabilizer bushings for Kia; the parts fit perfectly in size and have a sufficient level of quality, and it doesn’t matter whether these are original stabilizer bushings or analogues.
Important! When purchasing bushings, pay attention to the identical geometric parameters, otherwise it will be impossible to install them.
Reviews
| № | Positive |
| 1. | Petrovich , 35 years old (drive2.ru) Sverdlovsk: the car is a year old, I drive on the original bushings, no knocks, no rattles. I hope that they will last another 40 - 50 thousand km. |
| 2. | Vasily , 43 years old (prom.ua), Krasnodar: drove Vesta for two winters, original parts. There are no comments, the right side knocks a little, I blame the weak tightening of the rack. |
| 3. | Gennady , 38 years old (autotoday.com), Omsk: I won’t say that the quality of the original seals is super, but I’ve been driving for the third season and there’s no knocking. The manufacturer gives a guarantee of 60,000 km, let's see how long it lasts. |
| 4. | Vasily Gavrilovich , 48 years old (rozetka.ua), Rostov-on-Don: drove 45,000 km, a knock appeared on the right side. I went to the service station for diagnostics, the master said that the stabilizer bushings needed to be changed. |
| 5. | Dmitry Petrovich , 43 years old, Kursk (avtoflit.com): I bought the car second-hand, got it in good condition, well-kept. The speedometer shows 50,000 km, diagnostics showed good results. |
| 6. | Alexander Petrovich , 33 years old, Voronezh (autotoday.com): I’ve heard a lot of negativity about the quality of the seals, I can’t confirm it, since I’ve already driven 65,000 km on the factory ones. |
| Negative | |
| 7. | Vladimir , 38 years old (prom.ua), Uralsk: the speedometer already has 45,000 km, and the rubber bands on the stabilizers already need to be changed. Worn out very quickly, poor quality. It's better to buy from Kia, Toyota. |
| 8. | Mikhailovich , 44 years old, Moscow (avtoflit.com): I drove the originals for two winters, but it didn’t last longer. I heard that spare parts from Kia and Toyota are compatible. You need to get advice and install it at a service station. |
| 9. | Vladlen , 34 years old, Voronezh (drive2.ru): dissatisfied with the quality of production of the original bushings, they have already flown 45,000 km. I will buy foreign analogues, since the quality there is much better. |
| 10. | Mikhail Petrovich , 35 years old, Pskov (autotoday.com): on my first car Lada Granta, the spare parts took longer to take care of, why this is the case with the Lada Vesta, I don’t know. I think the reason is the quality of domestic components. |
Checking bushings for wear
The main cause of wear on these parts is dust and dirt getting between the bushing and the rod. The main indicator of bushing wear is a characteristic squeak that occurs when a car drives over road irregularities.
The sound can be heard well even inside the car, when driving at low speeds. Extraneous sounds that occur during such driving in the front of the car should be a reason for diagnosing the stabilizer. To do this you need to do the following:
- drive into a viewing hole or lift the car on a lift;
- remove both front wheels;
- visually check each bushing for wear, cracks and rubber squeezing out from under the mounting clamp;
- install the mounting blade and press it several times on the rod from above or below so as to simulate the operation of the stabilizer when moving.
If the bushings have wear, it will manifest itself as an unpleasant squeak when the barbell swings.
Causes of squeaking and ways to eliminate it
Drivers consider the appearance of a squeak to be a harbinger of an imminent breakdown of the noisy unit. If the vehicle's chassis is configured correctly, the moving joints should not make any sounds. However, worn friction pairs may creak when moving relative to each other. This phenomenon often occurs in cars with high mileage, but components of a new vehicle can also become noisy. The source of a squeak when the car is stationary cannot always be determined. To find it, car mechanics alternately wet the hinges with penetrating lubricant or water. The disappearance of noise indicates a faulty part.
For your information!
In wet weather, after overcoming deep puddles, the squeak may disappear and appear again after the suspension parts have dried.
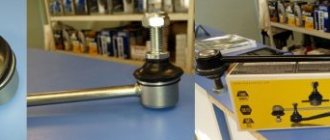
Ball joints and ends
Checking the front suspension arms, steering rods, stabilizer struts will allow you to identify a damaged joint. The design of the latter is a steel pin with a sphere at the end, which is clamped in plastic inserts. When the lubricant in the ball joint stops reducing the friction force (it has dried out or been washed out with water), a squeaking noise may appear when the parts move together. Hinge diagnostics:
- Inspect the anther. There should be no traces of grease, rust, or damage on it.
- Unscrew the hinge and remove the protective cap.
- By rotating the pin, inspect the condition of the sphere; the presence of corrosion products, chips, or scuffs on it is not allowed.
- Check the play. To do this, vigorously move the finger from side to side. Ease of movement is a sign of excessive wear and the part should be replaced.
After inspecting the hinges, the unsuitable ones are replaced with new ones, and the serviceable ones are filled with fresh lubricant before being installed in place. Assembly procedure for the old one:
- The hinge is washed in gasoline or kerosene, thoroughly wiped and dried.
- Fill the cavity with new lubricant.
- Install the boot on top. If the old one is damaged, you need to install a new one.
- Place the hinge in place.
Shock absorbers
In conditions of poor quality road surface, the racks quickly fail. Oil drips near the neck indirectly indicate damage to the shock absorber. The creaking of the latter occurs when the rod rubs against the sealing elements, or at the points of attachment to the suspension units. A little penetrating lubricant applied to the mating surfaces and subsequent movement of the vehicle will help determine the source of the noise. For accurate diagnosis, problem areas are moistened one by one.
Oil shock absorbers are subject to restoration. Other types of racks must be replaced. Repair sequence:
- Dismantle the shock absorber.
- Disassemble the sealing unit and wash all parts with gasoline.
- Inspect the rod, piston and cylinder. Dimensional deviations should not exceed acceptable standards (they are different for each model). If the difference is greater, the working surfaces are bored to the repair size, followed by honing.
- Fill the oil to the indicated mark and reassemble everything in the reverse order.
- Install a new sealing unit. The latter, if the rod and cylinder are bored, must be of repair size.
- Put the shock absorber in place.
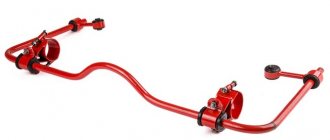
Anti-roll bars
Stabilizers are attached to the car body through rubber or polyurethane bushings. The latter allow the parts to rotate around their axis. When materials are abraded, a small gap is formed at the contact point. As a result, the stabilizer creaks and moves freely. To determine the source of the sound, you must use an inspection hole. Positioned near the stabilizer, rock the car. The amplitude of movement is enough to find a noisy place. Worn bushings definitely need to be replaced.
For your information!
If you plan to postpone the repair, you can place a piece of a car or bicycle inner tube under the rubber inserts. This will delay replacing the bushings for a short time.
Silent blocks
This design combines metal clips and rubber bushings. Most often, creaking occurs when they move mutually. The phenomenon is absolutely normal even for new cars. It is not necessary to change the silent blocks; it is enough to inject graphite lubricant into the friction zone using a medical syringe with a needle. The procedure is performed without removing the parts.
A car's suspension is directly related to the safety of the driver and other road users. If a squeak occurs in the suspension area, you should diagnose the chassis elements. Only in this case is it possible to assess the condition of all component nodes.
Let's sum it up
We made sure that replacing bushings with your own hands is not considered a complex job. If the entire list of manipulations is carried out correctly, then the products are guaranteed to withstand the declared service life or even exceed its value if driven carefully. When operating the Lada Vesta, it is important to periodically inspect the products and clean them of any dirt that has fallen on the rubber surface. Rubber and polyurethane bushings tend to be particularly sensitive to the effects of engine oil or transmission lubricant. If there is a leak factor in the units, then its elimination is guaranteed to protect the bushings from premature wear and destruction. It is also important to pay attention to the squeak.