Removal, installation and troubleshooting of the gas tank on VAZ 2108, VAZ 2109, VAZ 21099 cars
If a fuel leak is detected from the gas tank, it is recommended to replace the gas tank. If the fuel pump screen often becomes clogged, you should remove and wash the gas tank. If a leak is detected along the junction of the upper and lower parts of the gas tank, you can solder these places (it is recommended to do this in specialized workshops). To do this, pour out the remaining gasoline, thoroughly rinse and dry the gas tank. Then seal the leak with soft solder.
WARNING Only a thoroughly washed and dried gas tank that does not contain gasoline vapors can be soldered, otherwise the vapors may ignite during soldering. To flush the gas tank, use Lobomid, MS or ML detergents. Then, to remove any remaining detergent, rinse and steam the gas tank with hot water. Dry the gas tank thoroughly. Before removing the gas tank from a VAZ 2108, VAZ 2109, VAZ 21099 car, disconnect the wire from the “-” terminal of the battery.
USEFUL ADVICE It is recommended to remove the gas tank on VAZ 2108, VAZ 2109, VAZ 21099 cars with an assistant.
1. Fold back the rear seat cushion and unscrew the cut-out part of the sound insulation.
2. Unscrew the two screws securing the gas tank hatch cover.
3. Remove the gas tank hatch cover with the rubber gasket.
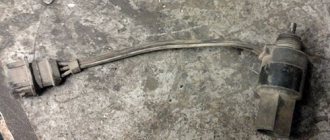
4. Disconnect the block with wires from the fuel level sensor.
5. Unscrew the nut securing the fuel level sensor, under which the ground wire is secured.
6. Remove the wire from the stud. The remaining operations are carried out under the bottom of the car VAZ 2108, VAZ 2109, VAZ 21099.
7. Loosen the clamp of the gas tank filler pipe hose.
8. Disconnect the hose from the gas tank filler pipe.
9. Loosen the clamp and disconnect the air release hose from the fitting on the gas tank.
10. Loosen the clamp and disconnect the separator hose from the fitting on the gas tank.
11. Loosen the clamps and disconnect the hoses from the fuel lines.
12. Holding the gas tank, unscrew the two bolts of the gas tank securing clamps.
13. Move the clamps down while supporting the gas tank. Bend the clamp on the left side behind the resonator pipe.
14. Lower the front end of the gas tank down and remove the gas tank from the VAZ 2108, VAZ 2109, VAZ 21099. Drain the remaining gasoline from the gas tank.
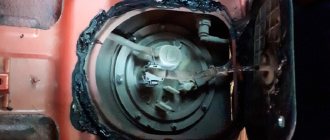
15. Unscrew the five remaining nuts securing the sensor and remove the fuel level indicator sensor from the gas tank.
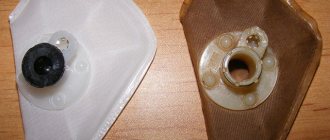
16. Remove the fuel gauge sensor gasket.
17. Inspect the gas tank along the line where the upper and lower parts meet. If you find a leak, pour out the remaining gasoline, thoroughly rinse and dry the gas tank. Then solder the leak with soft solder. If necessary, glue the torn rubber gaskets on the gas tank.
18. Connect an ohmmeter to the contacts of the fuel level indicator sensor and check the resistance of the sensor at three float positions. In the lowest position (empty gas tank) the resistance should be 315-345 Ohms, in the middle position (gas tank half full) -108-128 Ohms, in the highest position (full gas tank) - no more than 7 Ohms. If the resistance is different from the specified value, replace the fuel level sensor.
19. Wash the dirty filter. Shake the float. If there is gasoline in it, then the float is leaking. We recommend replacing the float.
20. To replace the gas tank mounting clamps, remove the clamps from the brackets on the body and install new ones.
21. Assemble and install the gas tank on a VAZ 2108, VAZ 2109, VAZ 21099 car in the reverse order. Before installing the gas tank, remove the fuel level sensor wires inside the body.
Fuel tank of VAZ 2108, VAZ 2109, VAZ 21099 (bottom front view)
1 — fuel tank; 2 — fuel drain line; 3 - fuel supply line
Fuel tank of VAZ 2108, VAZ 2109, VAZ 21099 (bottom rear view)
1 — air release hose; 2 — separator hose; 3 - filling pipe hose
Replacing the fuel line of a VAZ 2109
Perhaps the most difficult operation (if there is no pit and lift). To replace the lines, I had to remove: - the link, - the anti-roll bar, - pants, resonator, muffler, - tank (change it anyway), - steering rack, - old supply line fuel (I left the return line under the adsorber). Purchased: - highways = 400 RUR, - set of rubber pipes = 560 RUR, - fuel filter = 200 RUR, - fuel filter clamp = 80 RUR (barely found!), - fastening the lines from VAZ 2110 for 5 pipes-8 pieces = 136 RUR (went around the whole city, thank you for finally opening “Ladya”), rubber bands -10pcs=20r
The arrangement of the tubes in the VAZ 2110 mounts (for 5 tubes) and in the original eight-wheel ones (for 4 tubes) are different! Therefore, I had to swear a lot, and also re-arrange the brake lines!
Reworking the fuel lines took one day of life and a lot of nerves, a lot of nerves! But now we will have an adsorber))) Ecology comes first!
One beautiful July day, the car was making a lap of honor around its native area. Everything would have been fine if not for the pungent smell of gasoline. Considering the fact that the car had not driven normally for a long time and had recently returned from cleaning the bottom, the first thing I decided to do was look under the hood at the pipes and pipes.
My “joy” knew no bounds when I saw the fuel pipe calmly lying approximately in the middle of the left wheel drive. Having lifted the phone a little and fixed it, I went to the place of the upcoming repair, that is, to the place where the car usually spends the night.
For a long time I couldn’t get around to repairing it, and then another two-week vacation. In short, I only got to the car repair on August 16th. First of all, I decided to fill all the tube mounting studs with a well-known and much-loved compound - “WD 40” and clean the fastenings on the bottom from mastic (after welding, the bottom was completely processed).
Two studs in the engine compartment (under the steering rack and above it)
Fastening the pipes near the gas tank
Another stud on the bottom (it’s hard to see, the photo was taken on a phone and lying on the asphalt)
No matter how hard I tried to do without casualties, it didn’t work out. The result of my labors were two broken pins - one near the gas tank (pictured), the other - the second one from the engine shield. Well, actually, it’s not scary, both are located in places where, in fact, they may not exist.
Let's continue further. Having unscrewed the hoses from the gas tank and lowered the tank itself, I pulled the hoses out from under it.
To ease further hassle, I decided to remove the gear shift link and the handbrake cables (which, by the way, I will also change). There are no photos, because sometimes I just forget, and sometimes the rain pushes me on. Pulling out the tubes, I saw the same hole from the rotating wheel drive, and squeezing the tube a little, I realized that no one had touched them in 15 years. At this point the decision was ripe to change the brake pipes to the heap, so as not to have to go through them a second time.
The return hose to the tank is normal from the outside, but it has been pretty battered by life (it’s all cracked, it just broke in my hands).
A hole in the tube caused by the drive.
It was not possible to remove the tube completely.
So far, the only new spare parts are the fuel main pipe, the brake pipe to the sorcerer and the fuel hose.
Now I’m waiting for the spare parts I ordered from the store - a fuel return pipe, a brake line, brake hoses from the sorcerer to the rear brake hoses, handbrake cables, a return hose, a bunch of clamps, a handbrake lever and, well, nothing - a short-throw rocker and a Kalino-cardan with anthers.
As soon as the order is ready and I have time, I will make more, I will write about everything. Well, at the end of this story, a photo of beauty in the car.
If such malfunctions occur in the operation of the carburetor engine of VAZ 2108, 2109, 21099 cars, such as unstable idling, failure when pressing the gas pedal, drop in power and throttle response, difficulty starting the engine, etc., you should pay attention to the fuel supply system to the carburetor, namely on the cleanliness of fuel lines and the cleanliness of the vehicle’s fuel tank. The presence of blockages and contaminants in them often leads to disruption of the fuel supply to the carburetor and further to the engine, followed by the occurrence of the above-mentioned malfunctions. Let's consider cleaning fuel lines on VAZ 2108, 2109, 21099 cars.
How does a fuel pump work?
There is nothing complicated about the fuel supply system. A conventional pump, which is driven by the rotor of an electric motor. To protect the entire fuel system from small particles, a filter is used. But this is not the end of the features, because it is worth noting that it is necessary to maintain the pressure in the ramp at the same level. And the VAZ 2109 fuel pump (the injector simply cannot work without it), provided that it constantly pumps gasoline, will begin to pump up the pressure higher and higher. And this will disrupt the operation of the system.
Therefore, it is necessary to adjust the pressure. For this, a special device is used, which is called a pressure regulator. It is installed in the fuel rail and connected to a pipeline that serves to dump excess gasoline into the tank. When the ignition is turned on, the rail pressure sensor is polled, after which the fuel pump drive is turned on. After the pressure in the rail has increased to the required value, the fuel pump is turned off. Therefore, it does not work all the time.
Design features of the VAZ-2109 fuel system
The fuel supply is located in the tank located under the bottom in the area of the rear seats. The tank is made of steel and consists of two stamped halves welded together.
Through drainage tubes it is connected to a non-separable separator that traps gasoline vapors. The latter communicates with the atmosphere through a double check valve, which prevents excessive increase or decrease in pressure in the fuel tank.
The filler neck is connected to the tank with a gas-resistant rubber hose secured with clamps.
The plug is sealed. Through a fuel intake with a mesh filter, gasoline is supplied from the tank through steel fuel lines and rubber gas-resistant hoses to a fine fuel filter, a fuel pump and then to the carburetor.
Gasoline is sucked from the tank due to the vacuum created by the gasoline pump.
Fine filter – with a paper filter element in a plastic housing, non-separable design.
There is an arrow on the filter housing that must coincide with the direction of fuel movement.
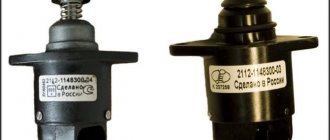
The fuel pump is a diaphragm type, mechanically driven by the camshaft eccentric, with a manual pumping lever.
It consists of a lower housing with drive levers, an upper housing with valves and pipes, a diaphragm assembly and a cover.
The diaphragm assembly is installed between the upper and lower housings.
Two diaphragms are installed on top (working ones), and one (safety) on the bottom: it prevents gasoline from entering the engine crankcase if the working diaphragms rupture.
In this case, leaked gasoline is discharged through holes in the external spacer located between the safety and working diaphragms.
The diaphragms, together with the internal gasket and plates (from the outside), are assembled on the rod and secured with a nut.
The rod is inserted into the cavity of the balancer using a T-shaped shank.
A spring is installed between the diaphragm assembly and the lower housing.
The upper housing is closed with a lid secured with a bolt. Underneath there is a mesh fuel filter.
The pump is attached to the engine on two studs through a heat-insulating spacer, sealed on both sides with cardboard gaskets.
Gaskets are available in thicknesses of 0.30, 0.75 and 1.25 mm.
A 0.30 mm gasket is installed between the heat-insulating spacer and the engine, and a 0.75 mm gasket is installed on the outer side of the spacer (facing the fuel pump) and the minimum protrusion of the pusher from the spacer is checked, which should be 0.8 - 1.3 mm.
To do this, slowly turn the engine crankshaft, pressing the pusher with your finger and periodically checking its protrusion above the plane of the gasket.
If the minimum protrusion is less than specified, the outer gasket is replaced with a thinner one, if more, with a thicker one.
Part of the gasoline supplied to the carburetor is drained back into the tank through a system of pipelines and hoses - this improves the cooling of the gasoline pump and prevents the formation of vapor locks in the power system.
A check valve is embedded in the drain line, allowing fuel to flow in only one direction - from the carburetor to the tank.
The air filter housing can receive cold air through an intake near the radiator or hot air from an intake mounted on the exhaust manifold.
The flow is switched by a damper controlled by a thermostat.
The built-in thermal power element opens the hot air damper when the incoming air temperature is below 25°C and completely closes it if the air is heated above 35°C.
Thus, the temperature of the incoming air is automatically maintained within 25-35°C.
The air filter is dry, with a replaceable paper filter element, mounted on the carburetor studs through a rubber gasket and secured with four self-locking nuts through a metal plate.
Checking the power system
Remove the air filter housing cover by unscrewing the nut with a 10 mm wrench and unfastening the spring clips. Remove the air filter.
Unscrew the four nuts with a size 8 wrench, use a screwdriver to loosen the clamp of the crankcase ventilation hose at the connection point to the valve cover and remove the air filter housing.
Look inside the carburetor.
The primary choke should be completely closed if the engine is cold, and fully open if the engine is warm or hot.
In the first case, open the air damper.
Press the carburetor throttle valve actuator with your hand.
If a stream of gasoline appears from the accelerator pump nozzle, then there is gasoline in the carburetor
In order to be completely sure that there is gasoline in the carburetor, it is necessary to unscrew the five screws securing the top cover of the carburetor, the screw securing the bracket for the choke control cable sheath and remove the wire from the idle speed solenoid valve.
Very carefully, without allowing lateral movements, lift the carburetor cover.
The gasoline level should be approximately 22–23 mm below the connector of the carburetor cover and body
Place the carburetor cover in place and tighten it with 2-3 screws diagonally.
Get behind the wheel, smoothly pressing the gas pedal, turn on the starter and start the engine.
Replace the carburetor cap without securing it. Carefully insert the screwdriver into the connector of the cover and housing.
Try manually pumping gas. If it fails, turn the crankshaft a little with the starter and try again.
If the carburetor begins to intensively fill with gasoline, put the carburetor cover in place and press it with 2-3 screws diagonally. Try starting the engine.
If the engine starts, the carburetor needle valve hangs.
If you cannot pump gasoline manually, reassemble the carburetor and use a screwdriver to loosen the clamp of the rubber hose supplying gasoline to the carburetor.
By turning the hose from side to side, pull it off the carburetor fitting.
Place the end of the hose in an empty plastic bottle to avoid flooding the engine with gasoline.
Press the manual fuel pump lever.
Turn the engine shaft a little with the starter and try again.
Replacing the fuel rail on VAZ 2108, VAZ 2109, VAZ 21099
Welcome! The fuel rail is a very important thing because there are injectors on it; if you remove the ramp, then you will remove the injectors from the car engine and thus the car will no longer start, therefore, without a ramp on injection cars in which fuel is supplied under high pressure (Approximately 284- 325 kPa) cannot be avoided and if the ramp, for example, is clogged (This happens over time and mainly depends on the quality of gasoline that was poured into the car engine before the clogging), then the car will drive worse, and all this because the fuel to the injectors will be worse therefore, you need to not only monitor the condition of the ramp, but simply make sure that it is in normal condition and the rubber cap that closes the fitting of the ramp (What kind of cap is this as you read the article) was always on it and was removed only in cases of checking the fuel pressure on the ramp.
Note! To carry out the operation of replacing the ramp with a new one, you will need to stock up on: A set of wrenches, as well as a “5” hex key, you need to stock up since the ramp is mounted on bolts with hex heads and you will also need two screwdrivers, one of which will be a flat type , and another cross-shaped but flat one may not even be needed!
Summary:
Where is the fuel rail located? It is quite long and looks like a pipe, so you won’t see it completely in the photo below, but let’s move on to only part of it closer to the explanations, it is not in a very convenient place and therefore, in order to remove this unit, the air hose will need to be removed and other parts that will interfere with removal (Basically, removing the air hose is enough to remove the ramp), and now closer to the location of this unit, first open the hood of the car and find the receiver underneath it, then the ramp is located, if you know what a receiver is and where it is located in the engine, we will explain in more detail, first find the cover that closes the timing system from dirt getting in (the cover is indicated by a red arrow), next to this cover there is a ramp (indicated by a blue arrow), it is quite long and you can’t see it completely in the photo You will also see on the fuel rail that is shown in the photo that the same plastic cover that was mentioned a little earlier has already been removed (you will also remove it, this is necessary to relieve the fuel pressure in the system) for clarity, the place where it was located is indicated by a green arrow.
When do you need to change the fuel rail? It changes if there is severe damage due to which your car will start to drive differently than before, namely it will have dips, there will be a poor response to the pedal, the speed may still float at idle and the car may not start at all (This is unlikely) , but besides this, the ramp, like the injectors, becomes clogged over time due to poor-quality fuel, which contains small particles of dirt, and all of the above symptoms will also be present in the car if the ramp or injectors are clogged, so it is not always advisable to change the ramp if it can be simply removed separately rinse from the injectors (The injectors need to be cleaned separately, and the ramp separately, if you are interested in how you can clean the injectors, then in this case, read the article entitled: “Cleaning the injectors on a VAZ”), but the ramp should be washed in any way liquid for cleaning injectors and we do not recommend using any strong substances for washing, for example, various types of solvents.
When replacement is required
There are several signs that indicate you need to at least remove and check the condition of the fuel injectors. Next, a decision is made to clean or replace the elements.
Pay attention to the behavior of your car and specifically the engine. They will tell you if there is something wrong with the injectors. This may manifest itself as follows:
Do not rush to purchase new injectors right away, since cleaning old ones often restores their functionality and returns them to their previous stable functionality.
How to replace the fuel rail on a VAZ 2108-VAZ 21099?
Removal: 1) Before starting the operation, you will need to do two things so that the ramp can be removed without unnecessary inconvenience and problems, namely, remove the minus terminal from the battery; this does not affect convenience in any way; you will simply protect the wiring from a short circuit if water suddenly gets into it (For information on how to remove the terminal, read the article: “Replacing the battery on a car”, study the first point in this article), after you have removed the terminal, proceed further, namely, for the convenience of removing the ramp, remove the air intake hose from the car engine (This hose indicated in the photo below with a red arrow), to remove it, loosen the two tightening screws with a screwdriver (indicated by blue arrows) and then remove it from the car, but the crankcase ventilation hose will not be completely removed, so also use a screwdriver to loosen the tightening screw of the crankcase ventilation hose ( Indicated by a green arrow) and then disconnect the hose from the air pipe and completely remove the pipe itself.
2) Now disconnect by hand the vacuum hose (Indicated by a red arrow) from the fuel pressure regulator (see photo below, this regulator is located on the ramp itself) and after disconnecting, release the pressure in the fuel system, for more details on how to do this, read the article called which: “Bleeding the fuel pressure on the VAZ.”
3) Then disconnect the fuel pipes from each other (There are only two pairs of them, see photo 1 in which only one pair of pipes is shown), to do this, use a wrench to unscrew them by the nuts and disconnect them from each other and do the same with the other pair of pipes, from the pipes Most likely, a little gasoline will spill out so that it does not get on the engine (You never know, if gasoline gets on something very hot, the car may even catch fire, so follow the fire safety rules) put a thick cloth under the place where the gasoline will flow, and then disconnect the block wires with a connector (see photo 2), and unscrew the screw that secures the pressure plate and then remove the plate (see photos 3 and 4).
4) Let's go further, now unscrew the two bolts that have hex heads and which secure the ramp itself to the car engine, one of the ramp mounting bolts is indicated by an arrow just below for clarity (This is the right bolt if you look in the direction of the car).
5) When all the tubes are disconnected and the ramp mounting bolts are unscrewed, proceed to removing it from the car, first grab it with your hand and pull it back and along until all the injectors come out of the holes (For clarity, one of the holes is marked with a red arrow in photo 1 shown) in which they are located (Remove the ramp carefully and precisely lengthwise; you don’t need to pull it to the top with all your might right away, since you will simply break off the injectors and go to the auto store for new ones), as soon as you see that all the injectors have come out of the hole then just carefully pull the ramp out onto the street and thereby remove it as shown in photo 2 (Pull it out to the left side of the car if you look at it as you drive, you just can’t pull it to the right, there’s not enough space).
Installation: The new ramp is installed in its place in the reverse order of removal, but before installation, be sure to, regardless of the condition of the o-rings, replace them with new ones and before installation, lubricate them with engine oil, there are not very many of these o-rings, namely, one at a time each injector and one more is located on both fuel pipes (For clarity, see how these rings look in the photo below; on the injectors and on the fuel pipes they are located absolutely identically and you will immediately find them).
Removal and replacement
Now we’ll talk specifically about how to properly remove and replace old injectors that have lost their usefulness with new units.
The process of dismantling each of the 4 injectors is identical, so there will be no difference in the process.
Perhaps the most problematic step in replacing or cleaning injectors is dismantling the fuel rail. Therefore, we will separately tell you how this knot is removed.
The fuel rail is the bar on which the injectors are mounted. It is secured with a pair of bolts on the intake pipe. To the left of the ramp there is a fuel pressure control fitting. To remove it you need:
Please note that under the fuel rail mounting bolts there are washers that must be returned to their place during reassembly or replaced with similar new ones.