Armrests are the interior of the car and the comfort of the driver. The product is individual and unique. It all depends on how developed the master’s imagination is. Often this production is standard - factory-made, which is not very original. The gazelle armrest is made by the drivers themselves from various materials. Since this interior detail is small in size, you can put all your ideas into it.
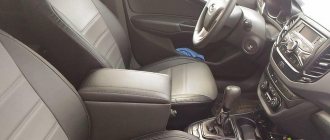
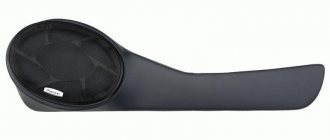
This is what the armrest looks like in the Gazelle's cabin
This can be a very convenient niche for small but necessary things, such as a mobile phone, cigarettes, lighter, recharger, checks and plastic cards. This part of the Gazelle Next design may have cup holders, as well as some built-in keys for the car system (window lifters, switching music tracks).
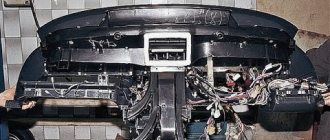
In many imported cars, armrests with niches are installed not only in front between the seats, but also in the back for the convenience of passengers. In Soviet cars of early production, modifications of cars with armrests were practiced. But they were a little uncomfortable, so they were often removed. Let's say GAZ-24. The first cars produced had this thing in the car, but there were no seat belts. It is very inconvenient to fix the belt with it.
This is what the armrest looks like in a Gas 24 car
What is the right armrest?
The idea of creating your own element for the location of one of the driver’s hands is not without meaning. Buying such a factory-produced design is not the easiest undertaking. It is expensive, it is difficult to find a structure with suitable dimensions, appropriate design and the internal functionality that you require. There is only one way out - to delve into the manufacture of armrests for cars and try your hand at this exciting business.
We need the “correct” armrest, the design of which will take into account all the nuances, its ergonomics will be brought to the maximum, and the appearance will fully correspond to the interior of the car. To do this, you will need to pay attention to the following points:
- the presence of a separate compartment for storing important little things that can be easily and quickly found;
- the ability to put a bottle of water or a glass of tea/coffee;
- the presence of a sliding and tilting mechanism to give the structure mobility and provide access to the hand brake and seat belt latch;
- the use of soft but durable materials that will ensure a comfortable and comfortable hand position.
This is exactly the kind of armrest for the car that we will make.
DIY bar armrest for Gazelle dimensions
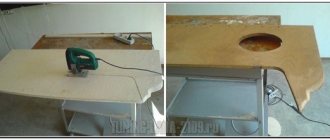
What you will need for work: a jigsaw, self-tapping screws, a screwdriver and saw blades for it, a thick sheet of plywood (with a reserve). Printer or pattern, ruler, pencil, PVA glue, furniture stapler.
- Beginning of work.
- Take a sheet of paper and make a pattern.
- Apply it to a sheet of plywood and transfer it to the plywood, assemble the structure, cut out Alcantara or fur with a margin to bend along the edges.
- Apply glue, let dry, apply a stapler,
- Reassemble. Before screwing in the screws, use a thin drill to mark holes so that the plywood does not burst.
- Assemble the structure in the cabin.
Tuning a Gazelle involves not only changing the driving performance, but also transforming (tuning) the appearance of the Gazelle. Tuning can turn a Gazelle into an Audi or Mercedes, or at least add recognizable features to these cars. To do this, replace body kit spare parts (grilles, hoods, bumpers, lights) with tuning ones. Even Gazelle next tuning can decorate and add some convenience inside the cabin. Below you can find tuning parts for the Gazelle: covers, armrests, steering wheels, upper shelves, consoles, floor mats, including for the Gazelle NEXT. Often the driver spends most of his life in the car. While waiting for loading or unloading or in traffic jams, the Gazelle driver may get tired. Rugs, armrests, decorative panels, interior curtains, and lambrequins will help create comfort in the car interior. In addition to beauty, decorative details will provide convenience, for example, lambrequins will protect you from the sun, armrests and consoles will conveniently place small items in your pockets and make the journey less tiring.
Taking measurements
Here you need to show maximum care and concentration. The accuracy of measuring the distances and dimensions of the space for the future armrest will affect the parameters of the finished structure and its location in the cabin. It is necessary to carry out these actions only in your car, because in two cars of the same brand there may be discrepancies in the interiors.
All the data that you obtain must be written down, preferably immediately on a sketch of the future product. Thus, the measurements will not be confused and will be recorded clearly, accurately and without errors. You will need to measure the following parameters:
- at what distance from each other are the front seats;
- find out the distance at which the position of the driver’s hand is most comfortable (sit in the car, grab the steering wheel with one hand, and bring the other to a relaxed state and place it in its usual position);
- turn on the handbrake and measure the distance from it to the back surface of the backrest on the seat (the comfort of rear seat passengers cannot be ignored);
- Take into account the distance between the seat belt latch mechanism.
Make a visual comparison of the location of the future structure and its dimensions, stopping at the handbrake. I'm interested in the relative position of the handbrake and armrest. If the last element extends into the territory of the handbrake, then at the stage of taking dimensions it will be necessary to measure the lifting height of the brake lever.
Do it yourself
Interestingly, an armrest can also be made for the back seat, although it is less useful than in the front. This is true, for your information.
The work begins with preparatory activities. To begin with, I advise you to re-read the materials about armrests for Renault Logan. We also discussed the issue of choosing and assembling armrests for the Lada Largus.
Based on these examples, we can conclude that the first step is to take measurements for the future design. Everything here is individual, depending on whether the armrest fits a Grant, Renault Sandero, Hyundai Solaris or any other car. The sizes and distances are different everywhere.
You need to know the following:
- distance from driver to passenger seat;
- driver's elbow height;
- distance from the raised handbrake to the back of the chair;
- maximum height of raised handbrake;
- distance between belt buckles.
This will allow the structure to be made at the optimal height, but so that the armrest does not interfere with the rear passengers, does not interfere with the latching of the seat belts, and allows the handbrake to be pulled out normally.
Headrest pillows are a logical addition to the armrest. From 600 rubles. High-quality and durable materials. Carabiner strap. Discount for a set of 2 pieces! Go to the pillows page
Stainless steel license plate frames. Rectangular and oval. 3 colors available. From 450 rubles. Go to the frames page
Creating a Project
So, the measurements have been recorded and checked, it’s time to create a paper prototype of the future design. Don’t be lazy and make several options that will reflect the car armrest from different angles. Transfer all dimensions to each drawing and make sure they are completely consistent.
Now you can start marking the parts and finely drawing each element that will make up the future structure. We pay special attention to the following points:
- we indicate the dimensions on each element, if it is figured, then we determine the radius;
- we mark the attachment points, choose the method of connecting one element to another and indicate the length of the screws, if any;
- calculate the distance that remains to the edge;
- for the top part, which will serve as a support and a cover at the same time, you will need to mark the location of the mount with tilt-and-turn functionality (you can make a sliding top, but it will be a little more complicated).
Deciding on the mounting method
Think about the mounting method. Car armrests can be placed tightly between the seats or fixed using special fasteners.
If you decide to stick with tight fixation, you will need to prepare grooves in the lower part of the structure that correspond to the parts in the area of the intended installation location. You immediately need to decide on the upholstery material and take its thickness into account when marking the project.
Making your own fasteners is not an easy task, but the result is worth your effort and time spent on this process. The elements of the armrest in its lower part must be tied to the structural elements of the interior of the car or to pre-created fasteners.
Each of your decisions must first be transferred to a drawing, and only then brought to life. This way you can avoid errors and inaccuracies.
Select materials and complete the work
To create the body and supporting parts, you can choose any wood-based material. Its thickness should be 8 mm. If there are no curves, you don’t have to limit yourself in the choice of material; otherwise, it’s better to go with plywood, which can bend under the influence of water vapor. To cut out the structural elements of the required shape, you need to have a hacksaw on hand, or even better, a jigsaw. Any material that you like is suitable for cladding. But remember that it must be resistant to wear, have a durable color and match the design of the car.
So, the parts are cut out and prepared for assembly. Make patterns in advance on paper for upholstery material. Using glue or fixing elements, we assemble our homemade armrest into the car. If no mistakes were made previously, then problems will not arise.
Using the previously made patterns, we cut out the elements for the upholstery and attach them using a furniture stapler or glue. We are working on the lid, which should be soft and slightly rounded. You will need foam rubber or regular dishwashing sponges. We place the selected material, glue and cut off unnecessary elements. Cover with felt, which we carefully glue along the edges. All that remains is to cover the finished armrest and admire your work.
How to Make an Armrest for a Gazelle
Elbows. This is the car interior and driver comfort. The item is personal and original. It all depends on how well the master’s imagination is developed. This is often standard production. not very original. The Gazelle armrest is made by the drivers themselves from different materials. Since this little interior is small, you can put all your ideas into it.
It's like a locker in a Gazelle
It's like a locker in a gas 24 car
Make your own armrest
Every car owner, even a Russian manufacturer, wants to emphasize its “beauty.” Some people make a car a super car based on its appearance, while others focus on interior design. I want to drive simply and comfortably. Car owners who have a car that is not only a luxury vehicle but also a workhorse spend most of their time behind the wheel of a car.
Armrest design option in Gazelle
Elbow sized figure
What you need
To start creating this masterpiece, you need:
- Measuring the position of the armrest. Height, width, depth, etc.
Drawings with dimensions of the armrest for a gazelle
The process of cutting out a pattern from paper
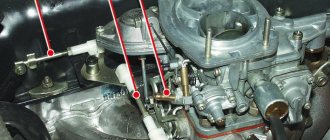
An example of the location of the parking brake in the cabin
Required materials and installation process
The work requires a saw or jigsaw, as well as wood of small thickness. It could even be chipboard or a varnished piece with old furniture. You have to draw a design on this wooden sheet and cut it out carefully.
Cut plywood from plywood
Plywood armrest design
Plywood elbow design option
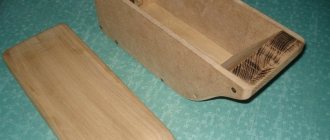
Example of a finished elbow frame
casing
The material should be chosen according to the tone of the car. Sliding wardrobes for gazelles can be made of leatherette. This will be vital.
The color of the fabric will look rich and beautiful when combined with gray and black. Placing is a very common thing that takes up to 40 minutes.
An example of a gazelle armrest design
Installing the cover
Special time is needed for this part. To prevent elbow bending, foam should be placed on top of the lid. If there is no hard foam, you can apply it with a sponge. To prevent the foam from shrinking and crumbling under the skin, glue is applied to the base of the lid. Then the lips or foam are applied to the glue. Let the glue dry. Then you need to sew the individual lips together or rub them with foam rubber. Excess is removed with scissors. The felt material is then applied on top and split on all sides.
Example of a finished cover
Loops and magnet
The magnet is needed to prevent the cover from moving back and forth when the driver places his hand and to prevent it from opening. After installing the magnet, the hinges should be screwed on. When you select the location of the cover, it is completely screwed to the elbow.
Gazelle elbow hinges mounted
Do-it-yourself armrest assembly
Every owner of a car, even a Soviet-made one, wants to highlight his “beauty”. Some people make a car into a supercar based on its external appearance, while others focus on its internal design. Wanting to ride easily and comfortably. Car enthusiasts, whose car is not only a luxury item, but also a workhorse, spend most of their time behind the wheel of a car.
Armrest design option in the Gazelle cabin
Sketch with armrest dimensions
What do you need
In order to start producing this masterpiece, you need:
- Measurement data for the location where the armrest will be located. Height, width, depth and so on.
Drawing with dimensions of the armrest for a gazelle
The process of cutting a template from paper
An example of the location of the handbrake in the cabin
Required materials and installation process
To work, you need a saw or jigsaw, as well as wood of small thickness. It could even be chipboard or a varnished piece from old furniture. On this wooden sheet you need to draw a drawing and carefully cut it out.
Armrest parts cut from plywood
Assembled plywood armrest structure
Plywood armrest design option
Example of a finished armrest frame
Sheathing
The material must be chosen to match the tone of the car interior. You can cover the gazelle armrests with your own hands with leatherette. This will be relevant.
The color of the fabric will look rich and beautiful if you combine gray and black tones. Sheathing is a very simple task that takes up to 40 minutes.
Example of armrest trim for Gazelle
Installing the cover
This detail requires special time. In order for the armrest not to be rigid, foam rubber must be placed on top of the lid. If you don't have solid foam, you can use a sponge.
To prevent the foam rubber from shrinking and crumpling under the casing, glue is applied to the base of the cover. Then sponges or foam rubber are placed on the glue. Let the glue dry. After this, you need to sew individual sponges or stitch foam. Excess is removed with scissors. Afterwards, felt material is placed on top and padded on all sides.
Example of a finished armrest cover
Hinges and magnet
To prevent the lid from “moving” back and forth when the driver places his hand, and to prevent it from opening, a magnet is required. After installing the magnet, you need to install the hinges with self-tapping screws. Having chosen the location for installing the cover, it is finally screwed to the armrest itself.
Upholstery with leatherette
For a novice car enthusiast, the process of reupholstering a finished armrest can cause difficulties, so let's talk about it separately. But first, let's define the tools.
Consumables and tools
To make an armrest with your own hands you will need the following materials and tools:
Sequence of operations
So, making an armrest for a car is not as difficult as it might seem at first glance. Only working with a sewing machine while reupholstering can cause certain difficulties, especially if the car owner is a man who has a vague idea of what cutting and sewing is. But with due patience, you can deal with this problem.
The interior of any car should be as comfortable as possible for the driver, because some users spend several hours without rest. Therefore, every little thing becomes important and significant, for example, an armrest, which can reduce tension in the arm, remove the load from the shoulder and relax the elbow. But not all cars come with this element in the interior. Many car owners try to create armrests for their cars with their own hands, and are even quite successful.
Installation
Installing your own armrest in the Gazelle is not difficult. You can simply install an armrest between the seats, but while driving it can move out of its place and cause considerable discomfort while driving. Therefore, it needs to be installed stably.
Mounted armrest for Gazelle
- A polypropylene tube in which the inner side will be steel;
- Hairpin M 8 100-110 cm;
- Drill.
Drill three holes. Insert slightly trimmed pins into them. A metal plate is placed and everything is secured. Cut a rectangle from plywood that will form the basis of the armrest. Tubes are installed into this plywood, and holes are made in the armrest itself at these places so that the pipes can go there. At this point, the process of assembling and installing the armrest can be considered complete.
What is the first thing you pay attention to when purchasing a new car? Technical characteristics, engine power, gas tank volume and fuel consumption? Or maybe the appearance of bumpers, spoilers, headlight shape or body color? No matter how beautiful your car looks from the outside, you will spend most of your time in its interior. So taking care of the car’s interior is not a whim, but a completely necessary condition when buying a new iron horse. And if everything is more or less clear with the seat upholstery and the thickness of the steering wheel, then what about such a mysterious element as the armrest? Is he needed or not? And if you still need it, then how to make it and install it in a car that initially does not have an armrest in the basic configuration? Is it possible to create everything with your own hands or is it better not to suffer and order the work from a master?
Assembly and installation of the armrest in the Gazelle
Armrests are the interior of the car and the comfort of the driver. The product is individual and unique. It all depends on how developed the master’s imagination is. Often this production is standard - factory-made, which is not very original. The gazelle armrest is made by the drivers themselves from various materials. Since this interior detail is small in size, you can put all your ideas into it.
This is what the armrest looks like in the Gazelle's cabin
This is what the armrest looks like in a Gas 24 car
Do you need an armrest in a car?
Some models of cars in the budget segment are sold without a special elbow rest. Drivers quickly get used to it and don’t even notice that their car is missing something. Therefore, a logical question arises: is there any benefit at all from the armrest?
In fact, there is, and it is quite noticeable. The armrest significantly reduces the strain on the arm and back muscles during frequent use of the gear lever. This is especially true in cars with a manual gearbox. When traveling long distances and even in regular traffic jams, the hand becomes tense and tired, in some cases the muscles begin to cramp, which can lead to an accident.
the armrest in the car significantly reduces the load on the muscles of the arm and back
Another nice feature is the ability to use the armrest as a place to store useful little things. A water bottle, wallet, car documents, sunglasses case and more can be placed inside and will always be at your fingertips (literally and figuratively). Expensive models often have armrests equipped with control buttons for some vehicle devices.
In addition, an ordinary armrest can create an atmosphere of home comfort in a car and make your stay in it more comfortable.
And I can’t imagine taxiing without an armrest, I’m so used to it. My right hand on the steering wheel didn’t work out for me - it’s uncomfortable and that’s it, it even seems to interfere, some kind of mismatch appears from both hands. In my case, the armrest is moved back and does not interfere with the use of the handbrake. Personally, I really need an armrest, and even when I sit in any other car and compare them, I pay attention not least to the convenience of the latter’s location.
AndRCZ
How to make this part for your car with your own hands
First of all, select the material from which the body will be made, as well as the fabric for subsequent upholstery. Their thickness affects the dimensions of the future product. Next, you need to make all the necessary measurements, and only after that start constructing the drawing.
We will talk about the choice of fabric for covering a little later, but we will dwell on the material for the armrest itself in more detail.
Material selection
Wood-based material is best suited for the armrest body. It can be a chipboard, fiberboard or ordinary plywood. If the proposed design does not have curves, then your choice is unlimited. Otherwise, the only material that will suit you is plywood, since only it can be bent by holding it over steam for some time or soaking it in hot water.
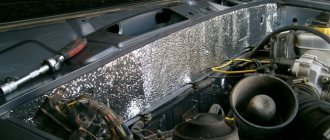
To bend the plywood, soak it in a bath of hot water
Consider the thickness of the board: it should not be less than 0.8 cm or thicker than 1.5 cm. The ideal option, which will be strong enough but not particularly bulky, is plywood 1 cm thick. To cover the lid you will need ordinary foam rubber.
Don't forget to prepare the accompanying tools: meter tape, graph paper, and an electric jigsaw for cutting the board into parts.
Measurements for the future drawing
The manufacture of an armrest must begin by measuring the necessary parameters. To do this, arm yourself with a meter tape, a pen and a sheet of paper where you will write down all the data received.
- Measure the distance between the front seats.
- Holding the gear shift lever with your right (or left, depending on the location of the steering wheel) hand, determine the most comfortable height for the future armrest.
- Measure the distance from the handbrake to the back of the seats.
- To prevent the window sill from interfering with fastening your seat belts, measure the distance between their buckles.
- If you plan to install the armrest in such a way that it will be partially located above the handbrake handle, then move it to the on position, and then measure the dimensions and height of the rise.
- Measure the area where your product will be attached.
measure the distance between the seats to find out the size of the future armrest
It is very important to choose the material for the armrest upholstery before starting the actual manufacturing of the part. It may be necessary to adjust the parameters taking into account the thickness of the material.
Element design
Having made all the necessary measurements, begin drawing up a drawing of the future armrest. Be careful: even small errors can lead to your product not being installed in its place or interfering with the operation of other elements of the car.
- When creating a project, draw a diagram of the armrest taking into account all sizes and proportions. For more accuracy, draw the part from both the side, front and back. Don't forget to label the lengths of the sides: it will be easier for you to transfer the markings to the material.
- Make a drawing for the upper part of the armrest - the future cover.
- Consider how to attach the lid: will it tilt or bend. Depending on this, determine the location of the grooves or other fasteners.
- If the part is not strictly rectangular in shape, carefully work out the bends.
- Determine in advance the lengths of the screws that will be used in the work. If their sizes differ in different parts of the product, indicate this on the diagram.
- Decide how the armrest itself will be installed: using special fasteners or tightly fixed between the seats. If necessary, add grooves to the diagram at the bottom of the structure.
using the data obtained from measurements, build a diagram of the future armrest
After the drawing is ready, it needs to be transferred to graph paper (it can be purchased at any store selling sewing supplies) with strict adherence to all parameters. Be extremely careful: this pattern will serve as a model for making an armrest in the future.
Please note that there are standards that must be followed when making an armrest. According to the requirements of the United Nations Economic Commission for Europe, it must withstand a load of at least 110 kg and not interfere with the operation of the handbrake and seat belts.
Price: 1480 rubles
Front Armrest Features:
1. Driver's armrests are made individually for the Gazelle car, to fit the dimensions of the space between the seats of this particular car. Suitable for any modification of the Gazelle, including the latest models. Adjusted to the millimeter!
2. Installation takes no more than 1-2 minutes: you just need to insert the armrest between the seats. It may be necessary to remove the plastic protective cover from the driver and/or passenger seat. No need to drill or use self-tapping screws!
3. Installs very firmly. Doesn't stagger or wander!
4. Externally it looks stylish and modern. You can evaluate how it looks inside the car from the side photographs or from the video below this text.
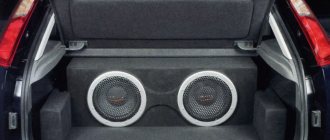
5. The voluminous inner box (bar) allows you to put a phone, wallet and even a small notebook inside.
6. The armrest does not interfere with using the handbrake, control buttons on the console, or fastening the seat belt.
Dimensions: Height - 520 mm, length 320 mm, width - 130 mm, box depth - 200 mm.
Suitable for modifications: Farmer, Business, Sable, Gazelle 3302, Gazelle 2705
Manufacturing process
Making an armrest with your own hands is quite simple if you have at least some experience with a jigsaw. If you have correctly measured all the distances and made the correct drawing, then all you need to do is follow the diagram and our instructions exactly.
- Cut out the pieces from graph paper. After use, do not put them away far, because they will still be useful when covering the body with material.
- Attach them to the plywood and transfer the contours.
- Using an electric jigsaw, cut out the necessary parts.
- To create curves, for example on an armrest cover, soften the plywood over steam or hot water.
- Fasten all the parts using self-tapping screws, according to the project. If necessary, you can use glue, but it alone will not be able to firmly hold the structural elements.
- If desired, you can install partitions inside the armrest: you will have compartments of different sizes for storing useful little things.
- Glue foam rubber onto the armrest cover, otherwise your hand will feel the hardness of the wood even through the upholstery material.
Making an armrest
Your armrest is almost ready: now its body needs to be sheathed with material, and then installed between the seats in your preferred way.
Video: making an armrest with your own hands
Manufacturing
This work is quite simple for those who have held a jigsaw at least once in their life. If all the measurements were made correctly and you have made a good drawing of the future product, then all you have to do is follow these steps:
- Cut out all the details on graph paper, thereby creating patterns.
- Attach the patterns to the plywood and use a pencil to draw the outlines of the future parts on it.
- Using a jigsaw, cut out the parts from plywood.
- To make it easier to make curves, use hot water or steam to soften the plywood.
- Now it's time to fasten the individual parts with self-tapping screws. It is better not to use glue - the connection is unlikely to be of high quality.
- If you wish, divide the internal space of the product with partitions, thereby creating several compartments.
- Glue a piece of foam rubber onto the top of the lid, which will create a soft and comfortable feeling for your elbow.
The product can be considered almost finished. All that's left is to tighten it up and put it in place.
Covering the armrest with material
To cover the new armrest, you will need a pattern on graph paper, which you made at the stage of manufacturing the parts. And also take care of the following set of materials and tools:
- material for covering the armrest from the outside and inside (one linear meter will probably be enough for you, but you can take extra material);
- high-quality glue;
- nylon threads (if desired);
- powerful hair dryer.
We will analyze the types of materials, their advantages and disadvantages further.
Selection of materials and tools
Leather is best suited for covering the armrest. You can choose either natural or artificial leather, which is also called eco-leather. This material is quite durable and wear-resistant. By buying high-quality material, you can be sure that it will not crack in the cold and will not fade in the bright sun. High humidity is also not scary for him. In addition, leather always looks very stylish in the interior of a car.
Of course, to save money, you can rip open an old leather jacket or skirt to make a cover. But such material will be much worse in quality than specialized automotive leather in the middle price segment. Materials intended for reupholstering furniture are also not suitable, since they are designed for use in a room with a constant room temperature. An armrest covered with unsuitable material will very quickly become unusable.
To save on the purchase of materials, you can use artificial leather to upholster the part of the body that is located between the seats and is not exposed to constant external influence. But it is better to cover the armrest cover with high-quality genuine leather, which is more scratch-resistant and softer to the touch.