In this article we would like to tell you what and how you can assemble anti-slip bracelets with your own hands. Let's look at the components that are sold in our store and that we use in production.
CascadeCenter has been manufacturing anti-skid bracelets for wheels since 2015. During this time, thousands of products were collected and sold, dozens of reviews were received from our customers, for which we are grateful to them.
If you have any questions, write or call, we are in touch! +79127080010 phone, WhatsApp, Viber [email protected]
Purpose of bracelets
The design of anti-skid bracelets is a combination of several parts: a chain, a strap and a self-tightening lock. Unlike chains, bracelets do not need to be installed in advance; they can be attached immediately before icy conditions or before driving on a slippery road.
Such devices allow you to safely drive on snowy roads, avoid slipping, and also provide additional safety due to tighter adhesion to the road surface. Car owners often purchase bracelets before traveling to mountainous areas, before heavy snowfalls or frosts. A huge advantage is that anyone can install a bracelet on a tire: this does not require any special skills or knowledge.
Characteristics of anti-skid bracelets
Despite the general scheme of how snow bracelets work, there are several different options. Basically, all models differ in size and number of chains.
The size directly depends on the type of car:
- for passenger cars, bracelets with one row of chains are suitable;
- for medium-sized minibuses and SUVs, thicker options with two rows of chains will be needed;
- for trucks and buses - professional large bracelets with thick chains in two or three rows.
In their action, bracelets are almost similar to standard chains. In this case, how do you understand when chains are needed and when you can get by with a lighter option?
If you are planning a long trip, during which you will be driving on dangerous snowy roads all the time, then it is better to immediately install special chains. If along the route it is expected that only a small part of it will be snow-covered, then bracelets are a better option.
Advantages of bracelets
If we consider the advantages of bracelets, then first of all it should be noted that it is very difficult to make chains for wheels with your own hands, in contrast to the simpler option.
Anti-slip bracelets are much cheaper due to the small number of parts and ease of manufacture. In addition, for many drivers, a big advantage is that such bracelets are much less harmful to tires, unlike chains.
Homemade anti-slip bracelets are easy to attach on the go; it only takes a few spare minutes. It's also easy to remove them later.
Disadvantages of bracelets
Despite the large number of advantages, there are also several disadvantages:
- if the bracelet is not fastened correctly, it may come unfastened while traveling;
- not always suitable for mountain roads.
Obviously, the advantages of anti-slip bracelets are much greater than the disadvantages. However, much also depends on the quality of the product and how correctly it was attached to the wheels.
Anti-skid bracelet and its types
Simply, a bracelet or chain is just an additional protector that can be removed at any time, just as it was installed. As quickly and simply as possible. Despite the simplicity of the device, there are quite a few design solutions for these bracelets and chains. You can choose it for both light snowy conditions and deadly mud and deep snow. Considering, of course, the capabilities of the machine. Due to the large lug, the bracelet helps to overcome even rocky, icy slopes or bare ice and increases the vehicle's maneuverability many times over.
Anti-slip devices are divided into two types:
- chains;
- bracelets.
There can be one chain that wraps around the entire wheel, and the bracelet can consist of separate plastic or reinforced strips. There can be from one to five or six such stripes on each wheel.
Ready-made anti-slip bracelets
If you don’t want to make your own anti-slip bracelets, you can always purchase a ready-made version. The stores offer a huge assortment of a wide variety of options, differing in both quality and price. You should definitely choose, taking into account the characteristics of your car, as well as the factors of the area where you are going. Having visited the store, you can immediately understand that the finished products are divided into “soft” and “hard” options. Let's look at what their differences are.
Hard chains
Rigid chains are made from a special weave of metal and reinforced chains. This method allows you to safely drive through deep snowdrifts, icy roads, ascents and descents. Please note that after you have attached the hard bracelets to the wheels, it is recommended to drive at a speed of no more than 40 km per hour. This is precisely the biggest disadvantage of this option. However, if you have to travel off-road or along mountain serpentine roads, then this is the best way to protect yourself and your car.
It is highly not recommended to use rigid chains all the time: the rubber will begin to wear out much faster.
Types of wheel chains
Different types of protective circuits
There are two main types of snow chains: soft and hard. In soft chains, rubber “lugs” act as cross members, while hard chains are connected using link elements. In addition, there are two types of chain patterns: “ladder” and “diamond” (another name is “honeycomb”). In the case of a “ladder” pattern, the connections between the longitudinal cables are made in the form of straight lines located transversely, similar to a rope ladder. The connections in diamond or honeycomb patterned chains are made diagonally, resulting in an interlocking structure.
Snow chains are also classified according to the following criteria:
- size;
- the shape of the links or “lugs”;
- material of manufacture: steel, aluminum, titanium, fiberglass with reinforcement and so on.
In some cases, additional reinforcement of wheel chain structures is performed using metal spikes. It is quite difficult to unequivocally answer the question of which type of chains should be preferred, since individual characteristics largely depend on the planned operating conditions. In particular, hard chains are better suited than soft chains for heavy off-road conditions such as loose snow or mud.
At the same time, certain limitations are associated with rigid structures, since at speeds exceeding 40 km/h there is a risk of damage to the transmission. In the case of soft snow chains, which are optimally suited for icy or slightly muddy road sections, you can accelerate to 80 km/h. At the same time, rubber wear is significantly reduced compared to rigid chains.
The situation is similar with the size of chains: increasing the links increases cross-country ability, but at the same time the weight of the structure also increases, and vehicle movement on flat sections of the road becomes more difficult and unpleasant. In addition, the transmission is more heavily loaded and tire wear accelerates.
Making your own anti-slip bracelets
A distinctive feature of anti-slip bracelets is that, with a little experience, you can not only secure them yourself, but also make them yourself. Let's consider what materials are needed for this, as well as detailed instructions.
Materials for bracelets
Making snow chains with your own hands is not that difficult. To do this you need to purchase:
- rubber chain - one or two strips of 15 links (the number of strips depends on the chosen bracelet option);
- M5 bolts - 2 pieces;
- M5 nuts - 16 pcs;
- self-locking nuts M5 - 2 pcs;
- body washers - 8 pcs;
- self-tightening lock - 1 piece.
All these materials are designed to make one bracelet. For a light car, on average, you will need 12 finished products (3 bracelets per wheel). Please also note that depending on your vehicle, the number and size of components may vary.
You can find and buy the above parts both in a store for car enthusiasts and in construction departments.
Step-by-step instruction
You can make anti-slip bracelets with your own hands as follows:
- take the chain and secure the bolt to one end with a washer;
- screw 8 nuts onto the bolt;
- connect the second piece of chain using a self-locking nut;
- repeat the steps with opposite ends of the two pieces of chain;
- measure the required bracelet size;
- We insert a belt with a self-tightening lock onto either side of the bracelet;
- testing the resulting bracelet on wheels;
- If necessary, you can cut off the excess part of the belt.
After completing these steps several times, you will receive a complete set of ready-made anti-skid bracelets for affordable money. Depending on your own wishes, you can change the size of the bolts, the number of chains, the length of the belts, and so on.
How to make bracelets for wheels?
To make wheel bracelets with your own hands, you will need the following materials to assemble one such device:
- Measure the width of the tire and buy two pieces of length the width of the tire is “plus” 7 centimeters. The chain should be chosen so that you can insert an M8 bolt (metric bolt with a diameter of 8 mm) into the chain link. The joints of the links must be welded. Large chain links will provide better traction than smaller ones. You should also consider the minimum distance from the tire pattern to the fender arch. It is necessary to install such a chain so that there is a normal distance to the wing arch, otherwise, if dirt gets under the chain, it can touch the wing.
- You will need 2 M8 bolts.
- Two steel tubes, approximately 4 cm long and 8.5 mm in diameter, so that the bolts can pass through them freely. If there are no tubes, then you can use nuts with a larger diameter than M8; you need 8 of them.
- You will need two self-locking nuts for the M8 bolts.
- The washers have an internal diameter of 8 mm, and an external diameter so that they do not fit into the chain link.
- A belt with a metal buckle or one sling called a traksa.
- Belt without buckle or one sling.
- Thick nylon threads.
Tools for creating and installing snow bracelets:
- Open-end wrenches for M8 nuts and bolts.
- Awl.
To determine the tire width, you can look at the markings on the side of the tire, .. .. .. / 70 R 14 (instead of dots, the tread width in mm is indicated).
Slings can be purchased at a climbing supply store.
After purchasing the above items, we begin assembly. Assembly is simple:
- Place the washer on the bolt.
- Place the last link of the chain onto this bolt.
- Put on the second washer.
- Put on the tube or 4 nuts and tighten with a wrench.
- After broaching, put on the third washer.
- Place the last link of the second section of chain.
- Put on the 4th washer.
- Tighten the self-locking nut.
In the same order, assemble the second half of the bracelet.
After the two halves of the snow chain bracelet are assembled, do the following:
- We insert the end of the belt for tying the loads through the bolt and stitch it with a thick nylon thread, using an awl and a needle for this. After bending around the bolt, leave the belt length at 10 centimeters.
- In the same way we sew the second belt or strobe without a buckle. We leave the length of the end of this belt longer to make it easier to fasten. You can reduce it at any time if necessary.
For those who prefer the video format, here is a video on the topic:
Recommendations:
- Chains and bracelets should only be worn on drive wheels. On driven wheels they are of no use; they will even worsen the cross-country ability and increase rolling resistance.
- The number of bracelets is worn as much as is optimal for a specific wheel radius. The optimal number for passenger car rims is from 3 to 5.
- If you haven’t yet had time to buy or make a snow chain bracelet with your own hands, and are stuck in mud or snow, then try placing something under the wheels that will catch on the tire tread and push the car. For trucks (Zil, Gazik, etc.), as well as Niva, UAZ, it is optimal to use a notch. Some drivers carry half-meter-long cuts.
- If a chain or bracelet was used to travel through a difficult section of the road, then after passing it, these accessories must be removed, because they are not intended for long-term use.
Installation of bracelets on wheels, mounting options
Installing bracelets on wheels is not a particular problem. There are several mounting options you need to be aware of. The difference between them is quite significant:
- The first option is to install bracelets only on the rear wheels. This method is especially relevant for cars with front-wheel drive.
- The second option is to install only on the front wheels. Accordingly, it is most effective for cars with rear-wheel drive.
- The third method is to install on all 4 wheels. The most reliable and safe option, guaranteeing maximum grip on the road.
The main rule, regardless of the fastening method, is an even distribution of bracelets. That is, if you attach a total of 3 belts to a wheel, then this must be done at an equal distance from each other. Only this method will minimize rubber wear and achieve precise anti-skid performance.
Operation of snow bracelets
The use of anti-skid bracelets requires certain skills, since otherwise they can cause accidents or breakdowns.
Security measures
According to owner reviews, snow bracelets should be used as follows. Fasten carefully, checking the strength of the mechanisms several times. After this, you should drive 100 - 200 meters on a safe road, and then get out of the car and re-check the fastenings.
Such safety measures are taken to eliminate the possibility of any bracelet becoming detached during travel or the belt breaking. It is also recommended that before particularly dangerous trips, replace old fasteners that have been in constant use for a year or more.
Use of anti-skid bracelets
Many motorists who have recently encountered the problem of snowfalls, heavy ice and drifts have a question at what stage of the journey they need to fasten the bracelets and whether they should be used constantly. To answer this question, it is necessary to consider two situations.
If the driver constantly drives in a city that is normally cleared of snow, but occasionally there is still a need for an additional anti-slip option, then the bracelets should be attached immediately before a dangerous section of the road arises. Especially in the city, this is easy to do; you can stop and fasten your bracelets.
If you are planning a long trip, then you need to take care in advance about where exactly to attach the bracelets, since not all routes have the opportunity to make a stop.
Several ways to increase vehicle cross-country ability
- Installation of all-terrain tires with large and high tread elements on the wheels.
- Putting chains on wheels.
Tires with high lugs have high rolling resistance, which significantly increases fuel consumption. They also make a lot of noise, making them uncomfortable to ride. Riding on chains is even more costly and uncomfortable. To put chains on the wheels, you need to jack up the car. Which is not always possible due to the jack falling into the mud or snow. Therefore, it is quite difficult to put chains on the wheels before going off-road.
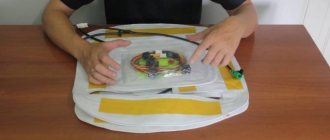
Design and advantages of anti-skid bracelets
The anti-skid bracelet consists of two pieces of chain with ends connected in pairs and two belts, one with a buckle and the other free. It is put on the wheel so that the chain, forming lugs, lies on the tread in two rows with a small gap between them. The free end of the belt is threaded through the hole in the wheel rim, and after tightening, it is fastened with a buckle on the other side of the bracelet. One bracelet placed on the drive wheel is, of course, not enough to significantly increase cross-country ability. A set of bracelets usually consists of 6 pieces. For a car with one drive axle, this is enough. For an all-wheel drive vehicle, it is better to buy or make two such kits. You need to put on 3 bracelets on each drive wheel at equal intervals. You can buy such kits or make your own. The main advantage of bracelets over chains is that they can be put on wheels without jacking up the car. That is, putting them on before a problem section of the road will not be difficult, and you can move along a good road without them. You can even put them on a stuck car.
The effectiveness of using bracelets is also high as that of chains, since the lugs are formed in the same way.
But do not overestimate the increase in cross-country ability with their help. If the car lands on its bottom in mud or snow, they will not be able to help. The advantages of this device, of course, include low cost and safe operation. If the fastening belt breaks, the bracelet will simply fly off the wheel without causing damage to the body. Some sources note increased rubber wear when using this device. I think that if you don’t ride on bracelets all the time, then wear and tear will not increase.
Oddly enough, in our country anti-skid bracelets are not as widely used as in Europe, which is snowless by our standards. This is apparently explained by the complete ban on studded tires in some countries, and the long-standing habit of drivers to carry such a device with them just in case (such devices have been used there since the 20s of the last century). And the fact that there are roads there that, under certain conditions, are prohibited without such an accessory. Apparently it also plays a role. They even have special road signs that open or close depending on weather conditions.