09/25/2021 1,499 Alarms
Author: Victor
Correctly setting the time on the Starline key fob is necessary to be able to automatically start the engine using a timer. The nuances of setting the clock and date depend on the specific alarm model and will be different for series A and versions E, D and B.
[Hide]
Engine starting options
ATTENTION! A completely simple way to reduce fuel consumption has been found! Don't believe me? An auto mechanic with 15 years of experience also didn’t believe it until he tried it. And now he saves 35,000 rubles a year on gasoline! Read more"
There are several ways to start the engine using the Starline A93 alarm:
- Starting the engine based on temperature. The system monitors the temperature and, if necessary, starts the engine to warm it up.
- Trigger by time or so-called trigger by alarm clock. The engine will start at a certain time.
- Periodic engine starting.
To start the engine on time, first of all, you need to set the time on the Starline A93 key fob. Setting up the clock is intellectually understandable and for most users it will not be difficult to set the time on the key fob, but if difficulties suddenly arise, instructions are provided below that will help you deal with the problem that has arisen:
Why is it necessary and what will happen if you don’t set the clock?
It is important to know
If you correctly program the communicator to remotely start the internal combustion engine using an alarm clock, then the engine will start at a specific time.
If the time indicators on the key fob are set incorrectly, this will lead to the fact that automatic start by time will not work correctly. Accordingly, if a trip is necessary, the engine will not be warmed up, which will lead to early wear of the starter mechanism as a result of high loads.
There will also be a problem with the alarm function used to remind you of an event.
Step-by-step instruction
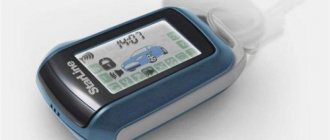
- The key fob is controlled using four buttons. All actions performed by the user are displayed on the LCD display.
Starline a93 buttons In order to set the clock, you need to enter the “Functions Menu”; to do this, you need to press and hold button 4. The key fob signals successful entry into the menu with one melodic and two short signals. The clock on the display will begin to flash. The user has 8 seconds to set the clock. To increase the clock readings, you need to press button 2, to decrease - button 3. After the hours are set, you need to briefly press button 4 and start setting the minutes. The minutes are set in the same way as the hours. The next short press of button 4 will switch to the alarm clock setting mode. Use buttons 2 and 3 to set the hour and press button 4 again to set the alarm minutes.
Setting the clock with 4 buttons
The main Starline A93 alarm remote control has four keys. Therefore, the standard procedure for setting the time looks like this.
- You should make sure that there is a battery inside the Starline alarm key fob and that the remote control is functioning properly and the keys are not blocked.
- Press and hold button number four until one melodic signal sounds. Then two more short sounds will follow, indicating that the key fob has entered the time setting mode.
- The value will now start blinking. You can set the appropriate number of hours using button two or three. The first key of the Starline key fob increases the value, the second one decreases it. After setting, press button four again, going into the minutes setting mode.
- The procedure for setting minutes is carried out in a similar way - by holding down keys two or three on the Starline key fob.
- The next press allows you to configure alarm functions or settings.
- Exit from the Starline programming mode is automatic after 8 seconds. You don’t have to press anything; the set time parameters will be saved automatically.
To summarize the above
That's all the simple steps to ensure that the time setting is successful. To exit the “Functions Menu”, you can briefly press button 4 to scroll through the remaining menu items until you exit, or if you do not perform any actions for 8 seconds, the menu will be exited automatically. Setting the time is the initial step for subsequent work with the alarm, and will allow the owner to use functions such as timed start, periodic start, or combine engine control and vehicle safety.
Tired of paying fines? There is an exit! Forget about fines from cameras! An absolutely legal new product - Traffic Police Camera Jammer, hides your license plates from the cameras that are installed in all cities. More details at the link.
- Absolutely legal (Article 12.2);
- Hides from photo and video recording;
- Suitable for all cars;
- Works through the cigarette lighter connector;
- Does not cause interference to radios and cell phones.
Find out more Subscribe so you don't miss anything important Contents:
Correct display of data on the key fob with alarm is necessary so that the vehicle owner has the ability to automatically start the engine using a timer. But the algorithm for how to set the time on a Starline key fob depends on the model: the installation nuances for series A, B, D and E differ in the details of adjusting the clock and date.
Setup video
Setting the time on the key fob is necessary for a reason: the alarm system has the ability to automatically start the engine using a timer. You will be able to go out to an already warmed-up car all work week without making any effort - and park the car so that it has a stable connection with it.
The site employs an auto electrician-diagnostician, a certified StarLine specialist. If you have questions about car alarms, ask them at the end of the article in the comments or on Vkontakte.
Why do you need customization?
The process of setting the time on a car alarm accessory has a direct impact on the operation of applications. If the owner of the car has not set the standard clock settings, then errors will occur when starting the engine: the ignition system will start to turn on earlier or later than required, and additional time will be required to warm up the engine and interior. Incorrect data brings with it a number of other inconveniences: the engine is activated at the wrong time, the alarm clock goes off late, and the engine autostart timer does not turn on according to the timer.
- Set the time on the Starline A92 key fob
Often replacing the battery entails resetting the anti-burglary protection. Therefore, to begin with, you should not set a new indicator, but set the car alarm. But it is important to take into account that when setting up, there is a high risk of losing additional information or erasing such standard parameters as turning on by alarm, set interval or timer (for models b9 or Starline A91).
If such problems occur for a long period of time, the starter device will break down, and there may be a need for a comprehensive battery change (if there is frequent downtime at low temperatures). Ignoring timing failures on the Starline a91 key fob also entails a deterioration in the correct operation of the battery and a decrease in the level of safety of the entire vehicle.
Instructions for setting the time
Setting the clock on an alarm system with automatic engine start of a Starline A93 car is done as follows:
- Take the communicator and install the battery into it. To do this, remove the back of the cover and install the battery in the special slot, taking into account the polarity.
- The key fob will turn on. If the key lock has been activated, unlock the device.
- Click on button number 4 and hold it down until the communicator speaker plays a melodic signal. After a pause, the device will emit two more short-term sound pulses.
- The pager will go to the time settings adjustment menu. To set the clock, the second and third buttons are used. The second is for reducing parameters, the third is for increasing. To quickly add or subtract hours, you can hold down these keys.
- To set the minutes, click on the fourth key.
- The same buttons (2 and 3) are used to adjust the minutes. The second key is used to decrease, the third - to increase indicators. For quick adjustment, the buttons are pressed.
Andrey Sharshukov clearly demonstrated the process of adjusting time parameters.
Reasons for settings failure
There are many factors that can affect the operation of the device. The main reasons for a failure in the key fob, which provoke the reset of the indicators and force you to install everything again, come down to:
- Problems with the power supply. The malfunction occurs due to water penetration into the housing. To avoid problems with time on the alarm key fob, you need a part that has burned out after a short circuit.
- Software violations. You can optimize the operation of the key fob by flashing it, which is best left to specialists.
- Weak battery. The battery gradually discharges and loses its previous capacity. If there is not enough energy for the time alarm, and the charge is at a critical level, you need to install new little finger batteries.
- No intersection of contacts. It is important to check the working elements of the Starline signaling and bend them yourself (alternatively, carefully solder them).
- Factory defect. If the warranty period has not yet expired, it is worth replacing the defective pocket alarm and re-linking it to the anti-theft pager.
To set up the watch in the Starline A91 key fob, you should carefully study the instructions and take into account the mechanical features of the series.
How to correctly set the time on the Starline key fob
The Starline alarm key fob displays not only useful system information, but also the time, which can be manually adjusted.
Most car alarm key fobs that have a screen can also display the time. This is not only practical in terms of controlling your schedule and time awareness, but also convenient when implementing additional automatic start capabilities. Starline does not lag behind its competitors and also uses the watch function in its arsenal. Setting them up is not difficult; you need to know the main principles of controlling the alarm key fob.
Despite the fact that Starline has simplified the time setting procedure to the maximum, some issues related to unsuccessful installation attempts continue to arise.
How to set the time on a key fob
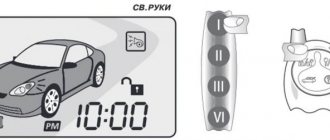
Setting the time on the Starline key fob depends on whether the device belongs to the collection of models - the settings for each category are partially different in their algorithm. Thus, the time for Starline e91, B94, B64, D94, D64 and Starline E90 is fixed in several steps:
- Click on key 4 and press until 1 long and 2 simple signals are played.
- Wait for the melody to ring again and the main menu items to be displayed on the screen.
- Enable the F-1 function using keys 1 or 4.
- Select 4 and hold your finger until 2 quick beeps.
- Use buttons 1 and 4 to set the required format.
- Fix the set value using keys 2 and 3.
- At the same time, for Starline E90 you can adjust the melody and volume.
Once you have set the time, you need to save the clock setting:
- put the accessory aside for 8 seconds to automatically exit the menu;
- hold button 1 until 2 short beeps sound to leave the menu.
The following procedure will allow you to achieve the correct time setting on the alarm for A39, A91, A92, A93 (a63), A61 and Starline A94:
- Review of car alarm Starline A63
- Press 3 and wait until the melody and 3 short beeps play.
- When the screen lights up, use keys 1 and 2 to set the clock.
- Quickly press 3 and wait until the values are displayed.
- Continue setting up the alarm using 1 and 2.
- Click on key 3 to turn on the alarm.
- Press 3 to switch where the device values are set.
- You should exit the menu, and after 15 seconds the key fob will save the settings.
On some models (A92 and A93/63), it is worth closely monitoring the alerts on the LCD display: users note that the brightness often goes off and it is not clear whether the function from the bottom navigation is active or not.
How to set the clock on the A series alarm key fob
One of the most popular Starline alarm models are the A series systems. Setting this parameter here is simple and the same for all types. Below are instructions based on the example of the Starline A91 modification.
- Pressing key 3 again allows you to activate or deactivate the alarm. In this case, the first button turns it on, and the second deactivates it.
- Another click of the third button allows you to go to the alarm timer setting menu. Parameters are reduced or increased in the same way.
- It’s very easy to finish setting the clock on the Starline remote control - just don’t press anything for 5 seconds. The system will remember and save the changes made.
Trouble-shooting
After resetting the settings, you will have to troubleshoot so that the situation does not happen again. This can be done in 2 ways: classic (through service commands) and radical (replace the battery). If the key fob still does not work, then the device needs to be repaired. You can set the required time as follows:
- Remove the battery from the device.
- Use a Phillips screwdriver to remove the screw that holds the housing.
- Using a soft brush or cotton wool and alcohol, carefully clean the parts from dirt.
- Check the operation of the system board, replace them if necessary.
- Use a soldering iron with a small tip to fix the new part in the remote control.
- Reassemble the case, secure the screw and return the battery.
To reset the parameters on the Starline A91 alarm key fob and return to the factory settings, you will need:
- Get into the car and turn on the engine.
- Quickly press the service key about 10 times.
- Turn off the engine and count 10 signals (notification of entering reset mode).
- Take the custom keychain and click on 1 again.
- Wait for a short sound from the system.
- Return to the menu by turning on the vehicle engine again.
If all the nuances of reinstallation on the Starline alarm key fob were completed correctly, the car will respond with 5 flashing headlights and a signal, confirming the preservation of the specified functions.
Related publications:
Setting the clock on the starline a93 key fob
Alarm starline v9 instructions
Pandora alarm key fob operating instructions
How to enable and configure autostart on a Scher-Khan alarm
Double-sided Starline A63 2Can 2Lin belongs to the fourth generation anti-theft systems. Unlike its predecessors, it can boast of using updated modifications of power relays and light alarms - their purpose is to control the main lock. The manufacturer has increased the level of vehicle protection, signal encryption and increased the comfort of car alarm control. Thanks to the built-in GPS and GSM modules, the device is able to monitor the location of the car, which helps in case of loss or theft. Starline A63 also monitors the condition of the car at one time or another.
Despite its budget, the Starline A63 car alarm boasts technical characteristics of a fairly high level:
- to transmit encrypted information, a convenient and secure radio channel with frequencies of 433-434 MHz is used;
- the main key fob is capable of transmitting commands over a distance of up to 800 meters under favorable conditions;
- the main remote control receives signals at a distance of up to two kilometers from the vehicle;
- an additional communicator is capable of communicating with the system at a distance of up to 15 meters;
- An integrated three-axis sensor is used to control the vehicle's tilt and sensitivity;
- the system operates at temperatures from -50 to +85 degrees Celsius;
- The anti-theft complex is powered by a voltage of 9 to 18 volts;
- protection mode limits alarm current consumption to 17 mA;
- The GSM module increases current consumption to only 25 mA - less than 10 mA;
- Can-lin module available.
It is worth considering that the operating range of the anti-theft complex control panels specified in the technical documentation may be less under unfavorable conditions - weather or interference.
- Factory reset starline b9
The standard Starline A63 article includes a number of elements and devices that allow you to perform all the functions provided by the manufacturer. These are, in particular:
- main control panel equipped with a liquid crystal display in a leather case;
- additional keychain with buttons;
- batteries for both the main and additional key fobs;
- main module with a microprocessor in a special housing;
- signal reception and transmission module with antenna;
- LED to indicate system status;
- block for connecting an additional relay and the device itself;
- limit switches for placement in the hood;
- self-tapping screws and connector for grounding limit switches;
- a set of electrical wiring and adapters to enable the anti-theft system;
- one year warranty card;
- instructions for using the complex;
- consumer reminder.
The Starline A63 functionality provided by the elements of the launch kit is divided into several main categories:
- anti-theft;
- service;
- comfort options.
The anti-theft functions of the Starline A63 complex include the following:
- security mode, supplemented by light and sound alarm;
- alarm signals transmitted to the main control panel in the event of an alarm;
- silent mode, both when activating and deactivating the machine’s protection;
- silent vehicle security, which means turning off the siren with a signal on the key fob;
- activation of the security mode when the engine is running;
- the ability to turn on and off the security mode without a remote control;
- immobilizer mode;
- robbery prevention function, which makes it possible to block the engine in case of car theft;
- automatic activation of the security mode in case of its accidental shutdown;
- “panic” mode, which makes it possible to turn on alarm signals upon command;
- special code for emergency arming or disarming of security;
- the ability to enable two-stage immobilizer deactivation;
- maintaining the engine blocking even in the event of unauthorized dismantling of the anti-theft system.
The category of car alarm service capabilities is the most extensive. It includes:
- delay in locking the doors and turning on the controllers until the car interior lighting turns off;
- the ability to select the volume of warning signals, both when activating and deactivating the security system;
- the ability to remotely turn off the shock and tilt sensor levels even when the internal combustion engine is running;
- function of controlling the main lock in remote mode;
- two-phase door opening and locking function;
- eight additional channels, making it possible to control devices and equipment not included in the kit;
- the ability to control the voltage level in the car;
- the ability to control the main ignition lock;
- indication of engine and interior temperature on the main control panel screen;
- function of calling the vehicle owner from his cabin;
- signaling of open doors using headlights;
- turbo timer mode;
- the ability to configure the remote control and program the system remotely;
- car alarm control in emergency mode;
- remote control of light inside the car;
- protection of key fobs from accidental pressing of buttons;
- the function of unlimited binding of additional key fobs and deleting from the system memory those that are no longer needed;
- indication of timer, alarm clock and current time on the LCD display of the main control panel;
- indication of the battery discharge level of the main key fob on the screen;
- possibility of installing additional sensors.
- the ability to remotely control the car engine starter, thanks to which the latter warms up more efficiently, especially in cold seasons;
- function of automatic adjustment of the position of seats and mirrors of the vehicle;
- operation of the diode light track when the security mode is on, if necessary;
- control the operation of the security system using an application on a smartphone;
- wireless engine blocking relay, thanks to which it is possible to install the alarm in the most inaccessible places of the car.
Thanks to all the listed functions, Starline A63 is one of the leaders in the domestic car alarm market.
Setting the sensitivity of the shock sensor
The vehicle impact sensor is located in the transceiver. Its sensitivity is determined on a 14-point scale, where the value “01” corresponds to the minimum sensitivity, and the value “14” corresponds to the maximum. A value of "0" disables the selected shock sensor level.
Setting the sensitivity of the sensor warning level
To adjust the sensitivity of the shock sensor warning level, you must do the following:
- disable security mode;
- turn off the ignition;
- press button No. 3 on the alarm key fob, first for a long time, until a sound signal is heard, and then once, while the car will emit three light signals and two beeps of the siren, and the key fob will make a melodious sound and an indication of the warning level of the shock sensor will appear on its display;
- Short presses on buttons No. 2-3 select the required value of the sensor sensitivity level.
The factory setting for this parameter is 10.
Setting the sensitivity of the sensor alarm level
To adjust the sensitivity of the alarm level of the shock sensor, you need to press button No. 3 on the alarm key fob, first for a long time until a sound signal is heard, and then once - the car will respond with one light signal, and the key fob will make a melodic sound. After this, an indication of the alarm level of the shock sensor will appear on the display.
The factory value of the sensitivity of the alarm level of the signal sensor is 5. To correct this value, you need to use buttons No. 2 and No. 3. It should be taken into account that the sensitivity value of the alarm level of the shock sensor cannot be higher than the sensitivity value of the warning level.
To exit the mode of adjusting the sensitivity of the shock sensor, press button No. 3 first for a long time until a sound signal is heard, and then briefly. The car reacts with three light signals and two siren signals. The keychain makes a melodic sound.
Weaknesses and strengths
The Starline A63 anti-theft telematics system has a number of advantages that set it apart from its competitors:
- the “dialogue” signal protection and encryption system does not allow code grabbers to intercept it;
- the versatility of the system, thanks to which it is able to work with cars of almost all models, including the newest ones;
- the presence of a digital CAN LIN interface, thanks to which the installation and programming process is significantly accelerated;
- the presence of remote control service channels, thanks to which all modules of the complex are configured without the use of external elements;
- reduced number of false alarms thanks to modern technologies that minimize the excessive sensitivity of alarm sensors and disruptions in their operation.
As for the disadvantages of the security system, these include excessive sensitivity to configuration or installation errors of the complex. It is because of the latter that most of the malfunctions that car owners have to deal with occur. Another drawback is the limitations of the key fobs due to the low range.
Security system capabilities
The first thing that catches your eye when you get acquainted with the electronic watchman is the abundance of simple and useful functions. The developers used a method popular in the industry: they divided the car into 9 zones and installed their own protection method for each. The Starline alarm system includes:
- a relay that prevents unauthorized engine starting;
- sensors (micro switches) for the trunk, hood and doors;
- two-level shock sensors to protect glass and body elements;
- parking brake lock;
- control of the ignition switch position.
Starline A93 review:
The operating instructions contain details about options that improve usability, increase security and prevent the possibility of hacking and control interception:
- dynamic coding of the control signal;
- turning on sound and light notifications (alarms) for a limited period of time;
- disabling alarms without disarming the vehicle;
- saving settings even when the power is turned off;
- simulation of engine malfunction (anti-robbery mode);
- the presence of an individual access code, which makes it possible to urgently turn off the alarm.
Alarm "Starline" with auto start , according to the instructions, has several ways to notify the owner and others about an attempt to steal or enter:
- turning on the siren and lights;
- alarm notification via key fob with feedback;
- “panic mode”, in which light and melodic alerts are forcibly turned on.
A feature inherent in the Starline series of alarm systems with autostart function is the ability to self-diagnosis. The control unit constantly scans the status of the sensors. If a malfunction is detected, it signals this to the owner using an LED indicator and a notification system via the key fob.
How the system works
All work of this system is carried out using a special, secure protocol and comes down to the simplest principles of a conventional encoder. A special algorithm with a secret code allows the key fob to process the incoming signal and send a response back to the sensor. In this case, the system turns off only when the sent and received signals match, and a confirmation is received on the key fob. All this takes just seconds!
Differences between StarLine A63 and A63 Eco
There are two modifications of the Starline A63 alarm system on the market - the regular version and Eco. The latter has the following characteristics:
- two-way type of communication with key fobs;
- "dialog" system encoding for message encryption;
- CAN interface, connected optionally;
- The GSM module is also optionally included;
- remote engine start, as in other models of the family;
- the presence of a single control panel - if necessary, additional ones can be purchased;
- inability to control the anti-theft system using the standard key.
Starline A63 Eco is distinguished by the presence of a built-in 3D controller, which allows you to control any external influence on the vehicle, including the risk of theft. The built-in engine blocker gives the car owner the remote ability to effectively limit the actions of the thief. And reliable communication encryption provides protection from code grabbers.
The most noticeable difference between the standard A63 and the Eco modification is the absence of an additional key fob without a display in the latter’s configuration. As noted above, the car owner can compensate for this by purchasing the remote control themselves. The alarm system supports recording several key fobs into the memory.
Review of car alarm StarLine A93
Keychain Starline 93
Thanks to a special modern CAN + LIN module, the installation of the A93 security complex itself is simplified. The functionality of the system on cars is significantly expanded. An excellent choice for the domestic auto industry, with the characteristic lack of digital buses on vehicles. If desired, the device can be easily configured yourself, although it is better to entrust this to professionals. The same applies to StarLine A91.
The difference from previous analogues is the recognition of any attempts to break into the car and do something with it. Thanks to modern sensors, the owner can even know when the vehicle is about to be towed. The Starline alarm system lets you know automatically.
Special attention to the key fob with shockproof complex. The main control has an informative display that provides all the necessary information, including information on the previous version of Starline A91.
The alarm works without problems using a timer and temperature sensors. This is especially convenient when certain engine characteristics need to be maintained at a specific level. The system automatically turns off all power if attackers try to hack the vehicle while it is warming up and working with standard programs.
The vehicle's location can be tracked using maps after connecting GPRS or GLONASS modules at the owner's choice.
This will also help if the car is stolen. The main thing is to conduct several tests in advance to understand what operating mode and alert level will be successful. This is what they do when owning Starline A91.
Functions of the StarLine A63 key fob
Thanks to the buttons of the main remote control, the following occurs:
- turning on and off the security mode using the “dialog” encryption system;
- setting the current time;
- turning on and off the winding mode by alarm;
- setting the alarm time;
- activation and deactivation of a car park using a timer;
- setting timer indicators;
- adjusting the volume level of siren and key fob alarms;
- activation and deactivation of silent mode;
- selection of siren signal type;
- activation of the motor based on temperature indicators;
- management of GPS, GSM modules and shock sensors;
- Slave function.
The additional control panel is not equipped with an LCD display, which does not allow, for example, setting up autorun by timer, alarm clock or temperature. At the same time, it is equipped with feedback in the form of special sound signals. General control of the system occurs using three buttons located on the front panel. These buttons make it possible to unlock and lock the doors or trunk, arm and disarm.
Icons on the screen: basic meaning
If you look starting from the center and go from left to right, then the following symbols are present on the screen:
- Time.
- Shock sensor warning level.
- Turn on alarms.
- Transmission of signals to the Starline alarm system.
- Countdown timer.
- Enabling silent security mode.
- Security with sound.
- Indication of open or closed doors.
- Engaging the parking brake.
- Personal PIN code, which is programmed separately.
- Auto start on alarm clock.
- Periodic launch.
- Temperature autostart.
- Turning on manual transmission mode.
- Open hood.
- Service mode.
- Turbo timer mode.
- Automatic switching mode.
- Shock sensor with alarm level.
- Immobilizer mode.
- Enabling locking for key fob buttons.
- Battery and charge level.
- Engine temperature.
- Anti-robbery.
- Engine operation. The correct setting of the StarLine key fob also depends on it.
- GSM/GPS module.
- Open trunk.
- Bypass sensor levels.
- Open doors.
- Bypass the first level of the sensor.
- Ignition on.
Visual signals make it easier to configure specific parameters and understand how to use the Starline alarm system.
Alarm button location
As noted above, the key fobs of the anti-theft complex have a different number of buttons, located in different places due to the design features of each. So, the main remote control has a display, which is why four keys are placed on the side panel. At the same time, three buttons for the additional communicator are located on the front, which is clearly visible in the photo.
Buttons and their combinations on the main remote control are used not only to issue direct commands, but also to select the desired functions among the icons on the screen. In addition to key fobs, the “Valet” service key, located in the car interior, is used.
Star Line
The algorithm for disabling the security mode without using remote control key fobs depends on the selected operating mode of programmable function No. 5.
If the shutdown mode is selected without dialing a personal code , then you should perform the following procedure:
Open the door with the key, alarm signals or 4 flashes of dimensions will follow (if the security mode was turned on without the key fob). Within 20 seconds, turn on the ignition and press the VALET service button 3 times. Turn off the ignition. The security mode will turn off and the engine will be unlocked.
If the shutdown mode is selected by dialing a 2-digit personal code , then the following procedure should be performed:
1. Open the door with the key. There will be 4 flashes of the dimensions and a 20-second countdown will begin, during which you need to open the door and turn on the ignition.
2. Press the VALET service button the required number of times equal to the first number of the personal code.
3. Turn off and turn on the ignition again.
4. Press the VALET service button the required number of times equal to the second number of the personal code.
5. Turn off the ignition. The security mode will turn off if the code is entered correctly. There will be 2 flashes of dimensions as confirmation.
Factory code value is 11
Star Line A6
To emergency disable the security mode, for example, in case of loss or inoperability of the remote control key fob, you must enter a personal code using the ignition key and service button:
1. Open the car door with the key, the alarm will turn on the alarms.
2. Turn on the ignition without starting the engine.
3. Press the service button the required number of times equal to the first number of the personal code.
4. Turn the ignition off and on again.
5. Press the service button the required number of times equal to the second number of the personal code.
6. Turn off the ignition. Alarms will be interrupted. Security mode will turn off.
Factory code value is 11
Star Line A8, A9
To emergency disable the security mode, for example, if the remote control key fob is lost or inoperable, you must:
1. Open the car door, the alarm will sound.
2. Turn on the ignition without starting the engine.
3. Within 20 seconds, press the service button 4 times.
4. Turn off the ignition. As confirmation, 2 siren signals and 2 headlight flashes will follow, and the security mode will turn off.
Attention! If the function of automatically turning on the security mode is programmed, then after completing step 4, turn the ignition on again for at least 10 seconds, then turn it off. otherwise, the system will arm the security mode again.
Star Line B6, B9, B6 dialog, B9 dialog, A62, A92, B62, B92
Emergency disarming of the security mode without a key fob
The algorithm for emergency disabling the security mode with simultaneous disabling of the engine locks or unlocking the engine with a 2-step disabling of the locks when the security mode is turned off depends on the state of the programmable function 9.
If the shutdown mode is selected without dialing a personal code , then you should perform the following procedure:
1. Open the car door with the key. Alarm signals or 4 flashes of dimensions will follow if the security mode was turned on without the key fob.
2. Turn on the ignition and within 20 seconds press the service button 3 times.
3. Turn off the ignition. To confirm that the security mode is turned off, 2 siren signals will follow.
Attention! If the function of automatically turning on the ohana mode is programmed, then after performing step 3, turn on the ignition again for at least 10 seconds, then turn off the ignition to avoid reactivating the security mode.
If the shutdown mode is selected by dialing a 1, 2 or 3-digit personal code , then the following procedure should be performed:
1. Open the car door with the key. Alarm signals or 4 flashes of dimensions will follow if the security mode was turned on without a key fob.
2. Within 20 seconds, you must open the door, turn on the ignition and press the VALET service button the required number of times equal to the first number of the personal code.
3. Turn off the ignition.
If a 1-digit personal code option is programmed, then if the code is entered correctly, the security mode will turn off. As confirmation, 2 flashes of dimensions will follow.
If a 2 or 3-digit personal code option is programmed, then after dialing the first digit of the personal code, turn on the ignition again and press the VALET button the required number of times equal to the second number of the personal code. If necessary, enter the third digit of the personal code in the same way. If the code is entered correctly, the security mode will turn off. As confirmation, 2 flashes of dimensions will follow.
Installation of alarm system Starline A63
- Installation begins by turning off the vehicle battery. The ignition is also turned off and any energy consumers are disconnected.
- The process begins with the installation of the main module with a microprocessor, which is installed so that only the car owner has free access to it. Typically, such a reliable location is considered to be plastic trim - the unit is placed behind the dashboard, audio system or storage compartment. Connect the device so that there are no other electronic devices near it that could cause interference, sources of high humidity or overheating. Fix the module with self-tapping screws or plastic clamps quite firmly.
- The signal receiving and transmitting device together with the antenna is installed on the rear or windshield. The strength of the transmitted signal greatly depends on the height of its position. Before installation, the glass surface is cleaned of dirt and degreased. And they fix the module on it using glue or double-sided tape - the first option is considered more reliable and more aesthetically pleasing, so it is used more often. To avoid interference, the antenna is placed so that the distance between it and electronic devices or metal parts is at least five centimeters.
- Tilt and shock sensors, both included and optional, are installed in the center of the cabin. Typically, a partition is used for fixation, which separates the engine compartment. The sensors are mounted as tightly as possible so that they are minimally affected by vibrations, leading to false alarms.
- To automatically start the engine based on temperature, a sensor is placed under the hood of the vehicle. It is cut into the pipe through which the cooling liquid circulates. But, at the same time, high-quality fixation plays an important role, which should protect the device from being washed away by antifreeze.
- The blocking relay is mounted at a distance close to the ignition switch, but so that it is invisible to outsiders. The relay does not require any wiring, making it easy to place correctly.
- The Valet service button is installed so that it has maximum free access, but at the same time it remains invisible. Place it close to the driver's seat for a quick emergency press. Mask the key with black electrical tape.
- Limit switches are located on the hood so that they are not accessible if the engine compartment is closed.
- The installation is completed by laying the electrical wiring. Its correct routing presupposes the impossibility of finding wires near moving components, such as the steering wheel or pedals, as well as potential sources of radio interference (ignition coils, high-voltage wires of the car, and other electrical appliances). Place the bundles under the interior trim and, if additional protection from moisture or other adverse factors is necessary, wrap them with electrical tape.
Disabling the alarm
If the battery in the key fob is dead or the button is broken, the alarm can be turned off in an emergency way or using a secret code.
Emergency shutdown of alarm without key fob
To emergency turn off the Starline A93 alarm without a key fob, you must use the Valet service button. They work like this:
- open the door with the key - an alarm sounds;
- turn on the ignition;
- press the service button four times within 20 seconds;
- turn off the ignition.
After this, the alarm system is turned off. You can start the car.
Emergency alarm shutdown using a secret code
To disable the security alarm using a personal secret code, you need to do the following:
- open the door with the key;
- turn on the ignition;
- within 20 seconds, press the Valet button the number of times corresponding to the first digit of the secret code;
- turn off the ignition;
- turn the ignition back on;
- press the Valet button, but this time the number of presses must correspond to the second digit of the secret code;
- turn off the ignition.
The car indicates that the alarm is turned off with a pair of sound signals and flashing hazard lights.
In many devices, when replacing the power element (battery, accumulator), a complete data reset occurs. If the battery on the Starline A91 alarm key fob is replaced, the time is reset, after which it must be set again. But not everyone knows how to set the time, and this is required when using the timer function.
How to attach a Starline A63 keychain
This is a mandatory preliminary procedure that is performed before setting up the alarm. Writing them to the device memory occurs as follows:
- disable the protective mode if it was enabled;
- press the Valet service button 7 times and wait until the sound alarm sounds the same number of times;
- On the main control panel, press the first and second keys simultaneously and wait for a melodic sound.
As a result, the communicator is linked to the system. The procedure is repeated for each device. When the registration is completed, the ignition is turned off and the car is armed.
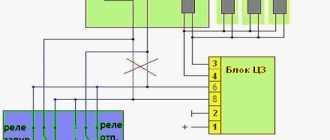
Location of StarLine car alarm components: installation maps and connection diagrams
Factory alarm equipment
Factory configuration
The instructions for equipment from the manufacturer most often contain a diagram according to which certain components are located in the machine. Control options are described separately. The “start-stop” button and ignition contacts are the parts that are most often used to configure certain parameters of the StarLine car alarm.
The starting moment can be recorded by such indicators as the voltage level of the on-board network, the generator voltage output or the tachometer signal.
Setting up the key fob
Use the Valet service mode button, which is pressed seven times when the car’s ignition is turned on. The correctness of each action will be confirmed by light and sound signals. To exit the settings mode, turn off the ignition.
Setting the time on the StarLine A63 key fob
First of all, hold down the fourth button until a long melodic signal sounds, followed by two short ones. As soon as the time display flashes, you need to use the arrow keys to set the current hour. The second button increases it, and the third button decreases it.
To go to adjusting the minutes, briefly press the fourth key again and set the desired indicator according to the scheme described above. The volume of the siren is adjusted in a similar way.
How to turn on the turbo timer
Used for turbocharged vehicles. It allows the engine to continue running even after the ignition is turned off for a set period of time. To configure it, you need to place the cursor on the icon with the inscription “TURBO” and press the first button. After the signal sounds, you can briefly press key 1 to select the engine operating time - each press is equal to an additional minute. The same button is pressed until the sound signal to save the settings.
It turns on when the parking brake is on by pressing the second button on the key fob.
Setting up the shock sensor
It can be turned on when the security mode is running and the ignition is off, if you press the first button twice on the main remote control or the second and first button on the additional remote control.
Sensitivity adjustment is made when the security mode is turned off, by successively pressing the third key twice. The desired level is set by pressing buttons numbered 2 and 3.
Door lock
Autostart module
The anti-theft system in question has a car factory function. Before you automatically start the engine of any car, be it a Niva or a Lada Granta, using the Starline A63, you need to make sure that the handbrake lever is raised, the program neutral is set and the hood and doors are locked.
To turn on the autorun unit, you need to press the first button on the remote control and hold it until a melodic sound signal appears. As a sign of successful completion of the task, the necessary indicators will appear on the display. To turn off the motor, use buttons 1 and 4 - the first is pressed until a sound appears, and the last is acted on briefly. In order for the car plant to work correctly, it is important to follow the system connection diagram.
Remote start
The new signaling complex allows you to control the engine remotely not only using remote controls, but also using a smartphone. To do this, you just need to install the official application on the latter and connect it with the GSM module. Control from a mobile phone will allow you to solve critical security tasks without having to remember a large number of button combinations.
How to open the trunk using the StarLine A63 key fob
The procedure occurs through the first additional channel. To activate it, hold down the second key until a beep sounds, and then briefly press the first. In addition to the light and sound signals of the car, the screen will show an indication of an open trunk. In models such as the Lada Granta, shock sensors are also turned off.
How to change your password
How to enable hands-free
Unfortunately, the Starline A63 system is not equipped with the “Hands Free” function, which turns the security mode on and off when the car owner approaches or moves away, respectively.
Factory reset
For Starline A63, the process occurs in the same way as for other models of the manufacturer - through the Valet service button. With the ignition off, press it ten times, after which you wait for the same number of short siren signals. Press Valet again and turn on the ignition. The settings are returned to factory defaults if a beep sounds.
How to register a key fob
You can register up to 4 remote control key fobs in the memory of the Starline A93 car alarm. To do this you need:
- disable security mode;
- press the Valet button seven times;
- turn on the ignition - the car will emit seven siren signals;
- briefly press buttons No. 1-2 - the car will emit one siren signal, and the key fob will emit one sound signal;
- turn off the ignition - the car will respond with three light signals.
If there are several key fobs, then the second point is repeated for each of them. In this case, the interval between recording key fobs should not exceed 5 seconds.
IMPORTANT! When registering key fobs, all information about the previous key fobs is deleted from the system memory. Therefore, all new and old key fobs must be registered within one programming cycle
Basic malfunctions and methods for their elimination
Like any technical device, the A63 alarm system can fail. There can be many reasons for breakdowns, but among them are the most common. Most often, the gadget does not work or does not work correctly due to the fact that it is incorrectly installed or configured. To troubleshoot the problem yourself, you need to remount it, strictly following the instructions.
In cases where the system requires complex repairs, including the need for disassembly, it is recommended that this be done at a car service center.