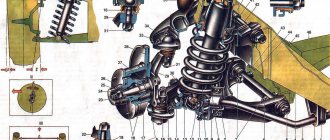
The braking system on the VAZ-2107 car is presented in the form of disc (front) and drum (rear) brakes. The design of the front and rear brakes has significant differences, so it is appropriate to consider the principle of replacing the rear brake pads on a VAZ-2107.
In principle, the rear pads have a longer lifespan than the front ones, but in any case the time comes when replacement is necessary. Often the service life of the rear pads is about 40-50 thousand km, but it all depends on the nature of the vehicle’s operation. In this material we will pay attention to how the rear brake pads of a VAZ 2107 are replaced, and what, in general, these products represent.
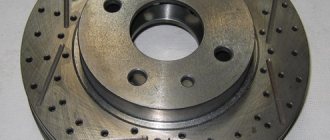
Appearance
Reasons for replacing pads
Braking is carried out using a special lining on the block. And when its thickness becomes less than 1.5 mm, it is necessary to replace the brake pads, the lining of which on the VAZ-2107 wears out quite quickly.
If you have any doubts about the performance of the rear brakes, it is worth checking the thickness of the lining.
The main sign of wear of this element is a squeaking noise coming from the rear of the car when you press the brake. Over time, the sound will increase in intensity to a metallic grinding sound until the gasket wears down so much that the brake stops working.
It happens that the brake pad is pulled out as soon as they suspect something is wrong, and often cracks or irregularities are found on it, which causes the element to move away from the body, which indicates the need for replacement.
It happens that the purchase of a low-quality pad is accompanied by the same signs of imperfection.
BRAKE PADS PROBLEMS
The parts of the braking system in question have to be changed not only when they wear out, but also when malfunctions occur that are associated with the use of low-quality consumables or too active driving. The following characteristic signs indicate problems with the pads:
- creaking, grinding and other extraneous sounds when braking;
- car skidding when pressing the brake pedal;
- to operate the pedal you have to exert more or less force than usual;
- beating of the pedal when braking;
- after releasing the pedal, it does not return to its original position;
- the presence of black dust on the rims.
EXTERNAL SOUNDS
Modern brake pads are equipped with special indicators that indicate wear of these car parts. The indicator is a metal strip that is attached below the friction lining. When most of the material is worn out, but the pad is still able to decelerate, a characteristic grinding or whistling sound appears when the brake pedal is applied. If the pads are not equipped with such indicators, the presence of extraneous sounds indicates obvious wear of the elements in the brake mechanism and the need to replace them.
Pad wear can manifest itself in different ways, and one of the signs is extraneous sounds when braking.
SKID
If the car skids to one side when braking, then the likely cause is wear on one of the pads. The car can skid until it turns around, even on a dry surface. In addition to the pads, skidding can occur due to scuffing or deformation of the brake discs.
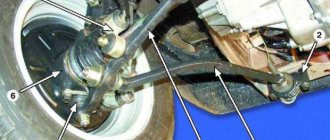
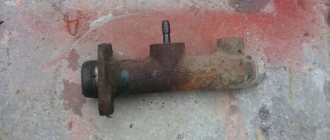
VIDEO: WHY DOES THE CAR PULL TO THE SIDEWAY WHEN BRAKING
Some time ago I was faced with a situation where the car began to pull to the side when braking. It didn't take long to find the reason for this behavior. After a quick inspection of the car's underside, it was discovered that one of the rear brake wheel cylinders was leaking. This caused brake fluid to get on the working surface of the pad and drum, as a result of which the mechanism was unable to perform its function. The problem was resolved by replacing the cylinder and bleeding the brakes. If you encounter a similar situation, I recommend replacing the entire cylinder rather than installing a repair kit, since the quality of rubber products today leaves much to be desired.
INCREASING OR DECREASING PEDAL FORCE
If the pedal has to be pressed unusually hard or lightly, the problem may be caused by worn or dirty pads. If everything is in order with them, then you should check the integrity of the entire brake system for fluid leaks.
VIBRATION
If there is vibration when you press the brake pedal, then a possible reason is that dirt has gotten between the brake disc and the pads, or a crack or chips have appeared on the latter. As a result, parts are subject to premature wear. However, you should be aware that a similar phenomenon is also possible due to problems with the hub or hydraulic cylinders of the brake system.
THE PEDAL IS DOWN
Sometimes it happens that the brake pedal does not move back after being pressed. This indicates that the pads are “stuck” to the disc. This phenomenon can be observed at sub-zero temperatures when moisture gets on the pads. In addition, air may enter the braking system, which requires inspection and subsequent repair or bleeding of the brakes.
RAID ON DISCS
Plaque on wheel rims is black dust, which indicates wear on the pads. If the dust contains metal particles, then not only the pads are erased, but also the brake disc itself. If such a situation arises, you should not delay inspecting the brake mechanism, as well as replacing failed parts.
The appearance of black deposits on wheels can be caused by active driving or natural wear of the pads.
One day I noticed that the front wheel rims were covered with black dust, and it was not road dust. It is no longer known what brake pads were installed at that time, but after replacing them with factory ones from AvtoVAZ, the situation remained unchanged. Therefore, I came to the conclusion that the appearance of black dust is a normal phenomenon, indicating natural wear of the pads.
When product replacement is required
Both the front and rear wheels are characterized by the use of 4 brake pads to ensure effective braking. These products differ only in design, although the principle of operation is similar.
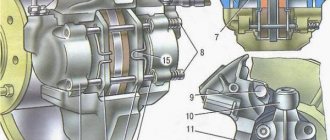
The rear pads of the VAZ 2107 are presented in the form of an arched steel structure, on the outer part of which a friction layer is applied. It is due to the friction of this layer against the inside of the drum that the car stops. If you do not replace the brake elements in a timely manner, this will be fraught with the development of unpredictable consequences, because the most important thing for any car is the serviceability of the braking system.
It is necessary to change the rear brake pads on a VAZ-2107 when the friction lining wears down to a thickness of less than 1.5 mm. It will not be possible to determine this fact without removing the wheel and dismantling the drum. But this is one of the main ways to determine whether the brake system is faulty. There is a second option, which is more convenient and does not require dismantling the rear wheel.
To do this, you need to listen for signs of squeaking of the rear wheels, as well as grinding and lack of braking effect, but this can lead to damage to the drum itself. You can squeeze the handbrake while standing on a slope and check that it is working properly. Of course, the cable on the handbrake may become loose, but if you tighten it and still have no effect, then it’s time to start replacing the pads.
If the rear brakes are not functioning, then it is time to change the pads. It is recommended to change them as a set on both rear wheels, since they are often worn out at the same time. What is the process of replacing rear brake pads on a VAZ-2107 will be determined further.
Features of replacing rear pads
At the beginning of the work, it should be noted that the handbrake must initially be lowered to its lowest position. This will allow you to dismantle the brake drum and thereby get to the worn parts. To begin replacing the brake pads of a VAZ 2107, it is necessary to remove the rear wheel:
- There is a drum behind the wheel, which also needs to be removed. There are no problems with this, so we move on.
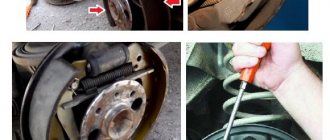
- After removing the drum, it is necessary to inspect the worn pads. If the thickness of the friction lining exceeds 1.5 mm, then there is no need to replace the products. Before carrying out further work, it is necessary to clean the mechanism from dirt and dust. To do this, you can use a brush or cloth.
- If the products need to be replaced, then you need to take a screwdriver and then remove first the upper, then the lower connecting springs. If you can’t dismantle it with a screwdriver, then you should use pliers. The photo below shows the springs that should be removed.
- Next, you need to remove the clamps, which consist of a rod, a washer and a spring. These washers must be rotated 90 degrees to remove them through the slots. This is what the washers that hold the pads look like.
- Similar procedures are carried out with the second block.
- After removing the springs and clamps, the pads are removed independently.
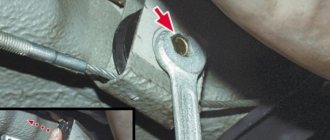
- The parking brake locking pin is straightened. The photo below shows the location of the locking pin. Now you need to unscrew the parking brake lever. This can be done using pliers. After this, the washer is removed, then the lever.
- During the dismantling process, you will have a question, what to do with the parking brake tip? It must be disconnected from the product and then left hanging.
- If necessary, it is recommended to replace all parking brake parts that were removed from the old product with new ones.
We recommend: Three ways to close the starter directly
The rear brake pads on the VAZ 2107 should be installed in the reverse order of removal. Before installation, remember to bring the brake cylinder pistons as close as possible. Despite their simple design, installing them is much more difficult than the front ones. But having completed the procedure once, all subsequent repairs will be much easier for you.
The cost of new pads starts from 800 rubles per set, but it is important to purchase high-quality products, and not Chinese “consumer goods”. Not only the service life of the products, but also the braking of the car will depend on this. This completes the replacement procedure; if you have any questions, be sure to ask them.
The life and health of the driver and passengers depend on the condition of the braking system. Owners of "sevens" often independently monitor the condition and replace the brake pads of the car. This is a simple operation that does not require special tools or high qualifications. It is enough to have basic plumbing skills and know how to change brake pads on a VAZ 2107 .
Replacing the rear brake pads of a VAZ 2109 – Lada Master
We change the front and rear brake pads of a VAZ 2110 ourselves.
There can be many reasons for replacing the brake pads on the rear wheels of a VAZ 2109, but most often this is caused by wear of the friction linings. The work process is not complicated, but requires care, since the car will be hung on a jack if you do not have the opportunity to lift it on a lift.
When to change brake pads on the rear wheels
There are no clear regulations for replacing brake pads on the rear wheels of a VAZ 2109, because the frequency of their replacement depends on many factors:
- quality of friction linings;
- driving style;
- operating conditions;
- the material from which the pads are made.
First of all, brake pad wear appears during active braking, when the car stops maintaining its trajectory. This indicates rather a problem in the brake system, but the possibility of uneven wear of the pads on the right and left wheels cannot be ruled out.
Also, creaking and noise during braking and insufficient tightening of the handbrake, provided that all elements of the handbrake drive are in good working order, indicate wear of the pads. In rare cases, the friction lining may crumble due to overheating during prolonged braking and during operation in difficult conditions.
Preparatory work
Replacing the rear brake pads of a VAZ 2109 begins with placing the car on a level surface. Since you will have to jack up the car, you should carefully secure the car.
The situation is further complicated by the fact that you will have to release the handbrake. Therefore, it is necessary to place wheel chocks, or simply wooden blocks, under the front wheels and put the car in first gear.
You need to take this seriously, because many operations will have to be performed under the machine.
For the work, we will prepare the necessary tool, which should be at hand during the process:
- wheel wrench;
- pliers;
- standard set of keys;
- wooden block;
- set of heads with extensions.
Removing the rear pads
The operation of replacing the pads begins with removing the wheel, so before putting the car on a jack, you need to remove the wheel bolts with a wheel wrench. Only after this can you put the car on a jack and remove the wheel.
- Using a socket or a 12-mm open-end wrench, remove the two guide pins from the hub.
- The brake drum should come off easily, but there are times when it sticks to the hub, in which case it should be helped with a wooden block. To avoid damaging the brake drum, it is not recommended to use a hammer. The drum may crack or become deformed. If this does not help, then take the guide pins and screw them into the other two threaded holes. Thus, the pin will rest against the hub and press out the drum. The pins must be tightened evenly to avoid distortion.
- After this operation, you can gain direct access to the brake pads.
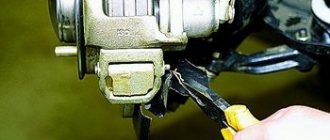
- Loosen the handbrake cable. We can only gain access to the compensator by removing the resonator. In order not to disassemble the muffler, you need to assemble an extension from a set of heads of sufficient length so that you can unscrew it with a 13mm head and a wrench. It is better to use a wrench with a ratcheting mechanism, this will simplify work in tight spaces.
- We unscrew the locknut with a 13mm wrench, and then with the assembled extension we release the handbrake tension cable as much as possible.
- To remove the pads, you must disconnect the handbrake drive. We remove the cotter pin from the fixing pin and press the pin so that it does not interfere with the removal of the mechanism.
- Carefully remove the spring from below using pliers, then remove the limit spring from the front block.
- Remove the upper spring with pliers and remove the front pad.
- Remove the spacer bar.
- We take out the lever that sets the pads in motion, freeing it from the cable.
- Remove the rear block, freeing it from the lateral movement limiter.
Installing new pads
To install new brake pads, you need to connect them with the upper tension spring and install a spacer bar. Install the pads on the caliper, and then reassemble in reverse order.
After assembling the unit and installing the wheel, do not forget to tighten the handbrake cable. In the normal position of the body, when it is not loaded, the handbrake should lock the rear wheels in 3-4 clicks.
After completing this simple operation, we will put the rear brake circuit in order and at the same time adjust the parking brake. Watch your brakes and good luck on the road!
Replacing the front pads of a VAZ 2107
To replace the pads you must perform the following steps:
- Jack up the car and remove the wheel.
- Treat the pad guide pins with WD-40.
- Remove the cotter pins from the fingers using pliers.
- Using a hammer and a bit (or a thin screwdriver), knock out the pins and remove the springs that press the pads.
- Separate the pads using a strong screwdriver or pry bar.
- Remove the old front pads of the VAZ 2107.
- Check the thickness and condition of the brake disc. If it is deformed or less than 9mm thick, replace it.
- Press in the brake cylinder pistons completely. This can be done by inserting the old pads into place and spreading them all the way using a pry bar.
Tip: Before completely recessing the pistons, you should check the brake fluid level. As the pistons retract, the fluid level rises. To prevent brake fluid from spilling out and getting on body parts and damaging the paintwork, you can take a little of it from the reservoir using a syringe or syringe.
- Insert new front brake pads on the VAZ 2107.
- Insert the pins of the front pads and secure them with cotter pins.
- Install the pad springs.
- Press the brake pedal several times so that the pistons come out of the brake cylinders and compress the pads.
- Install the wheel and lower the jack.
After replacing the VAZ 2107 pads on one wheel, you need to replace them on the second.
At the end of the operation, you should check the brake fluid level and add it if necessary.
Article number and approximate price for original front pads for VAZ 2107
The original front brake pads of the VAZ 2107 have catalog number 2101-3501090. The price of consumables is 260-380 rubles. The manufacturer of native products is the enterprise OJSC TIIR.
ATTENTION! A completely simple way to reduce fuel consumption has been found! Don't believe me? An auto mechanic with 15 years of experience also didn’t believe it until he tried it. And now he saves 35,000 rubles a year on gasoline! Read more"
Front pads VAZ 2107
When product replacement is required
Both the front and rear wheels are characterized by the use of 4 brake pads to ensure effective braking. These products differ only in design, although the principle of operation is similar.
The rear pads of the VAZ 2107 are presented in the form of an arched steel structure, on the outer part of which a friction layer is applied. It is due to the friction of this layer against the inside of the drum that the car stops. If you do not replace the brake elements in a timely manner, this will be fraught with the development of unpredictable consequences, because the most important thing for any car is the serviceability of the braking system.
It is necessary to change the rear brake pads on a VAZ-2107 when the friction lining wears down to a thickness of less than 1.5 mm. It will not be possible to determine this fact without removing the wheel and dismantling the drum. But this is one of the main ways to determine whether the brake system is faulty. There is a second option, which is more convenient and does not require dismantling the rear wheel. To do this, you need to listen for signs of squeaking of the rear wheels, as well as grinding and lack of braking effect, but this can lead to damage to the drum itself. You can squeeze the handbrake while standing on a slope and check that it is working correctly. Of course, the cable on the handbrake may become loose, but if you tighten it and still have no effect, then it’s time to start replacing the pads. If the rear brakes are not functioning, then it is time to change the pads. It is recommended to change them as a set on both rear wheels, since they are often worn out at the same time. What is the process of replacing rear brake pads on a VAZ-2107 will be determined further.
We recommend: Replacing rear brake pads on VAZ-2110, 2111, 2112
Features of replacing rear pads
At the beginning of the work, it should be noted that the handbrake must initially be lowered to its lowest position. This will allow you to dismantle the brake drum and thereby get to the worn parts. To begin replacing the brake pads of a VAZ 2107, it is necessary to remove the rear wheel:
Replacing brake pads on a VAZ-2107
There are several very important points that must be taken into account when replacing rear brake pads. For example, before starting work, you must lower the handbrake to the lower position. Both in the case of the front and rear, it is impossible to replace only a pair of pads, but all 4.
If you replace only one side, it may turn out that the new pads are much harder than the old ones or, on the contrary, they will brake better due to the complete absence of carbon deposits. Therefore, one side - with old pads - will skid during heavy braking.
Dismantling:
- First of all, remove the wheels and drums.
- Most likely, the brake system will be dirty, so it needs to be thoroughly cleaned. After this, you may not even need to change the pads themselves if the thickness of the gasket exceeds 1.5 mm. Using a brush you can quickly and efficiently clean the system. But never use strong solvents or other chemicals when cleaning.
- Remove the horizontal spring located on top. To do this, use a screwdriver or pliers to help yourself unfasten the element from one end, and then easily release the second.
- Once you remove the spring, you will notice a pair of bolts that support the piece that holds the pads in place. This is called a bowl. Press it down and turn it clockwise 90°, after which you can remove it. Before completely removing the bowl, feel for the rod on the back side and hold it, otherwise it will get lost.
- Remove the other compression spring that became visible after getting rid of the bowl. After this, remove the rod behind it. These elements prevent the block from being removed.
- The released block can now be removed. But both pads are attached to each other by a spring, which should be taken into account when removing them one by one.
- The opened spacer bar can be easily removed simply by hand. If you don't get rid of it, it will interfere.
- After you remove the front pad, only now can you remove the second (rear) pad using the same principle. During the process, you will be disturbed by the tip of the standing cable, which engages with the element being removed. It can be detached and just left hanging.
- The time has come to confirm or refute your assumption about the breakdown of the brake pads. Check whether they need replacing: use a caliper to measure the thickness of the lining in several places, which should be at least 1.5 mm. The replacement method, if necessary, will be described below.
- Using thin pliers, unpin the parking brake lever pin. Remove the released washer and remove the lever. As a result, the finger itself will be freed. The parking brake is commonly called a “handbrake”. All the parts you removed will then be installed on the new handbrake in the reverse order of dismantling. For the handbrake to work, it will need to be raised.
Installing new brakes:
- Check the tightness of the nuts securing the brake shield to the beam. If they need to be tightened, the tightening torque is 41.6-51.4 N*m (4.2-5.2 kgf*m).
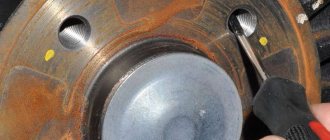
- Clean the seating surface with sandpaper, it is located at the flange and brake drum.
- Remove the collar that has appeared on the drum during use. Start the car and engage first gear, which will cause the rear drums to move. Use a file to remove the bead. Then turn off the engine and remove the drum.
- Install the pads in reverse order of removal.
If you are doing everything for the first time and are still poorly oriented in the details of your car, use the detailed video instructions.
Replacing the rear brake drums and pads of a VAZ-2107 with your own hands
Brake drums and pads are replaced when they are damaged or the working surface is worn out. The brake drum is replaced with a new one if its internal diameter is equal to or greater than 251 mm. Brake pads are replaced with new ones when the lining thickness is equal to or less than 1.5 mm.
In addition, oiling, poor connection with the base, chips, uneven wear and other defects are not allowed. The pads can only be replaced as a set on both sides of the car.
To check the remaining thickness of the pads, there is an inspection hole under the plug on the rear wall of the brake shield.
For work we will need:
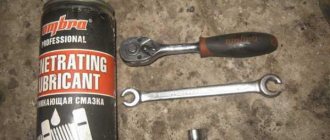
— Keys 7, 8, 10, 17, screwdriver, bit, mounting blades, file, hammer, pliers — Wire brush, sandpaper, rags — Vernier calipers — Two long M8 bolts — A set of new pads and brake drums, a repair kit for pad support struts , spacer springs, if necessary - “Liquid Key”, graphite, copper or LSC-1 grease
Before work, the rear wheels of the car must be suspended, the car must be secured in place with stops, and the parking brake lever must be lowered down until it stops.
We remove the wheel, clean it from dirt, and use a “liquid wrench” to treat the two mounting pins and the axle flange. Unscrew the pins and remove the drum.
If the drum cannot be removed by hand, then screw two M8 bolts into the threaded holes of the drum and evenly press the drum from the axle shaft flange, tapping it with a rubber hammer or through a wooden spacer. Disconnect the end of the upper tension spring from the front brake pad, then from the rear pad and remove it. Remove the lower tension spring.
We press on the upper cup of the pressure spring, rotate it 90° and remove the spring with the lower cup; when replacing, we also pull out the rod. We remove the front brake pad, spacer bar, and then similarly the rear pad, disconnect the end of the parking brake cable from the drive lever. After removing all the parts, clean the brake mechanism from dirt and wear products.
We inspect the condition of the working cylinder protective caps, possible leaks, and wear of the brake mechanism elements. We measure the thickness of each lining in several places - in any place it should be at least 1.5 mm.
To replace the rear brake pad, you must move the parking brake lever to a new pad.
We assemble the brake mechanism with new elements in the reverse order.
Make sure that the ends of the pads fit into the sockets on the pistons at the top and the brake shield at the bottom, and that the pad support posts are locked in the desired position.
We clean the seating surfaces of the axle shaft flange with a wire brush or sandpaper. Lubricate the seating flange of the axle shaft and the drum seat with copper, graphite grease or LSC-1 grease.
We install the new brake drum in place, center it with the punch along the mounting holes and tighten the pins with moderate force; it is also advisable to lubricate the threads of the pins.
If the drum does not fit onto the pads, bring them together by resting two mounting blades against the flange of the brake shield. Please note that this may cause the brake fluid level in the reservoir to rise.
If installation is still difficult after this, loosen the tension on the rear parking brake cable.
Press the brake pedal several times to set the wheel cylinder pistons to their working position.
Reinstall the wheel and check that it rotates easily. Re-adjust the parking brake cable tension. Over time, after grinding in the parts, this operation will need to be repeated.
A short video of the process:
What is needed to replace brake pads
To change the brake pads of a VAZ 2107, you will need the following tools and accessories:
- jack;
- wheel wrench;
- set of wrenches;
- hammer;
- bit or thin screwdriver;
- metal brush;
- rag (rags);
- a powerful flat-head screwdriver or pry bar;
- pliers;
- screwdriver;
- WD-40;
- new pads.
Important: VAZ 2107 pads must be changed only as a set: both left and right at the same time.
The front brakes of the “seven” are disc type, the rear brakes are drum. Accordingly, the design of the pads and the procedure for replacing them are different.
How to change rear brake pads yourself
Before you start replacing worn parts, you need to carefully inspect other mechanisms to make sure that there are no other “surprises”. Together with the drum system, they often break down: the drum, the cylinder leaks, the handbrake cable gets jammed.
Video
For effective repairs, the car must be driven into a hole or jacked up. Regardless of the brand and features of the mechanism, the process of replacing brakes is carried out in several phased steps:
- The wheel is dismantled.
- Inside the hood, the brake tank cover is removed;
- Parts are cleaned of dirt.
- The guide bolts are unscrewed.
- The pads are removed with a screwdriver and replaced in pairs.
- The system is checked upon ignition.
Working with a drum system is much more difficult than working with discs. However, if you follow the rules and take your time, this experience will become a useful skill that will help you deal with similar problems on your own in the future.
Interesting to know! Note! Rear brakes have an average mileage of about 50 thousand km, front brakes last much less - from 10 to 15 thousand
km. The check is carried out every 10 thousand kilometers.
Required tools and materials
To perform repairs yourself, you need to purchase special tools. Buying at the market or second hand increases the chances of getting low-quality products. Counterfeits, although they look like the original, will not last long.
It is better to purchase car parts from a dealer who supplies original parts from the company. In this case, a guarantee is provided for the operation of the pads, and it is possible to return the purchased product.
To work you need to prepare the following tools:
- jack;
- a set of keys;
- sledgehammer;
- balloon;
- screwdriver;
- bar;
- wd-40 spray;
- pliers.
Step-by-step replacement of rear pads on a VAZ 2107
You can replace the rear drum pads using the algorithm below.
- Raise the rear of the car using a jack and remove the wheel.
- Remove the drum.
- Disconnect the lower spring. To do this, you need to pry it off with a screwdriver.
- Using pliers, rotate the cotter pins until they align with the slots located on the washer.
- Turn the cotter pin on the other side as well.
- Straighten and remove the cotter pin that secures the handbrake lever.
- Remove the upper spring using a screwdriver.
- The above actions will cause the pads to fall down. After this, you need to disconnect the lever from them.
- Inspect the springs. If necessary, purchase a repair kit for the VAZ 2107 drum brake and replace the failed elements.
- Reassemble everything in the reverse order of removal.
The safety of the VAZ 2107 car depends on the braking system. Therefore, if any difficulties or questions arise when replacing the pads, it is recommended to watch the corresponding thematic video. This will help you avoid maintenance errors.
We remove the old ones
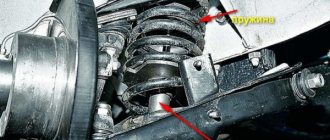
We jack up the rear wheel of the VAZ 2107 and remove it. You must first take the necessary safety measures: install shoes under the wheels, place a safety stand under the body. This task is usually not difficult. Next it will be a little more difficult. It happens that the brake drum gets stuck to the axle shaft, and it is impossible to remove it using standard means.
In this case, the drum is “torn off” - the guides are unscrewed, the car is started, the gear is engaged and the speed is increased, and then the brake is sharply pressed.
Be very careful when performing this operation - ensure that the VAZ 2107 is securely secured so that it does not fall off the jack.
- We remove the brake drum and check the condition of the brake pad linings. In addition to wear, there may be a partial breakage of the linings, since, unlike the front ones, the rear ones are not solid. We determine whether one or both pads need to be replaced.
- Using a flat-head screwdriver, remove the lower tension spring;
- Using pliers, remove the spring clamps from the guides, turning them until the slots match;
- Using a screwdriver, press on one end of the upper spring and remove it.
This is the last action, after which nothing holds the pads anymore, and they fall.