Purpose
A lambda probe (oxygen sensor) is necessary for the normal functioning of ignition systems and the preparation of a combustible mixture. Measuring the oxygen content in the exhaust gases passing through the exhaust tract, it transmits the received data to the ECU. Pre-installed software processes the received information and optimizes the composition of the combustible mixture, as well as the ignition timing, which allows:
- Develop maximum engine power in all operating modes.
- Reduce fuel consumption.
- Reduce the content of harmful substances in exhaust gases.
This becomes possible when a stoichiometric combustible mixture containing fuel and oxygen necessary for its combustion in certain proportions enters the cylinders. Measured in kilograms, the optimal ratio of air to gasoline is 14.7:1, and in calculations is denoted by the letter λ (lambda), borrowed from the Greek alphabet. Hence the name - lambda probe.
Device
Structurally, the VAZ-2110 oxygen sensor is designed in the same way as similar devices installed on other cars. It consists of:
- Housings with a protective tip in which slots are made.
- Two electrodes, one of which (internal) is made of zirconium, and the other (external) is made of platinum.
- Wires with a connector with which the lambda probe is connected to the vehicle's on-board electrical wiring.
The principle of operation of the sensor is based on the potential difference between electrodes heated to 300 - 400 °C. The higher the difference, the less oxygen is contained in the exhaust gases.
Visual inspection
The check should always begin with a visual examination of the condition of the oxygen sensor.
- Inspect the wires. They must be intact, without traces of damage or defects. Check all connectors for tight connections.
- Soot on the lambda probe indicates a malfunction of the device heater. Also, such deposits are caused by an excessively rich air-fuel mixture.
- If you notice shiny deposits on the surface of the element, this indicates an excess of lead in the fuel you are filling the tank with. This situation requires mandatory replacement of the oxygen sensor, since lead could damage the internal device.
- Gray or white deposits are the result of various types of fuel additives affecting the sensor. They often cause the probe to break and have to be replaced.
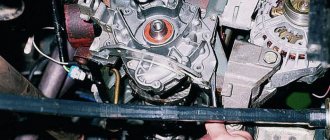
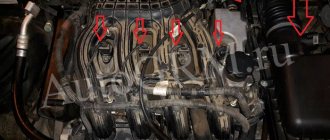
Location
During production, changes were repeatedly made to the design of the VAZ-2110. Therefore, depending on the specific modification of the car, the lambda probe may be located in different places:
- In the upper part of the exhaust pipe, near the resonator (on models of early years of production).
- On the exhaust manifold, in front of the catalytic converter (on new 1.6 liter engines).
The latest models of cars, equipped with sixteen-valve engines, were equipped with two oxygen sensors, one of which is located in front of the catalytic converter, and the other behind it.
Symptoms of a problem
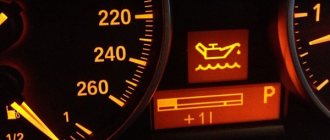
The main culprit for the failure of the lambda probe is low-quality fuel, due to which carbon deposits form on the electrodes, causing overheating of the contacts. Wire breaks occur less frequently. Most often, the driver finds out about a breakdown when the CHECK ENGINE lamp lights up, and computer diagnostics issues a fault code P0131. But it also happens that the ECU, for some reason, does not see the problem. In this case, the driver may suspect something is wrong, based on the following characteristic signs:
- Increased fuel consumption.
- Deterioration of the traction characteristics of the internal combustion engine.
- Unstable operation of the motor (vibrations, dips, floating speed).
If suspicion arises, it is necessary to first carry out a visual inspection. If there are no mechanical damages, control measurements should be taken.
Restoring the performance of the lambda probe by cleaning
In some cases, the oxygen sensor stops working only because the holes in the protective screen and the ceramic tip itself are covered with soot. To restore the working capacity of the part, it is necessary to clean the lubricating zone from soot, but when performing such work, you must follow certain rules. It is important not to use for cleaning:
- metal brushes;
- sandpaper;
- files;
- other objects that can damage the ceramic element.
The best method to get rid of contaminants is to soak the ceramics of the lambda probe in a solution of orthophosphoric acid, but to do this, you must first carefully saw off the protective cap. If acid cannot be found, you can use a rust converter, which is sold in stores selling auto chemicals. Of course, to clean the part from soot deposits, the sensor must be removed.
To soak a ceramic tip, it must be placed in liquid for 15-20 minutes; the soot should disappear from the surface on its own. If the deposits are not completely removed, they can be cleaned with a soft toothbrush. After the procedure, you need to secure the protective screen using camp welding. When it is not possible to restore the lambda's functionality, there is only one option left - to buy a new oxygen sensor.
Related articles:
- The starter spins, but the car does not start - a list of all possible options When a car internal combustion engine runs smoothly, starts and stops properly, the car owner feels comfortable and does not think about possible […]
- Computer diagnostics of GAZ 3110 and GAZ 31105 car engines Using diagnostic computer equipment, when diagnosing a GAZ engine, various errors that occur in the ECM are identified. Each error is assigned its own [...]
- Inexpensive Uzbek car Daewoo Nexia Korean cars in Russia began to gain popularity in the late nineties and early 2000s, and the budget car Daewoo Nexia was beloved by Russians for its practicality […]
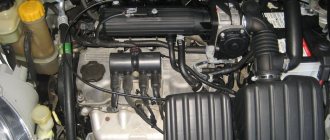
Examination
To detect faults, it is best to visit a service center and seek help from diagnostic mechanics who have special equipment at their disposal. If this is not possible, you can arm yourself with a multimeter and perform a series of control checks. To do this you will have to:
- Attach thin needles to the tips of the multimeter. They are necessary in order to take measurements without disconnecting the sensor from the electrical wiring.
- Warm up the engine to operating temperature. Only in this case will the lambda probe begin to function, and the results obtained will be correct.
- With the ignition on, measure the voltage between the signal (black) wire and ground (gray wire). On the connector these are terminals 1 and 2. It is normal if you get a reading of 0.45 - 0.50 volts.
- Measure the resistance between the white wires (terminals 3 and 4). It should be in the range from 2 to 10 ohms.
- Start the engine and measure the voltage between the signal wire and ground again. It should change cyclically, every 1.5 - 2 seconds, within 0.1 - 0.9 volts.
If at least one of the indicators is outside the specified limits, the lambda probe is faulty and should be replaced. Measurements taken with the connector disconnected from the electrical wiring may be incorrect.
Diagnostics
It should be noted that checking the functionality of the lambda probe should be carried out in conjunction with vehicle maintenance, at intervals of every 10 thousand kilometers. However, if the car was operated in unfavorable climatic conditions, which is applicable to Moscow, or in aggressive mode, maintenance should be carried out more often. This is the manufacturer's recommendation.
The manufacturer also does not recommend performing independent diagnostics or repairs if there are signs of any malfunction. To fix it, you should contact a service center.
Diagnosis by visual inspection
The beginning of any diagnosis begins with a visual examination. Primary methods for diagnosing an oxygen sensor include:
- visual inspection of the electrical wiring of the lambda probe for integrity and absence of mechanical damage or rupture;
- inspection of the lambda probe itself. There should be no soot or hard deposits on its surface.
Carbon deposits on the oxygen sensor housing indicate a faulty electric heater or an excessively rich combustible mixture entering the combustion chambers.
Solid deposits on the sensor body indicate poor fuel quality and the presence of harmful impurities in it, or an incorrect proportion of the combustible mixture.
If there are no visible causes of the malfunction, more detailed diagnostics are performed.
Detailed diagnostics
At the service center, by connecting a diagnostic computer, all electronic systems of the car are checked. If one of them malfunctions, the on-board computer detects the error and stores it in its error register. Each error has its own code, which makes it easy to find out the source of the problem.
In the absence of a diagnostic computer, plumbing diagnostics are required, which involves partial disassembly and diagnostics with a voltmeter. It consists of the following operations:
- starting the engine and warming up to operating temperature;
- engine stop;
- disconnecting the sensor connector and connecting a voltmeter to it;
- restarting the internal combustion engine and one-time increase in idle speed to 2500 thousand per minute;
- disconnecting the vacuum pipe from the fuel pressure regulator;
- checking the voltmeter readings. If the reading is equal to or less than 0.8 V, the 2110 oxygen sensor is faulty. It cannot be repaired, therefore, replacement is necessary;
- checking the oxygen sensor to detect a lean fuel mixture. In this case, the air supply to the engine is artificially cut off. If the voltmeter reading is 0.2 V or less, the sensor is working. Other readings indicate a sensor malfunction.
Also in the service center, using a voltmeter, it is possible to check the signal supplied to the lambda probe from the electronic control unit. If the supplied voltage is higher than 0.45 V, more detailed diagnostics of the control unit is necessary.
Price
Even on a VAZ-2110 of the same year, there are oxygen sensors not only with different catalog numbers, but also from different manufacturers. Most often this is Lada 2112-3850010-20. Prices for this part in stores range from 2200 – 3200 rubles. But you can also choose a replacement from a reputable brand. Among the possible options:
- Bosch 0 258 006 537 (2300 – 2700 r).
- NGK 1628 (2500 – 2800 r).
- Era 570023 (1700 – 2000 rubles).
All these components will normally fulfill their purpose.
Causes of failure
Old and new samples
Before starting the test, it is necessary to determine the reasons why the sensor stopped working correctly.
- Coolant has leaked inside the device.
- Unsuitable cleaning agents were used to clean the body of the device.
- The gasoline you fill your car with contains large amounts of lead. A popular breakdown typical for cars of those owners who prefer cheap gas stations.
- A banal overheating of the heat-resistant sensor, which again occurs due to low-quality fuel.
Article on the topic: How to check and clean the mass air flow sensor on a VAZ 2114
Replacement
To remove/install the lambda probe, you must first warm up the engine to operating temperature and then turn it off. It is very difficult to unscrew the part when it is cold. After reaching the desired temperature, be careful not to get burned:
- Disconnect the connector.
- Armed with an open-end or socket wrench, first move the sensor from its place, and then unscrew it and carefully remove it from the socket.
- Make sure the socket is not damaged. Sometimes scale mounds form in it, which can damage the new part during installation. If there are any, they will have to be removed with a file.
- Install the new sensor and tighten it properly.
- Connect the connector to the electrical wiring.
If you do everything correctly, no problems should arise.
What and how can you check the lambda?
To check, you will need a digital voltmeter (preferably an analog voltmeter, since its “sampling” time is much shorter than that of a digital one) and an oscilloscope, if possible, the measurements will be more accurate. Before checking, you should warm up the car since lambda operates correctly at temperatures above 300C°.
First we look for the heating wire:
We start the engine, do not disconnect the lambda connector. We connect the negative probe of the voltmeter (ordinary gauge) to the car body. We “poke” the positive probe on each wire contact and observe the voltmeter reading. When the positive wire of the heater is detected, the voltmeter should show a constant 12 V. Next, using the negative probe of the voltmeter, we try to find the negative wire of the heater. We connect to the remaining contacts of the sensor connector. If a negative contact is detected, the voltmeter will again show 12 V. The remaining wires are signal wires.