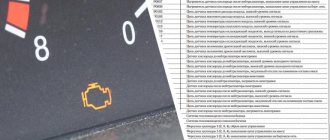
What temperature sensors are installed on the VAZ 2114
DTOZH is designed to monitor the temperature of antifreeze in the cooling system circuit of the power unit. After receiving data about the current “degree”, the ECU increases (lowers) the speed of the power unit in order to adjust the temperature.
The quality composition of the fuel mixture depends on the accuracy of the DTOZ readings. The service life of the sensor is unlimited, with the exception of mechanical damage or short circuit in the circuit.
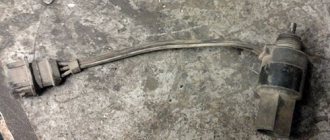
Where it is located: the standard installation location is the outer part of the thermostat housing. The base is screwed into the thermostat body. Two power contacts are connected to the upper part for power supply from the on-board network.
- A melting element is installed inside the DTOZh base. As soon as the antifreeze degree reaches “90”, the contacts close and the on-board computer signals an error.
Next, the driver decides on the advisability of stopping the car immediately, carrying out preventive maintenance, or calling a tow truck.
Catalog articles, prices of temperature sensors for VAZ 2114:
| Name | Catalog item | Price in rubles |
| DTOZH (original), 8 valves, injector | 2115-3811053 | from 350 |
| DTNV (original) | 2115-3828210 2115-3828210-02 2115-3828210-03 | from 350 – 400 |
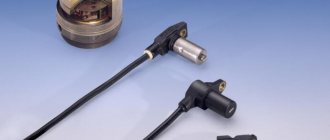
The device is installed in the mounting location of the front bumper, to the left of the center of the radiator grille. The DTOS shape is conical with two contacts on the back side.
The fuse in the mounting block at number 18 is responsible for the operation of the DTOS. Lack of temperature readings on the dashboard is the first sign of equipment failure.
How to set up the sensor
First of all, mechanics advise replacing the thermistor with a new one. In most cases, this is enough for the outside temperature to be displayed correctly. If this does not help, you can use one of the following tips:
- Check the contacts, if they are not oxidized, then you need to look at the sensor itself. You need to bend the legs on it a little.
- If the contacts on the chip oxidize, they need to be wiped with alcohol and dried. The best way to do this is to leave the car in the garage overnight.
- To check the wiring you will need a VAZ-2114 electrical circuit diagram. Start by checking the contacts in the X6 block of the mounting block (MB) on the motor side (usually the blue-red wire) in the 7th cell. Next, you need to check the contact in the 15th compartment of the MB block X4, located on the passenger compartment side. In the dashboard, testing is carried out in block X2, most often the conductor occupies 1 cell there (may vary depending on the year of manufacture of the car). According to the diagram, the “ground” is common with the headlight unit, so you need to look for it there. If there is no contact, then look for an open circuit.
How to replace it yourself
- Open-end wrench set to “19”;
- Rags;
- Additional lighting as needed;
- New "measuring device".
- We install the VAZ 2114 in the perimeter of the repair area;
- We turn off the engine, open the hood;
- We provide priority safety measures: block the rear row of wheels with wheel chocks, squeeze the parking brake;
- Remove the terminals from the DTOZH, unscrew the sensor with a key;
- We replace the device with a new one, screw it in, and put on the power terminals again.
We turn the key in the ignition, activate it, and check the functionality of the equipment. Add the missing amount of antifreeze as needed.
Sequence of actions when replacing DTOS with your own hands:
- We install the VAZ 2114 on a flat platform, squeeze the parking brake for safety reasons;
- Open the hood and remove the power terminals from the battery. This is necessary in order to prevent short circuits in the circuit during work;
- To the left (right) of the center of the front bumper, the sensor is located on the radiator. Unscrew it;
- We insert a new one into its regular place, screw it on, put on the terminals;
- We assemble the structure in reverse order;
- We put the power terminals on the battery.
How to connect an air temperature sensor yourself
The mechanism itself has two contacts, one of which must be connected to the vehicle ground, and the second to the ECU. But, before starting all work, you need to make sure that the on-board computer supports collaboration with a specific type of sensor. Information can be found in the documentation.
As for the installation itself, there are no difficulties here. You just need to follow the instructions for connecting the DTNV. After connecting the sensor, make sure that the instrument panel display shows the correct temperature.
If the incorrect outside air temperature is still displayed, you should “restart” the on-board computer. You just need to remove the positive terminal for 5-10 minutes, and then reconnect it. After the operation has been completed, the DTNV should begin to display the actual ambient temperature.
What is an intake air sensor and where is it located?
The intake air temperature sensor (abbreviated as ДТВВ, or IAT in English) is needed to adjust the composition of the fuel mixture supplied to the engine. This is necessary for normal operation of the motor in different temperature conditions. Accordingly, an error in the intake air temperature sensor into the manifold threatens excessive fuel consumption or unstable engine operation.
DTVV is located on the air filter housing or behind it . It depends on the design of the car. It is performed separately or can be part of the mass air flow sensor (MAF).
Places where the intake air temperature sensor is located
Intake air temperature sensor malfunctions
There are several signs of a malfunctioning intake air temperature sensor. Among them:
- interruptions in engine operation at idle (especially in the cold season);
- Engine idle speed is too high or low;
- problems with starting the engine (in severe frosts);
- reduction in engine power;
- excess fuel consumption.
Malfunctions may be due to the following reasons:
- mechanical damage to the sensor caused by exposure to solid particles;
- loss of sensitivity due to contamination (increased inertia of transient processes);
- insufficient voltage in the car's electrical system or poor electrical contacts;
- failure of the sensor signal wiring or its incorrect operation;
- short circuit inside IAT;
- contamination of the sensor contacts.
Checking and cleaning DTVV.
Checking the intake air temperature sensor
Before checking the intake air temperature sensor, you need to understand the principle of its operation. The sensor is based on a thermistor. Depending on the temperature of the incoming air, the DTVV changes its electrical resistance. The signals generated by this are sent to the ECM in order to obtain the correct fuel mixture ratio. Diagnosis of the intake air temperature sensor must be performed based on measuring the resistance and the magnitude of the electrical signals emanating from it.
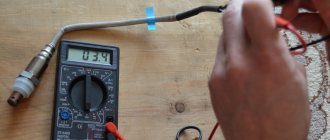
The test begins with calculating the resistance . To do this, use an ohmmeter by removing the sensor from the car. The procedure is carried out by disconnecting two wires and connecting them to a measuring device (multimeter). The measurement is carried out in two engine operating modes - “cold” and at full speed.
Sensor resistance measurement
In the first case, the resistance will be high-resistance (several kOhms). In the second - low-resistance (up to one kOhm). The operating instructions for the sensor must contain a table or graph with resistance values depending on temperature. Significant deviations indicate improper operation of the device.
As an example, we present a table showing the relationship between temperature and resistance of the intake air sensor for the engines of the VAZ 2170 Lada Priora car:
| Intake air temperature, °C | Resistance, kOhm |
| –40 | 39,2 |
| –30 | 23 |
| –20 | 13,9 |
| –10 | 8,6 |
| 5,5 | |
| +10 | 3,6 |
| +20 | 2,4 |
| +30 | 1,7 |
| +40 | 1,2 |
| +50 | 0,84 |
| +60 | 0,6 |
| +70 | 0,45 |
| +80 | 0,34 |
| +90 | 0,26 |
| +100 | 0,2 |
| +110 | 0,16 |
| +120 | 0,13 |
At the next stage, check the connection of the conductors to the control device . That is, using a tester, make sure there is continuity of each contact to ground. Use an ohmmeter, which is connected between the temperature sensor connector and the disconnected connector of the control device. In this case, the value should be 0 ohms (note that you need a contact diagram for this). Check each contact on the sensor connector with an ohmmeter with the connector disconnected against ground.
What can cause the outside air temperature sensor of a VAZ 2114 to fail?
The mass of sensors in the vehicle operating system facilitates monitoring of various processes, and also supports the correct functioning and proper distribution of resources between various systems.
- Outside air temperature sensor VAZ 2114
- What should you know about a device malfunction?
- Bottom line
Over the years, the inside of a car becomes more and more functional and more and more controllers are required to maintain its functionality.
For example, the outside temperature sensor was not used at all in early car models. In truth, these types of detectors began to be introduced everywhere not so long ago. This is evidenced by the fact that a good part of car enthusiasts to this day are sincerely perplexed when the statement is made that the use of such devices is convenient and even necessary.
The operation of the DTVV is similar in principle to a duct air temperature sensor. The DTVC measures the air in the duct based on readings sent to the head unit from the sensing element. In general, the car device works almost the same. Both of these devices are thermistors - they convert temperature level data into resistance readings.
Outside air temperature sensor VAZ 2114
The model of the temperature sensor that is installed on this VAZ car is 2115-3828210 and its modifications 02 and 03. Some of them are marked VDO - there is an opinion that devices with such markings are more accurate, faster and more modern.
In the most modern car models, the system for measuring the external air temperature allows the owner to start auto-warming of the engine in case of frost.
It is worth noting that early Lada models were not equipped with such devices. Over time, the situation began to improve for the better. For example, VAZ 2110, VAZ 2112 have so-called trip computers, which may not be as informative as the devices of more modern cars such as Samara-2, but could also show the level of air heating outside the car.
What's good about the VAZ 2110? You can install the DTVV on it yourself. It must be taken into account that it should be located so that water and direct sunlight do not fall on it. It is also worth mounting it away from hot parts of the car in order to avoid heating, which may cause incorrect readings.
The best choice would be the space allocated by the manufacturer for the detector. Or - a place near the towing area under the bumper. It is important to install the device under the front bumper, since under the rear bumper, due to warm air from the engine, the readings may be distorted. Not much, but it won’t have the required accuracy.
It is located in the front of the vehicle - between the bumper and radiator.
Like any other sensor in domestic cars, this one can be changed on your own, the main thing is to read the instructions and safety instructions and strictly follow them. You can, of course, take the car to a service station and entrust it to professionals, but if you have some skills, it will be easier and cheaper to change the device yourself.
It is worth noting that the DTVV cannot be repaired - only replaced, but this is not so scary, since the cost of the spare part is very low.
Intake air temperature sensor repair
How to repair an explosive temperature sensor.
The simplest type of IAT repair is cleaning . To do this, you will need some kind of cleaning liquid (carb cleaner, alcohol, or other cleaner). However, remember that you need to work carefully so as not to damage the external contacts .
If you encounter a problem where the sensor shows the wrong temperature, instead of completely replacing it, you can repair it. To do this, buy a thermistor with the same or similar characteristics as the thermistor already installed on the car.
The essence of the repair is to re-solder and replace them in the sensor housing. To do this you will need a soldering iron and the appropriate skills. The advantage of the repair is significant savings in money, because the thermistor costs about a dollar or less.
Where is the temperature sensor installed?
Most often, such a useful device is mounted behind the radiator grille of a car or installed under the front bumper. Manufacturers thus minimize the risk of heat from the air conditioner or power unit of the car. In addition, this installation option allows you to protect the element from direct sunlight, under the influence of which the device may show unreliable readings. To prevent this component from heating up from the hot asphalt surface in the summer, it is mounted at a height of more than 30 cm from the road surface. With these important considerations in mind, manufacturers can place the temperature sensor in the most accessible location without having to install a lot of additional wiring. In practice, the exact placement of this device directly depends on the company that manufactured the car.
Replacing the intake air temperature sensor
The replacement procedure is not difficult and does not take much time. The sensor is mounted on 1-4 bolts that need to be unscrewed, and also with a simple movement, disconnect the power connector to remove the incoming air sensor from its place.
When purchasing a new sensor, make sure that it is suitable for your car. Its price ranges from $30.60 depending on the car brand and manufacturer.
It cannot be said that the VAZ 2114 is a very modern car filled with electronics. However, the list of sensors used that are connected to the electronic control unit is quite impressive on the fourteenth.
Each of these devices is responsible for certain functions and collects data transmitted to the main computer of the car. This way, the ECU controls the entire process and makes appropriate changes, so that the driver does not have to look for the reasons for the failure or insufficiently efficient operation of a particular unit.
Main characteristics
The ambient temperature is read by an electronic thermistor. The VAZ-2114 is equipped with one of the following types of sensor:
You can purchase any of these options, as they are interchangeable. They can be made by different manufacturers, the price of this component is about 300 rubles, so it is impractical to repair it. In unclear situations, it is necessary to change the device.
The information from this device is read by an on-board computer, which reads pulses from the sensor and converts them into readings on the instrument panel. If you use a faulty sensor for a long time, the pulse from it may be read with an error, then the “Check” light on the dashboard will light up. A car enthusiast can look for problems for a long time until he notices a difference between the actual air temperature and the one shown by the sensor.