The shank oil seal is one of the elements of the rear axle on VAZ-2107 vehicles. In general, it has a long service life, but incorrect installation, installation of low-quality parts or wear can lead to a leak in the area of the drive gear shank of the gearbox. The malfunction can be easily diagnosed if oil drops suddenly appear on the outer part of the gearbox housing.
If there are any, the shank oil seal needs to be replaced (see video below). If there are no drops, and the gear housing is covered with a thin oily film, then there is no need to install a new oil seal.
Please note that the replacement process requires certain qualifications from the performer. In case of gross errors, the gearbox may need to be disassembled and repaired, and this work can only be done in a workshop.
How to remove the rear axle oil seal
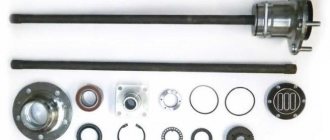
To replace the shank oil seal on a VAZ-2107, stock up on a torque wrench and a two-jaw puller.
The algorithm of actions is as follows:
- Drive the VAZ-2107 to a place convenient for performing work (this can be a hole or an overpass).
- Drain the lubricant from the rear axle.
- Separate the driveshaft from the drive gear flange.
- Pull the handbrake lever all the way up. This ensures that the machine is secured while the repair is being carried out.
Use a twenty-four socket wrench to remove the mounting nut holding the shank flange. The flange can be secured without applying the handbrake. To do this, insert the bolts into the holes in the drive gear flange. Then hold the flange to prevent twisting and use a tool (such as a pry bar) to tighten the flange retaining nut.
After that, do the following:
- Take a two-jaw puller and, with its help, press out the shank flange. Your task is to remove it from the splines of the drive gear. If you're lucky, you'll be able to tighten the part manually, without using a special tool.
- Remove the washer from the shank, as well as the flange with the dirt deflector.
- Pry up the oil seal using a screwdriver, then remove it from the gearbox housing.
How to install the rear axle oil seal
Now proceed directly to replacing the shank oil seal. Before installing a new part, make sure there is no wear or signs of corrosion on the cylindrical surface of the flange (the one in contact with the seal). If such problems exist, polishing work will be required. If a deep groove has formed on the surface, install the oil seal with a slight offset. This means that after pressing, it should protrude slightly in relation to the end part of the gearbox neck.
The algorithm for installing a new shank oil seal is as follows:
- Treat the landing site and the working edge of the installed part with grease.
- Press the oil seal into place. To do this, apply light blows with a hammer to the bushing of the required diameter, and if there is none, to the steel cage of the oil seal itself.
- Replace the shank parts that were previously removed. Replace the old self-locking nut holding the shank flange with a new one.
- Raise the rear of the car, then disengage the axle shafts from the differential gears.
Now grab the bolts that are screwed into the hole in the shank flange and pull the nut on the shank with a force of 120 Nm (use a torque wrench). After tightening to the required torque, return the flange by hand. If everything is normal, the resistance to rotation should be slight and uniform. If there are clicks or jamming, the gearbox will have to be repaired at a specialized service station.
Check the shank bearings for axial play. If this occurs, increase the pulling torque by 20-30 N*m. Now check the part again for play and smooth rotation. If the problem cannot be resolved, the gearbox needs repair. Situations are possible when, during the process of tightening the nut, the torque remains unchanged, but it is not possible to achieve the required value of 120 N*m. This fact signals the “sagging” of the spacer sleeve and the need to replace it. To perform this work, you will have to disassemble the rear axle gearbox.
If the test was successful, the replacement of the shank oil seal can be considered completed.
Video: Replacing the rear axle gear oil seal
If the video does not show, refresh the page or
Oil seals, also known as rubber cuffs, when installed correctly and of good quality, have a fairly long service life, regardless of which element they protect. However, the reality is that, trying to save on one thing (on purchasing original spare parts, timely filling of high-quality oil, etc.), motorists very often ruin something else, and this other thing is often rubber cuffs. Fortunately, they are inexpensive - several times cheaper than the services for replacing them. Although the replacement itself is not difficult, the main thing is to find the time, place and stock up on the necessary tools. Of course, it is not possible to talk about replacing all such elements in a car at once within the confines of one article, so now we will only consider replacing the rear axle gearbox seal of a VAZ 2107.
Where is this seal located?
To be able to replace the rear axle gear oil seal, the first thing you need to do is find it. For this:
- drive the car into a viewing hole, or even better, an overpass (the work will be carried out under the car);
- tighten the handbrake;
- drain the oil from the rear axle gear housing;
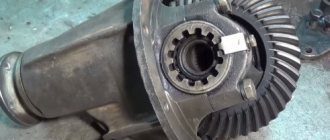
- Locate where the driveline is attached to the rear flange.
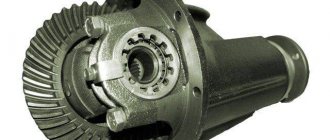
It looks like this:
The blue arrow here indicates the rear flange of the gearbox, the green arrow indicates one of the bolts securing the cardan drive (there are 4 such bolts in the mount), and the red arrow shows the lock nut securing the flange itself.
In order to finally get to the oil seal itself (it is shown in the small photo), this entire assembly will need to be unscrewed, and from there it will only be a matter of little work.
But more on this a little later, while we deal with another, no less important issue.
Step-by-step replacement process
- We drive the car into the pit and unscrew the propeller shaft mounting bolts, having previously made a mark on the flank of the cardan and gearbox. After unscrewing the cardan, we tie it with a wire so that it does not interfere.
Using a special wrench, we secure the flange from turning and, using a wrench or a twenty-seven socket, unscrew the nut. The key for fixing the flange is shown in the photo below. You can also screw two universal joint mounting bolts into the flange and insert a powerful screwdriver between the bolts.
Unscrew the plug and drain the oil from the rear axle.
How do you understand that the rubber cuff of the rear axle gearbox of the “seven” needs to be replaced?
Recognizing the wear of the rear axle gearbox seal can, by and large, be done only visually and tactilely - by smudges (precisely smudges, not fogging) of oil on the gearbox in the place where the rubber cuff is located. However, as practice shows, a fairly small number of car owners notice such a breakdown in a timely manner (before the oil completely drains out of the gearbox), therefore, most likely, minor vibrations and/or a strong hum in the VAZ 2107 rear axle gearbox will need to be replaced. rear of the car while driving.
Be that as it may, if you find oil leaks on the gearbox, do not rush to immediately go to the oil seal; in addition, a poorly tightened drain plug can lead to oil leakage, so first of all you should check its condition, and a clogged breather. You will be alerted to the latest breakdown by replacing the rubber seal of the rear axle gearbox too often. However, in order not to wait for these replacements and, accordingly, waste money, we recommend checking the breather for functionality even before starting to deal with the oil seal, so that if necessary, clean or replace it at the same time as the cuff.
This is quite simple to do: grab the breather, or rather its cover, as shown in the photo, press and rotate it in different directions. This should come out easily, without any jamming, otherwise the breather also needs to be replaced. If the cover moves easily, but oil in the oil seal area still oozes, remove the breather (to do this, twist the thread indicated by the arrow in photo 2 with a wrench) and thoroughly rinse it with carburetor cleaning liquid or gasoline, and then blow it with compressed air. Reinstall the removed element, run the repair for 30 kilometers, and then check the rear axle gearbox again for leaks. If it occurs, change the oil seal, and if such a replacement happens again soon, change the breather.
How to replace the rear axle gearbox seal of a VAZ 2107 with your own hands: step-by-step instructions.
- Secure the driveshaft using a screwdriver/spade identical to the photo and remove the 4 bolts securing the driveshaft.
- Carefully hang the disconnected shaft, for example, on a rope to the muffler.
- Determine the moment of resistance to turning the drive gear (it will help you avoid making mistakes during assembly), this can be done in different ways.
Method No. 1 - the most accurate - involves using a torque wrench or a dynamometer and a rope.
If using the latter tools, wind the rope around the flange a couple of turns, as shown in the photo, and attach a dynamometer to its free end. Then start winding the rope, gradually pulling back the device. As soon as the flange begins to rotate with the rope, pay attention to the readings of the device and write them down. After replacing the oil seal and installing everything in its place, this figure should remain unchanged.
If you have chosen a torque wrench as an assistant, make sure that its measurement range (scale) is at least 147 Ncm (15 kgfcm), and start tightening the flange mounting nut with it. The force that you need to move it from its place is the required moment of resistance.
Method No. 2 is useful for those who do not have any measuring equipment at hand, but have a colored marker. All you need to do is make 2 marks with it: the first on the nut, the second on the flange itself - as shown in the photo.
Pay attention to the mark on the nut - it should be made exactly on top, and not on the edges, otherwise it may simply be erased when unscrewing.
- Using a wrench and a socket, unscrew the central fastening nut of the gearbox flange, but first you will have to lock the flange itself. The most convenient way to do this is with a homemade wrench made from a piece of pipe and two bolts (see photo).
IMPORTANT!
If you use marker marks to determine the moment of resistance, be sure to count how many full turns the nut will make relative to the flange until the cavity is unscrewed. Suppose it made 15 such revolutions, which means that during the assembly of this element the nut will need to be tightened exactly 15 revolutions, and then simply align its mark with the mark on the flange.
- Remove the flange (indicated by a blue arrow in the photo) using a special puller (indicated by a red arrow in the photo) or a hammer and a wooden spacer (you can use a plank as it).
- Using any available tool (screwdriver, wrench, etc.), pry up the oil seal and remove it from the installation hole.
Wipe the area where the rubber cuff was installed thoroughly with a rag to remove dirt. So that you do everything correctly, we have indicated with arrows the places where you need to wipe. The oil seal in this photo has already been cleaned.
- Take a new rubber cuff and lubricate its working surface (shown by the arrow) - the one that will go into the hole - with Litol-24 lubricant.
- Install the rear axle gear oil seal in its seat using a mandrel (it can be an ordinary metal pipe, an old bearing, etc.) of a suitable diameter.
The mandrel should rest exactly on the edge of the oil seal: place the mandrel on the seal and start hitting it until the latter is “recessed” to a depth of 1.7-2 millimeters from the end of the gearbox.
In this case, it is most convenient to check yourself with a caliper, although in the absence of such a simple ruler will do.
- Lubricate the working surface of the rubber cuff from the inside with clean oil, and do the same with the flange. Firstly, additional lubrication in such parts is never superfluous, and secondly, this action will contribute to better pressing.
- Complete the replacement of the VAZ 2107 rear axle gearbox seal by installing all previously removed parts in reverse order, but do not forget about the correct moment of resistance, otherwise you risk very soon returning to repair, but not the rubber seal, but the gearbox, rear hub and the whole a number of details.
Video.
Oil seal, the old name for a rubber cuff, received its term when hemp, felt or felt, generously lubricated with lard and grease, served to seal the joint between the shaft and the housing in various mechanisms. And if an oil leak occurs, on a VAZ 2107 it is necessary to replace the gearbox seals in worn units.
- Currently, the oil seal is a rubber part produced by factories producing such products, and is called a reinforced rubber cuff for shafts. Companies produce oil seals according to state standards, one of them is GOST 8752-79.
- In addition to sealing the connection, the oil seals serve to protect the components from the penetration of dust and moisture into them. Depending on the purpose, products can be of different shapes and diameters.
- The operating temperature range of the seals is from minus 60 to plus 170 degrees.
- Rubber type: fluorine rubber; silicone or nitrile butadiene rubber - determines the scope of application of the product.
- The maximum pressure at which oil seals are used is 0.05 MPa.
- The working environment for their use can be: mineral oil, water, diesel fuel.
- Types of reinforced cuffs:
- single-edge, used to prevent liquid from flowing out of the device;
- single-edged with a boot, additionally protect the mechanism from dust getting inside.
Depending on the type of production, oil seals are:
- reinforced with molded edge;
- reinforced with machined edges.
Instructions for replacing the rear axle gearbox on a VAZ 2107
1.
Replacing the VAZ 2107 gearbox oil seal begins with draining the oil from the crankcase, which is installed on the rear axle.
2.
Then you need to screw back the plug that is located on the oil drain hole.
3.
On the rear axle, both axle shafts must be removed from the beam.
4.
We unscrew the 4 nuts and take out the bolts that connect the gear flange and the universal joint. To prevent the cardan from turning, it must be secured using a mounting blade.
5.
Use a screwdriver to separate the flanges.
6.
We wind a strong cord around the flange of the drive gear, to do this we make several revolutions of the shaft.
7.
After this, use a dynamometer to wind the cord and check the resistance when turning the gear. Remember his indicator. This is the main point when replacing the gearbox seal on a VAZ 2107. Or simply remember the number of turns of the nut
8.
Unscrew the nut holding the gear flange. We fix
wrench and remove the washer.
9.
Remove the flange.
10
.Remove the drive gear oil seal from the crankcase neck of the unit using a screwdriver or open-end wrench.
01
02
03
Step-by-step instructions for installing a new oil seal.
1
.We clean the seat from traces of corrosion.
2.
Lubricate the crankcase surfaces of the new cuff with Litol-24 lubricant. This high-quality lubricant does not leak, is not afraid of water, and retains its properties in any weather.
01
02
3.
We put the oil seal in place and, using a hammer and a mandrel, press it into the gear housing. The oil seal should not be allowed to become distorted. The pressing depth from the crankcase end will be from 1.7 to 2 mm.
Tip 1:
If you do not find a mandrel, use the ring of the faulty bearing or a piece of pipe of the required diameter.
4
.After replacing the oil seal, install the gear flange and washer.
5.
Using a special wrench, hold the flange and tighten the nut that secures it. The tightening torque, depending on the moment of resistance of the gear to rotation, is 117-254 Nm.
Start tightening with a smaller torque, and do not forget to check the resistance torque of the nut.
Tip 2:
When turning, exceeding the moment of resistance of the gear indicates excessive deformation, which is obtained by the spacer sleeve installed between the bearings. In this case, it is necessary to replace the bushing. Repairs are carried out using special equipment and tools. It is best to do it in specialized auto repair shops.
Tip 3:
The key that secures the flange when tightening the nut can be made with your own hands from a pipe into which 2 bolts with nuts are attached. By following the instructions, you can replace the rear axle gearbox seal on a VAZ 2107
Brief summary of the replacement Replacing the oil seal in the gearbox is not so difficult; this work can be done in a garage if you have an inspection hole. By doing this operation yourself, you will save your finances and time spent traveling to services.
The shank oil seal is one of the elements of the rear axle on VAZ-2107 vehicles. In general, it has a long service life, but incorrect installation, installation of low-quality parts or wear can lead to a leak in the area of the drive gear shank of the gearbox. The malfunction can be easily diagnosed if oil drops suddenly appear on the outer part of the gearbox housing.
If there are any, the shank oil seal needs to be replaced (see video below). If there are no drops, and the gear housing is covered with a thin oily film, then there is no need to install a new oil seal.
Please note that the replacement process requires certain qualifications from the performer. In case of gross errors, the gearbox may need to be disassembled and repaired, and this work can only be done in a workshop.
How to remove the rear axle oil seal
To replace the shank oil seal on a VAZ-2107, stock up on a torque wrench and a two-jaw puller.
The algorithm of actions is as follows:
- Drive the VAZ-2107 to a place convenient for performing work (this can be a hole or an overpass).
- Drain the lubricant from the rear axle.
- Separate the driveshaft from the drive gear flange.
- Pull the handbrake lever all the way up. This ensures that the machine is secured while the repair is being carried out.
Use a twenty-four socket wrench to remove the mounting nut holding the shank flange. The flange can be secured without applying the handbrake. To do this, insert the bolts into the holes in the drive gear flange. Then hold the flange to prevent twisting and use a tool (such as a pry bar) to tighten the flange retaining nut.
After that, do the following:
- Take a two-jaw puller and, with its help, press out the shank flange. Your task is to remove it from the splines of the drive gear. If you're lucky, you'll be able to tighten the part manually, without using a special tool.
- Remove the washer from the shank, as well as the flange with the dirt deflector.
- Pry up the oil seal using a screwdriver, then remove it from the gearbox housing.
How to install the rear axle oil seal
Now proceed directly to replacing the shank oil seal. Before installing a new part, make sure there is no wear or signs of corrosion on the cylindrical surface of the flange (the one in contact with the seal). If such problems exist, polishing work will be required. If a deep groove has formed on the surface, install the oil seal with a slight offset. This means that after pressing, it should protrude slightly in relation to the end part of the gearbox neck.
The algorithm for installing a new shank oil seal is as follows:
- Treat the landing site and the working edge of the installed part with grease.
- Press the oil seal into place. To do this, apply light blows with a hammer to the bushing of the required diameter, and if there is none, to the steel cage of the oil seal itself.
- Replace the shank parts that were previously removed. Replace the old self-locking nut holding the shank flange with a new one.
- Raise the rear of the car, then disengage the axle shafts from the differential gears.
Now grab the bolts that are screwed into the hole in the shank flange and pull the nut on the shank with a force of 120 Nm (use a torque wrench). After tightening to the required torque, return the flange by hand. If everything is normal, the resistance to rotation should be slight and uniform. If there are clicks or jamming, the gearbox will have to be repaired at a specialized service station.
Check the shank bearings for axial play. If this occurs, increase the pulling torque by 20-30 N*m. Now check the part again for play and smooth rotation. If the problem cannot be resolved, the gearbox needs repair. Situations are possible when, during the process of tightening the nut, the torque remains unchanged, but it is not possible to achieve the required value of 120 N*m. This fact signals the “sagging” of the spacer sleeve and the need to replace it. To perform this work, you will have to disassemble the rear axle gearbox.
If the test was successful, the replacement of the shank oil seal can be considered completed.
Video: Replacing the rear axle gear oil seal
If the video does not show, refresh the page or
Oil seal, the old name for a rubber cuff, received its term when hemp, felt or felt, generously lubricated with lard and grease, served to seal the joint between the shaft and the housing in various mechanisms. And if an oil leak occurs, on a VAZ 2107 it is necessary to replace the gearbox seals in worn units.
- Currently, the oil seal is a rubber part produced by factories producing such products, and is called a reinforced rubber cuff for shafts. Companies produce oil seals according to state standards, one of them is GOST 8752-79.
- In addition to sealing the connection, the oil seals serve to protect the components from the penetration of dust and moisture into them. Depending on the purpose, products can be of different shapes and diameters.
- The operating temperature range of the seals is from minus 60 to plus 170 degrees.
- Rubber type: fluorine rubber; silicone or nitrile butadiene rubber - determines the scope of application of the product.
- The maximum pressure at which oil seals are used is 0.05 MPa.
- The working environment for their use can be: mineral oil, water, diesel fuel.
- Types of reinforced cuffs:
- single-edge, used to prevent liquid from flowing out of the device;
- single-edged with a boot, additionally protect the mechanism from dust getting inside.
Depending on the type of production, oil seals are:
- reinforced with molded edge;
- reinforced with machined edges.
Replacing oil seals
If an oil leak is detected in the machine components, it is necessary to replace the VAZ 2107 gearbox seals.
Replacing the cuff of the drive gear of the rear axle gearbox of a VAZ 2107
Rear axle malfunctions due to oil leakage:
To replace the VAZ 2107 gearbox seal on its drive gear you will need:
- Wrenches for “13” and “24”.
- Screwdrivers.
- Calipers.
- Torque wrench.
- Dynamometer.
- Mounting blade.
- Durable cord.
Instructions for removing the cuff
So:
- Replacing the oil seal in a VAZ 2107 gearbox begins with draining the oil from the crankcase mounted on the rear axle
. After this, the plug on the oil drain hole is screwed back on. - Both axle shafts are removed from the beam on the rear axle.
- The four nuts are unscrewed and the bolts connecting the universal joint flange and the drive gear flange are removed. To fix the cardan (see) from turning, it must be held with a mounting blade.
- The flanges are separated using a screwdriver.
- A strong cord is wound around the drive gear flange. To do this, you need to make several revolutions of the shaft. Then, while winding the cord using a dynamometer, check the moment of resistance when turning the drive gear. Its meaning is remembered. This is very important when replacing the rear axle gearbox seal on a VAZ 2107
- The nut holding the drive gear flange, which is secured with a special key, is unscrewed and the flat washer is removed.
- The flange is removed.
- The drive gear oil seal is removed from the crankcase neck of the assembly, for which it is pryed off with a screwdriver.
Installing a new oil seal
So:
- The seat is cleaned of traces of corrosion.
- Litol-24 lubricant is used to lubricate the working surfaces of the crankcase of the new cuff.
- The oil seal is put in place and pressed into the gear housing through a mandrel with light blows of a hammer. The oil seal must not be skewed. The pressing depth is 1.7 - 2 millimeters from the end of the crankcase.
Tip: If there is no mandrel, you can use a piece of pipe or a ring of a faulty bearing of a suitable diameter.
- After the oil seal on the VAZ 2107 gearbox has been replaced, the drive gear flange and washer are installed.
- The flange is held with a special wrench and the nut securing it is tightened. The tightening torque depends on the moment of resistance of the drive gear to turning, and is equal to 117 - 254 Nm.
It is necessary to start tightening with a smaller torque, periodically checking the resistance moment of the nut being tightened.
Tip: Exceeding the moment of resistance of the drive gear when turning indicates excessive deformation resulting from the spacer sleeve, which is installed between the bearings. In this case, the bushing needs to be replaced. Why do you need to disassemble the gearbox and adjust the engagement of the main gear gears? Repairs must be carried out using special tools and equipment. It is better to do it in specialized workshops.
Once the VAZ 2107 axle gearbox seal has been replaced, installation of the removed parts is done in the reverse order of removal.
Tip: The key that secures the flange when tightening the nut can be made with your own hands from a pipe onto which two bolts with nuts are attached, as shown in the photo.
In this way, the rear axle gearbox seal of the VAZ 2107 is replaced.
Nut tightening
Now the most important point is tightening the nut. To properly tighten the nut, you need to do the following preparatory work:
- hang up the rear of the car;
- Remove the rear wheels and brake drums.
Tighten the nut until you feel a slight stop. Thus, we brought the bearings to the new spacer, but we had some play in the flange. He must be. This is normal with a new spacer. We tighten the nut 10-20 degrees and check the play. Tighten the nut until there is no play. Next, we check the force to break the flange using a digital scale. We insert the “ear” of the scale into the hole on the flange and pull it at a right angle. The breaking force should be within 1.5 kg. If the force is less than 1.5 kg, tighten the nut literally by degree and control the force.
The tightening torque of the nut should be from 12 to 26 kg/m when the required force is achieved. If, after eliminating the flange play, the force is significantly more than 1.5 kg, then you have received a defective spacer sleeve.
Next we reassemble:
- We fasten the cardan according to the marks;
- Fill in new oil (you need to pour oil with API GL-4/GL-5 approvals, volume 1.5 liters);
- We install brake drums and wheels.
Replacing the oil seal in the steering gear
If an oil leak occurs in the steering gear, it is most likely necessary to replace the oil seals of the VAZ 2107 steering gear.
Removing the cuffs
Begin:
- Oil is drained from the gearbox housing. To do this, unscrew the adjusting nut and remove the lock washer.
- Unscrew the bolts holding the top cover of the gearbox using a key set to “13”.
- The head of the adjusting screw is removed from the groove on the bipod shaft and the cover is removed.
Tip: If the gap between the shaft groove and the screw head increases by more than 0.05 mm, it is necessary to install adjusting plates. Their installation pitch is 0.025 mm, the thickness of the elements is 1.95 - 2.2 mm.
- The bipod shaft with the roller installed on it is removed from the crankcase.
- Use a 13mm wrench to turn the bolts securing the worm shaft cover.
- Together with the gaskets for adjusting the ball bearings, the thickness of which is 0.1 - 0.15 mm, the cover is removed.
- The worm shaft and bearing are knocked out of the gearbox housing with light blows of a hammer made of soft metal. There are special tracks at the ends of the worm for the bearing balls.
- Carefully pry up and remove the worm shaft cuff using a screwdriver.
- The cuff of the bipod shaft is removed in a similar way.
- The outer ring on the second bearing is knocked out using a punch.
- All parts are washed in diesel fuel or kerosene.
- The working surfaces of the worm and rollers are carefully checked for signs of wear, damage or scuffing. The gap between the bronze bushings and the bipod shaft should be no more than 0.1 mm.
The surfaces of the cages, rings and balls must be free of any damage or signs of wear. Bearings must rotate freely without seizing. Any cracks on the crankcase are not allowed. Damaged or worn parts are replaced with new ones. Replacing gearbox seals on a VAZ 2107 is always done.
Steering assembly
So:
- All internal parts are lubricated with transmission oil.
- The inner bearing ring is pressed into the crankcase using a piece of pipe of a suitable diameter or a special device, which is used when replacing rubber-metal hinges in the front suspension.
- A cage with balls is inserted into the bearing ring.
- The worm shaft is installed.
- The outer bearing cage is placed on the shaft.
- The outer ring is pressed in.
- The cover with gaskets is installed.
- The cuffs of the bipod and the worm shaft are pressed in, the working edges of which are first lubricated with Litol-24 lubricant.
- A worm is installed in the crankcase.
- Using a set of adjusting shims, the turning moment of the worm is set to 2 - 5 kgf/cm.
- The bipod shaft is installed and the engagement gap is adjusted. The shaft turning torque should be 7 - 9 kgf/cm when the worm shaft rotates left and right by 30 degrees. When turned all the way, it gradually decreases to 5 kgf/cm.
- Conducted. Transmission oil is poured into the crankcase up to the lower edge of the filling hole.
The VAZ 2107 gearbox seal has been replaced. In more detail, all the work to prevent leaks in oil seals can be viewed in the video. With timely diagnostics of the operation of the components of the VAZ 2107 car, the use of high-quality parts and lubricants, the car will be used for a long time without major repairs, the price of which is much higher than constant preventive maintenance.