What to do if the speedometer and tachometer stop working
As practice shows, failure of the speedometer and tachometer is a fairly common occurrence.
On the one hand, such breakdowns do not affect the basic functions of the car, but on the other hand, the driver does not receive important information, which can lead to more serious malfunctions or even an accident.
Therefore, if your speedometer stops working or the tachometer needle begins to “take on a life of its own,” you need to urgently take some action.
In this article we will look at what and how to do.
The tachometer does not work on the VAZ 2110 injector reasons
REASONS FOR A NON-WORKING TACHOMETER
The tachometer in a car is used to indicate the number of revolutions of the engine crankshaft. Let's look at why the tachometer doesn't work and how to find and eliminate the cause of the breakdown. We will definitely dwell on the device and principle of operation, which will help to find out why the tachometer stopped working, the needle twitches or behaves inappropriately.
CLASSIFICATION BY OPERATING PRINCIPLE
- Mechanical or electromechanical tachometers with direct drive. The revolutions are transmitted to the dial indicator through a flexible shaft, which, through a worm gear, receives rotation directly from the crankshaft or one of the transmission shafts. The operating principle of the indicator is based on the phenomenon of eddy current induction. The operation and design of a magnetic tachometer are extremely similar to the operating principle of a car speedometer. In modern cars, a similar tachometer design is not used.
- Electric machine. A distinctive feature is the connection to a generator. It is used primarily on diesel engines, but for the purpose of unification, a device of this type can also be used on gasoline engines.
- Electronic. The signal can be taken either from the ignition system or directly from the computer. Installed on gasoline and diesel internal combustion engines.
DEVICE AND PRINCIPLE OF OPERATION
Main components of electric machine and electronic tachometers:
- measuring unit, or signal converter. It can be based on elements of analog circuitry or built using special microcircuits;
- display unit with analogue or digital display of the number of revolutions;
- auxiliary elements.
The operation of electronic tachometers is based on the conversion of individual signals or pulses captured from the computer, ignition system or generator into a signal “understandable” for the display unit.
CONNECTION DIAGRAM
When looking for the reason why the tachometer does not work, it is first of all important to understand the connection diagram and the type of signal. There are 3 typical connection schemes:
- to a contactless ignition system (the tachometer wire is connected to the primary circuit of the ignition coil). The operating principle is based on measuring the frequency of voltage surges in the primary circuit of the ignition system. Calculating the ignition angle is impossible without focusing on the number of crankshaft revolutions, therefore the sparking frequency directly depends on the crankshaft rotation speed. On 4-cylinder internal combustion engines, a full revolution of the crankshaft corresponds to 2 voltage pulses in the primary circuit. Accordingly, the higher the crankshaft rotation speed, the greater the frequency of voltage surges;
- connection to the contact ignition system. The operating principle and connection diagram are similar to the BSZ, but the design of the measuring unit will differ depending on the voltage of the input circuit;
- connection to the engine ECU. The principle of operation is still based on recording voltage pulses in the primary circuit of the ignition system, but the signal to the tachometer comes from the engine control unit;
- connection to the generator (the tachometer signal contact is connected to terminal W of the generator). The rotation of the generator pulley is carried out by a belt drive from the crankshaft, so the rotation speed of the generator rotor will always be proportional to the crankshaft speed. The change in the number of revolutions of the crankshaft can be calculated by constantly measuring the amount of EMF generated on the winding. By its operating principle, an electric machine tachometer resembles a conventional voltmeter.
SPECIFIC FAULTS
If the mechanical tachometer on a car stops working, there is mechanical damage to any of the structural elements. A broken cable of a flexible shaft, wear of the worm gear elements, the appearance of backlashes, deformations - all these reasons can cause the engine speed indicator to fail.
What to pay attention to if the electronic tachometer does not work:
- integrity of electrical wiring. In this case, it is important to check not only the signal wire, but also the ground and power supply of the instrument panel;
- quality of contacts. The presence of oxides and loose contact inside the chips may well cause the tachometer to fail;
- the integrity of the elements of the measuring unit, which are located behind the protective glass inside the dashboard. Among mechanical damage to transistors, burnout of microcircuits, tracks or swelling of resistors, the most common reason for a non-working tachometer is a violation of solder integrity. For example, on the Mitsubishi Padjero II, the appearance of microcracks in the soldering areas of the tachometer elements is a generally recognized disease.
On vehicles with an alternator connection, a non-functioning tachometer may indicate a faulty alternator. In this case, the breakdown is accompanied by the lighting of the low battery charge indicator and the sporadic lighting of a “garland” of warning lights on the dashboard.
In some types of design, changes in the linear resistance of high-voltage wires can make adjustments to the accuracy of the engine speed indication.
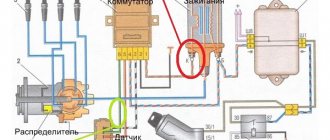
Connection diagram for the tachometer on VAZ-2110 vehicles with a fuel injection system:
2 – trip computer;
3 – ECM controller;
4 – crankshaft position sensor;
5 – ignition module.
Scheme for connecting the tachometer on a modern Volga: 1 – tachometer; 2 – generator warning lamp; 3 – generator; f – phase output (to the tachometer).
Find out more about how to connect a tachometer here
Most owners of a VAZ 2105 sooner or later think about installing a tachometer, as it is not provided as standard. Considering the options for installing a tachometer, such as: 03/06 tachometer in place of the standard instrument and the removal of additional instruments on a dashboard or rack, an external store tachometer, and here is another option for installing the instrument panel from 2110 (carburetor). I liked the option of installing the entire 2110 dashboard more. Firstly, the panel should fit in size instead of the standard one, and secondly, everything is electronic, a speed sensor will be installed (there is no rattling sound from the speedometer needle as on a cable drive). And also the opportunity to add exclusivity to the car.
I read a lot of information on the Internet, but most of all I liked the Love1y installation. Thanks for the idea and the pinout for the device.
Read also: Sign for courtyard area and residential area
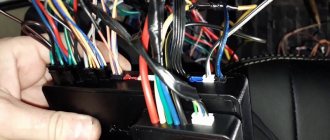
1 - checking the brake fluid level indicator. If you apply +, the brake light will light up. You can connect it to the red wire of the ignition switch, then, just like on 2110/2114, the lamp will be checked when the starter is turned on. 2 - alarm lamp, lights up when + is applied. 3 - high beam lamp, connect to the green-black wire. 4 - fuel level indicator, connect to the pink-red wire. 5 - to the speed sensor. 6 — speed signal output to the on-board computer. If it is, then take the speed signal from this contact. 7 - brake fluid level indicator, connect to the pink-blue wire near the lamp above the cigarette lighter. In the VAZ-2107, the lamp works the other way around: the sensor connects the lamp to ground and it lights up. You will have to either leave the lamp where it is, or in the new device, solder the lamp to + and swap the diodes (in this case, to check the lamp, pin 1 must be connected to ground, for example, to the parking brake lamp), or remove the black wire from the sensor on the tank, and connect instead the orange one from the EPHH unit, or the blue one from the ignition coil, while the diode in the wiring (between the beard and the glove compartment) must be disconnected; if this is not done, there will be a short circuit. 8 — left turn lamp, connect the steering column switch pad to the blue-black wire. 9 — right turn lamp, connect the steering column switch pad to the blue wire. 10 — instrument lighting, connect to the white wire. 11 - ground, connect to the black wire. 12 - power supply for devices, connect to the orange wire. 13 - if the tidy is simple (without microcircuits, etc.), then connect to the blue-red wire (fuel reserve lamp), if there is a display under the tachometer, then connect to the temperature sensor (take from VAZ-2114, one contact to the tidy , the other to ground, place it either in the passenger compartment or in the engine compartment, but so far from the engine and so that the wind does not blow). 14 - ground, connect to the white-black wire. 15 - low-voltage tachometer input (from the ECM), connect to the brown-blue wire. 16 - high-voltage tachometer input (from the coil), connect to the brown-blue wire. 17 - if there is a display under the speedometer, then connect it to the red-white wire at the brake light switch. 18 — coolant temperature indicator, connect to the green-white wire. 19 — outdoor lighting lamp, connect to the yellow wire. 20 - lamp for covering the carburetor air damper, connect to the gray-orange wire. 21 and 22 go to the ECM lamp. If the machine is injection, then connect one of the contacts to the orange wire, and the other to the remaining one. 23 - power supply for devices, connect to the orange-blue wire. 24 - handbrake lamp, connect to the brown wire. 25 - battery charge lamp, connect to the brown-white wire. 26 - low oil pressure lamp, connect to the gray-blue wire.
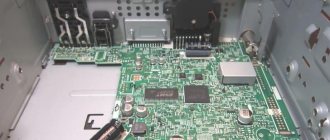
An old model 2110 dashboard was purchased.
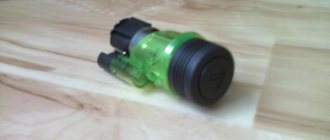
Speed sensor from injection 2109
Well, small things - terminals, wires, pads. I will install it parallel to the 2105 wiring so that I can return the standard tidy back.
Plans: sort out the wiring, change the lamps to LEDs, and install the panel in the dashboard (without any cracks, etc.)
Read also: How to wash a rubber mat in a car
Schematic electrical diagrams, connecting devices and pinouts of connectors
The first car from the Zhiguli family equipped with a tachometer was the VAZ 2103. Neither 2101 nor 2102 had such a device. The tachometer is used to measure the crankshaft speed. It is a revolution counter, showing their number by deflecting the scale needle to a certain angle. The tachometer is also indispensable when setting up the carburetor - its indicators are taken into account when adjusting the idle speed and the quality of the fuel mixture.
Connection diagram for tachometer VAZ-2108 and 2109
Let us immediately note that the fuel supply system – injector or carburetor – does not play a special role here. As you know, currently the most common are cars with the following engine types: gasoline or diesel. Depending on this, the tachometer is selected, unless, of course, it comes in the stock version. The thing is that on gasoline engines the tachometer reads data from the ignition coil, or rather, the impulses that arise here. However, the design of diesel power plants does not provide for this unit. Accordingly, here the tachometer reads pulses not from the ignition coil (for lack of one), but from the generator.
The first two wires (12-volt and Signal) are to contacts “B” and “K” of the ignition coil, respectively. All that remains is to secure the mass in any convenient place.
Schematic diagram of the tachometer electronics
Connecting modern electronic tachometers:
Read also: Cars made in China in Russia
A tachometer designed for a 4-cylinder engine cannot be installed on another, because the readings will be false. Therefore, select a tachometer in accordance with the make of the car and the number of cylinders.
VAZ tachometer connection diagram
A pulse must be generated for each short circuit of pin 2 to the common wire.
From the shaper, triggering pulses of an already defined size and shape B are supplied to the input of a waiting multivibrator assembled on transistors V2 and V4. The second step is connecting the tachometer to the diesel generator. If there are no problems, then the arrow will be at zero.
It is recommended to repair the tachometer exclusively at a car service center or service stations.
On the scale, zones of dangerous crankshaft speed are highlighted with colored lines.
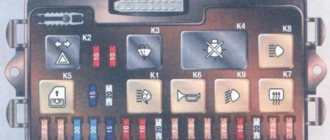
Cigarette lighter failure
It is its malfunction that often causes the shield to fail. The fact is that many car owners turn on various devices through the cigarette lighter, for example, a special vacuum cleaner, chargers, pumps and other devices. Due to the fact that these gadgets require high current, either the socket itself or fuse F19 often breaks, as a result of which the instrument panel on the VAZ-2110 does not work.
In addition, the cigarette lighter may become damaged if left on for too long. In this case, you can return the instrument panel to functionality by disconnecting the socket block. But it is worth saying that such manipulation will be successful only if fuse F19 is functioning. If it does burn out, it must be replaced.
Causes of malfunction on a VAZ 2110 with a carburetor
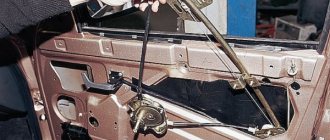
In the “ten” with a carburetor, torque is transmitted from the gear in the gearbox (gearbox) through a flexible shaft to the speedometer mechanism. In most cases, it is the shaft that may be causing the problem.
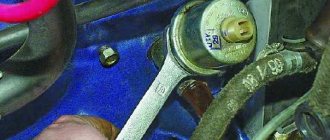
Flexible drive in the shell is the main cause of speedometer malfunction
If the speedometer stops working, first check the mounting points of the flexible drive . Tighten the nuts. If even after tightening the speedometer does not work, then the shaft has probably broken or there has been a breakdown in the mechanism on the instrument panel. In this case, the flexible shaft must be replaced. You can do this type of repair yourself. When installing a new drive, avoid extreme bending. Incorrect installation of the shaft will lead to unpleasant knocking.
If everything is in order with the flexible shaft and the instrument panel mechanism, then the problem is in the gear. It is located inside the checkpoint. We recommend that such repairs be carried out at a service station.
What does a tachometer do?
Its work is based on reading crankshaft revolutions. This is necessary in many life situations. Experienced car owners may argue that it is of no use on the VAZ 2105. This is fundamentally wrong. It’s enough to imagine a situation where you can’t hear the engine running due to noise on the street or loud music in the cabin. You can drive based on the speedometer, but what if the car, for example, is heavily overloaded or has a trailer?
To put it briefly, you can make a list of tachometer functions.
- Determining the optimal moment for changing gears.
- Detection of floating revolutions.
- Determination of surges and maximum torque.
- Idle speed adjustment.
- Helping beginners learn how to drive a car.
- Ease of use in noisy environments.
- Early detection of engine or electrical problems.
- Reduces engine wear and saves fuel thanks to timely gear changes.
There are many types of tachometers. What are the differences between them?
- Installation.
- Tachometer type.
- Differences between carburetor and injection systems.
- Connection method.
- Principle of operation.
VAZ 2105
Installation
There are 3 main options for this parameter:
Installation of standard devices is carried out in the panel. We are talking about a shield with a VAZ 2107. Remote ones can be located anywhere. They come with a special leg for fastening. You can use either adhesive tape or double-sided tape. In a word, everything depends on the flight of fancy. Non-contact tachometers do not require connection, which means that installation is not necessary for them. It should be taken into account that such devices are not designed for constant monitoring of speed. They are better suited for checking, tuning the engine and the main tachometer.
The cost of standard devices is the lowest, remote devices are slightly more expensive, and non-contact devices are several times superior to previous types.
By type, all tachometers are divided into:
A mechanical tachometer is a rarity. These are the very first devices that were installed on cars. Its use today has no basis other than adherence to retro style. Analog tachometers are the main type that is found on the VAZ 2105. They have the form of a dial and a arrow, less often, a vertical or horizontal scale. These are the devices installed in panel 2107, but they can also be remote.
The electronic type is housed in a plastic box and has a display. The revolutions are indicated here in digital form. Sometimes such devices have a slight delay in readings, but their accuracy is higher than analogue ones.
And the last type is the most modern. This is a digital tachometer. It has a lot in common with the electronic one, but the display is better. Capable of displaying several different dimensions at the same time and having a nice design. This is the most expensive type.
Injector and carburetor
Many car owners have long switched to using an injector instead of a carburetor. The tachometer of the injector and carburetor has a slight difference. But it will not work correctly, without intervention in the design. You need to pay attention to this.
Connection method
The device is selected for a specific type of engine. The connection is carried out strictly according to the tachometer instructions. The colors and purpose of the wires may vary greatly.
The most common connection is 3 wires:
This connection is used when replacing the tachometer on a panel from a VAZ 2107.
The second connection is more often used on remote devices. It looks like this:
- “+” to “+”, to the terminal marked “B+”;
- “–” to “–” or “ground”;
- “signal” to the coil (contact “K”).
There are all sorts of options that allow you to use the device for your own purposes. For example, the connection determines when and how the device will turn on. The choice depends on the owner’s knowledge of the car’s electrical circuits and the flight of his imagination.
Why does the speedometer break?
It is worth noting that in some cases it is not difficult to repair the speedometer yourself.
In others, you will need the help of specialists. Thus, oxidation of contacts is considered a fairly easy to fix fault. It is characterized by the “jumping” of the arrow, despite the fact that the speed of movement remains stable. The problem is resolved by cleaning the contacts.
The wires are frayed. This reason can be suspected by the chaotic movement of the needle when starting the engine. Meanwhile, experts note that sometimes the problem does not manifest itself for a long time. It can be identified using a tester.
Sensor failure. A speed control device whose performance is questioned is replaced with a known good one. If the speedometer begins to function normally after this procedure, then there is no point in further looking for damage. Often sensors become unusable after their housing is destroyed and water or dirt gets inside.
Connectors. They are located in the VAZ-2110 in a place where they are constantly exposed to dirt. As a result, the contact is broken and the speedometer needle moves chaotically. The connectors must be completely cleaned and the connection must be checked for reliability.
Often the speedometer also begins to malfunction due to shaft wear. In this situation, it will be possible to get rid of the problem only after completely replacing the above-mentioned part.
Expert recommendations
Some expert recommendations regarding diagnostics and repair of speakers:
- Diagnosis of the cause of unit failure should begin with a visual inspection of the speed sensor, as well as the wiring connected to it. As practice shows, the reason often lies in a broken wiring, in particular, in the place next to the plug.
- If the controller is covered with dust or oil, you need to dismantle it and wipe it thoroughly. Then you can put the sensor in place and try to check the performance of the speaker. There is a possibility that after these steps the speaker will operate normally.
- Under no circumstances should you drive with a non-working speaker, so if problems are found in its operation and you cannot check it yourself, you need to seek help from a specialist.
Sorry, there are no surveys available at this time.
Symptoms
Poor tachometer performance is due to several reasons. Symptoms of the malfunction are:
- Complete tachometer failure. The arrow completely or partially stops functioning. Often freezes in a certain position or trembles. The cause of the phenomenon may be an unstable contact connection in the power connectors.
- Poor start of a cold engine. The problem may be related to the connection of the autostart system to the tachometer. A connection problem or error disables the tachometer.
- Loss of power. Power is lost due to incorrect calculation of the fuel supply by the on-board system.
- Engine speed instability at low speeds.
- Increased fuel consumption.
- Complete loss of performance of the power unit. The cause may be a failure of the crankshaft sensor.
These symptoms become the reason for checking and troubleshooting.