First of all, you need to remember that the diode bridge on the VAZ-2114 is no different from the same unit on the VAZ-2109, VAZ-2110 and other models. Therefore, if you figure out how to determine the malfunction, it will not be difficult to identify it on any of the cars. There are several main symptoms; they can appear together or separately. Any of them requires an immediate check of the generator:
- The warning lamp, which lights up when the ignition is turned on, does not go out even after the engine is started. This is a general indicator of a problem, but if the diode bridge has failed, the lamp will light in any case. If a voltmeter is installed in the car, you can check its readings; the arrow will most likely be either in the red zone or at its very border.
- Another option is that the warning light does not light up when you turn the ignition key and does not light up after starting the engine.
- When measuring the voltage produced by the generator with the engine running, the reading is less than 13.5 Volts. You need to measure at the battery terminals.
- The next morning the car will not start due to a dead battery, although in the evening it was in normal condition. After charging the battery, it discharged again in a short time, and the generator housing becomes so hot that you can burn your hand on its surface.
- Extraneous noise appears under the hood, most often it is a whistle or howl. The noise level may vary depending on engine speed.
- Various errors appear - the ABS, ESP, and so on may light up. The power steering may stop working, the radio will begin to wheeze and freeze. Instead of a turn signal, the light turns on. All this manifests itself against the background of a dead battery, which does not charge due to a broken diode bridge.
- The headlights begin to dim or stop working altogether, and the air conditioner does not cool as it should.
These are the main signs of a diode bridge breakdown, but it is worth remembering that they may indicate other generator failures. Therefore, first of all, you need to accurately identify the faulty unit. It is not necessary to take the car to a service center for diagnostics; the car owner can do the work; a minimum set of tools is needed.
If the control light on the panel lights up or, conversely, does not work, first of all you need to check it and the control relay. Often it is these elements that are faulty, and not the generator.
How to check the diode bridge of a VAZ generator at home
Most motorists are comfortable with electronics, especially in modern cars; this is not surprising, given the complexity of modern engines.
A large number of different sensors and wiring instills fear in “our brother.” However, there are things that at first glance look very complicated, but in fact their repair and diagnostics are a piece of cake. Today we will talk about how to test a diode bridge with your own hands. saving money and time on a trip to specialists at a car service center. I once wrote about how to repair a VAZ 2101 generator. This time we will talk specifically about the diode bridge, or more precisely about how to check it at home.
It’s probably not worth talking about the role of a generator in a car; everyone knows that this is a very important part, without which one cannot imagine an engine. The service life of the battery largely depends on the performance of the generator. which receives charging from a generator.
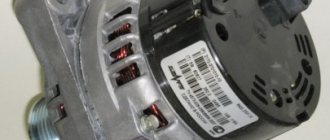
A diode bridge consists of four or six diodes that convert alternating current into direct current according to the principle of a bipolar rectification method. The rectifier diodes of the generator play the role of a gateway that allows current to flow in only one direction, preventing current from the vehicle’s on-board electrical network from passing to the stator windings. The diodes are located on the generator body and tend to burn out, there are several reasons for this.
Common causes of diode burnout:
- Ingress of moisture (for example, during engine washing).
- Dust, oil and dirt that can get into the generator while driving.
- When “lighting the car” when the battery is completely discharged, in case you accidentally mixed up “+” and “-“.
In fact, there are a large number of situations in which the diode bridge burns out, but of course we will not describe them.
Tasks of the VAZ diode bridge, causes and malfunctions
The generator circuit is very simple - it consists of a rotor with an excitation winding and a stator made of thin steel plates.
The three-phase stator winding is located in special slots, connected to the zero point and a group of four (sometimes six) diodes.
The task of a diode bridge is to convert the type of current from alternating to direct. The peculiarity of its operation is that current flows only in one direction - from the generator to the on-board network.
One of the most common breakdowns is the burnout of one or more diodes. The reasons may be different - moisture (dirt, oil or dust) getting into the generator, polarity errors in the event of “lighting” another car, and so on.
As we have already mentioned, checking the diode bridge of a VAZ even in a garage. All you need is a 12V light bulb and a multimeter.
Before starting work, it is advisable to remove the protective casing of the mechanism and disconnect the regulator terminals. Please note that the “positive” diodes have red wires, and the “negative” ones have black wires.
Let's look at two ways to check a diode bridge:
- Using a multimeter (tester).
- Using a light bulb.
Method number 2 - using a multimeter.
This option will help to identify which (or which) diode is faulty. True, this check can only be carried out by completely dismantling the alternator rectifier unit from the car, so do this first. Next, proceed to the following steps.
- Turn the multimeter into beeper mode. If your device does not have such a mode, set it to 1 kOhm.
- Place the probes against both ends of the diode, then swap them. If in one case the multimeter shows infinity, and in the second - 400-700 Ohms, the diode is working. If both indicators are equal to infinity, then the diode under study is broken; if they have the same or low resistance, it is broken and requires replacement.
- Check all the diodes in this way and you will know exactly which one to solder, which one to replace, which will save you a lot on repairs. Although if you don’t have a great desire – and, by the way, no skills either – then maybe it’s not worth wasting your time. In this case, it would be easier to overpay a little and completely replace the entire diode bridge.
How to test a generator with a multimeter
The diode bridge of the generator can be checked with a multimeter, but you can also use the stand that was used to check the regulator.
But before that, first of all, without removing the rectifier bridge from the generator, connect the red wire of the tester to terminal 30 of the generator, and the black wire to the housing. Set the tester operating mode to dial (diode icon). If it is not there, then set it to 1-2 kOhm. The multimeter should show infinity. If the readings are different, the diode bridge is faulty.
Then check the current rectifiers for breakdown. Leave the positive (red) probe on terminal 30, touch the negative one to the bridge mounting bolts one by one. The multimeter display should show infinity in all cases; any others mean a breakdown.
Next, connect the positive probe to the axle mounting bolts, and the negative probe to the generator housing. In this case, the tester should also output infinity.
But in practice, such verification is most often not enough. In most cases, it is necessary to ring the generator in more detail.
Careful testing
To do this, unscrew the fastening bolts of the rectifier unit, disconnect the copper wires of the stator winding and remove the diode bridge from the generator. Now you can test each semiconductor individually. Before checking, it is advisable to rinse the stabilizer with running water using a medium-hard brush, and then dry thoroughly. For quick drying, a hair dryer is quite suitable.
Attach one of the tester probes to the diode plate, connect the second to the central terminal of each diode fixed to this plate. Then swap the probes. In one case, the multimeter should show infinity, in the other - a nominal resistance of approximately 570-590 Ohms. Rectifiers are considered faulty if:
- In the first and second measurements (when the polarity was changed), the multimeter readings are the same;
- Diode resistance is greater or less than nominal values.
Perform the same actions with the second plate of the diode bridge. If a fault is detected in one or more diodes, it will be easier to replace the entire rectifier unit. True, there are craftsmen who replace failed diodes individually, but such work requires a certain skill and dexterity.
Checking the armature and stator windings
Further inspection requires completely disassembling the generator. First of all, visually check the anchor. Brush rings should not show any blackening, chipping or wear on the treadmills. Blackening and slight wear can be smoothed out with zero-grade emery cloth. Rings with deep grooves must be replaced or, if the thickness of the rings allows, turned on a lathe.
The armature winding should not clearly smell like burning . The color of the winding must be uniform and free of damage and breaks. To check the armature winding for a break, you will need a multimeter. Set the operating mode to continuity testing or resistance measurement and connect the probes to the brush rings. The winding resistance should be within 3-5 Ohms. Then leave one probe on the ring, connect the other to the body. The multimeter display should show infinity.
The generator stator is diagnosed after removal from the housing. First of all, carry out a visual inspection. There should be no visible damage to the wire or its insulation. Then connect the tester wire to the stator housing. With the second wire, touch the terminals one by one. There are only three of them. The tester must be in dialing mode. If the display shows infinity, this indicates that the stator is working properly.
Further testing consists of diagnosing the windings. The resistance of all three windings must be the same.
Before assembling the generator, you need to check and, if necessary, replace the bearings. When turning, they should not jam or make a creaking sound. This means that they are very worn out and will soon fail. Therefore, it is better to replace them immediately .
Checking the return current
Diagnostics is carried out with the engine running at high speeds. It is necessary to measure the current consumed by the vehicle components. The probe is pressed against the wire from terminal 30 or B+.
It is necessary to turn on the electrical appliances of the car one by one and record the indicators. The resulting values should be summed. Then you need to turn on all the devices and measure the current indicator. The resulting indicator should be compared with the summed value of previous measurements. The final value should be approximately 5 A below the summed value. A higher value confirms that the node is faulty.
Signs of a diode bridge malfunction
First of all, you need to remember that the diode bridge on the VAZ-2114 is no different from the same unit on the VAZ-2109, VAZ-2110 and other models. Therefore, if you figure out how to determine the malfunction, it will not be difficult to identify it on any of the cars. There are several main symptoms; they can appear together or separately. Any of them requires an immediate check of the generator:
- The warning lamp, which lights up when the ignition is turned on, does not go out even after the engine is started. This is a general indicator of a problem, but if the diode bridge has failed, the lamp will light in any case. If a voltmeter is installed in the car, you can check its readings; the arrow will most likely be either in the red zone or at its very border.
- Another option is that the warning light does not light up when you turn the ignition key and does not light up after starting the engine.
- When measuring the voltage produced by the generator with the engine running, the reading is less than 13.5 Volts. You need to measure at the battery terminals.
- The next morning the car will not start due to a dead battery, although in the evening it was in normal condition. After charging the battery, it discharged again in a short time, and the generator housing becomes so hot that you can burn your hand on its surface.
- Extraneous noise appears under the hood, most often it is a whistle or howl. The noise level may vary depending on engine speed.
- Various errors appear - the ABS, ESP, and so on may light up. The power steering may stop working, the radio will begin to wheeze and freeze. Instead of a turn signal, the light turns on. All this manifests itself against the background of a dead battery, which does not charge due to a broken diode bridge.
- The headlights begin to dim or stop working altogether, and the air conditioner does not cool as it should.
These are the main signs of a diode bridge breakdown, but it is worth remembering that they may indicate other generator failures. Therefore, first of all, you need to accurately identify the faulty unit. It is not necessary to take the car to a service center for diagnostics; the car owner can do the work; a minimum set of tools is needed.
Advice!
If the control light on the panel lights up or, conversely, does not work, first of all you need to check it and the control relay. Often it is these elements that are faulty, and not the generator.
Why does the diode bridge burn out?
There are several reasons for the failure of the diode bridge on VAZ cars. To prevent the breakdown from occurring again, you need to check the machine for one of the options described below. Only by eliminating the problem can normal operation be ensured.
Most often, a bridge burns down due to the following:
- Moisture getting inside the generator housing. Over time, casings or connections may become loose, which allows water to enter. Also, diodes burn out due to contaminants: soot, lubricant particles, which inevitably accumulate inside the generator over time.
- A faulty battery can also cause diodes to burn out. Another very common option is when car enthusiasts confuse the positive and negative terminals on the battery when connecting. In this case, the diode bridge almost always burns out.
- If the car is from another car in violation of the rules of this process, the diodes may also burn out.
The diode bridge, like any spare part, has its own service life. It usually lasts about 10 years, after which the unit may fail due to normal wear and tear.
It is best to periodically diagnose the car, check the serviceability of the main components and conduct an inspection to identify problems when they are not yet fatal. It is recommended to check the battery annually and measure the charge level to monitor the condition of the generator.
How to determine generator malfunctions
Signs of a faulty generator diode bridge. A car generator and a generator, a household power station are similar. Accordingly, the principles of troubleshooting and repair are the same. The only difference is that the car generator contains a rectifier and a voltage regulator, so the car network is designed for 12 Volts. The article discusses generator malfunctions and how you can fix them yourself. Your vehicle is equipped with a warning light that can alert you that the alternator has lost power. If this happens, you need to make sure that the sensor is working and the lamp is connected correctly.
It often happens that these lamps use a bad connector or the control relay fails. It is also possible that your battery, charging terminals are faulty, or it is simply discharged. When there is a lot of energy consumption, for example, when using lighting devices to the maximum, charging, or leaving the radio on overnight. Generator malfunctions may occur due to increased energy production when the voltage is above 14-15 Volts. The numbers vary depending on the model.
Therefore, if the battery breaks down, you should always check the generator too. Sometimes the generator begins to deliver current below the required limit of 13.2 Volts, then it is urgently necessary to check it for damage.
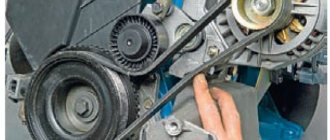
Before removing the generator, it is necessary to check the tension of the drive belt. Lack of electrically conductive connections between the battery or generator and the car body; voltage may be lost “on the way” to the battery. Also check the bearings for clearances and the integrity of the fuses.
For some types of faults there is no need to remove the generator. If there are knocks or noise during work, it is necessary to disconnect the wires: the noise will disappear - but a short circuit will form, unfortunately, these are expensive repairs, their cost exceeds the price of new equipment.
The noise remains - replace the bearings, they have worn out during use. Check the brushes, maybe it's time to replace them too. The contact brushes and rings may not be pressed well, then the spring should be adjusted. Get rid of dirt and burnt marks on the rings, if any. Sandpaper is the best way to remove scorch marks. If the rings become unusable, the rotor must be replaced. Check the rotor contacts with a multimeter.
Generator malfunctions in the form of a damaged rotor must be removed in the following order. Since a faulty rotor cannot be replaced, it must be completely replaced if it fails. The same applies to the stator. Remember that the rotor and stator must not have electrical contact with the body or other parts of the vehicle. A faulty stator must be replaced. Voltage rectifier diodes should not conduct current in both directions.
Diagnostic methods
There are two main methods that will allow you to determine the malfunction of the generator diode bridge. You need to choose based on what you have at hand. The first option requires the presence of a multimeter, and the most entry-level option, which is inexpensive, is suitable. The second is a regular 12V light bulb with three long wires so you can connect them to the right pins.
Diagnostics using a multimeter
Let's look at the option without removing the diode bridge, since it requires less time. The test is easy to carry out on an installed unit if you know the main features. The process is simple; you first need to provide access to the generator contacts. After this, carry out the following checks:
- When checking for a short circuit, press the positive contact of the multimeter to pin 30, and the negative contact to the body. If everything is in order with the diode bridge, the resistance readings will tend to infinity. Any other reading indicates a problem.
- To find out whether the positive diodes are broken, you should attach the positive terminal to pin 30 on the generator, and the negative terminal to the diode bridge mounting bolt. If everything is in order, the resistance will tend to infinity.
- To test the performance of negative diodes, you need to press the positive probe against the bolt that secures the diode bridge, and attach the negative probe to the housing. The readings should tend to infinity.
- To check additional diodes, the positive contact of the multimeter should be pressed to pin 61 on the generator, and the negative contact to the mounting bolt of the diode bridge. As in all cases above, the resistance should tend to infinity.
Do not forget to first switch the device to ohmmeter mode.
Using simple recommendations, you can literally check in a few minutes and find out whether the diode bridge has burned out or the reason lies in another unit. You can use not only a multimeter, but also any other device if it has an ohmmeter mode.
Check Features
When checking the generator of a VAZ 2110, 2107 and others for serviceability, the following conditions must be met:
- An accurate multimeter should be used for diagnosis.
- The normal voltage is 12 V.
- If it is necessary to replace the wiring, you must use wires with the same cross-section as the original.
- Before checking, you should check that all fasteners are connected correctly and the belt tension is correct. If necessary, the connections should be adjusted to normal, the belt should be loosened or tightened.
During the verification process it is prohibited:
- short circuit the wires;
- connect terminals that differ in purpose and parameters, connect terminal 30 or B+ to ground;
- diagnose a generator without connected consumers.
More details about replacement
Of course, this procedure can easily be performed by a technician at the nearest service station. However, many car enthusiasts prefer to repair or change parts on their car themselves. If you have knowledge and experience in this matter, then follow this algorithm:
- At the very beginning, you should turn off the power to the VAZ-2110.
- Next you need to disconnect the battery.
- Then pull out the pink wire that turns on the generator. To do this, unscrew the nut from the positive bolt.
- Then you need to loosen the upper and lower nuts and remove the tension bolt. After all this, you need to remove the belt.
- Next, the generator is turned 90 degrees, removing the lower mounting bolt.
- Then all connections need to be cleaned, including the rectifier housing.
- The upper part must be cleaned especially carefully.
- After this, the mechanism is replaced, and all connections are assembled in the reverse order.
- Finally, you need to check how the generator works.
When purchasing a new mechanism, you need to know that it must come with a warranty card. That is why you should buy only in specialized stores. If you find it difficult to replace the diode bridge yourself, then it is better to entrust this work to specialists from the technical service. They will easily perform the replacement, without removing the generator and with a guarantee.
Signs of generator malfunction and ways to eliminate them
The operation of the generator is controlled by a signaling device on the instrument panel. When the ignition is turned on, the window should light up and go out after the engine starts. If this happens, then everything is fine, the generator is working.
Too bright or too weak illumination of the indicator already indicates certain malfunctions of the generator system parts. In any case, insufficient battery charge always indirectly indicates problems with the generator.
The generator does not supply charging current at all
A very common occurrence is low drive belt tension. When it slips, the generator cannot operate at full capacity, and this leads to a gradual discharge of the battery. Belt slipping can also be caused by worn alternator bearings. It must be remembered that the service life of this unit is less than that of the engine, and is about 130-160 thousand km.
If the drive belt tension is weak, the generator cannot operate at full power, which leads to a gradual discharge of the battery
Brush sticking, the second most common problem, is caused by dirt buildup on the brush holder and brushes themselves, as well as weakened brush springs. To solve the problem, it is necessary to clean the above elements and, accordingly, replace the springs with new ones. However, serious wear of the brushes may occur, which will require their replacement.
During intensive use, sometimes the so-called burning of slip rings occurs, as a result of which contact with the generator significantly deteriorates or disappears. This problem can be solved by thoroughly cleaning and grinding the rings or turning them. Additionally, it is worth inspecting the wiring connecting the generator and the battery for breaks.
Also, the reason for the lack of charging current may be a faulty voltage regulator, which must be replaced with a new one. There are frequent cases of breakage of the excitation winding; with some experience in repair work, this can be eliminated
It is also important to pay attention to the fact that there are cases of the rotor touching the surfaces surrounding it. This may lead to partial damage. The cause is usually worn out bearings or seating areas.
The cause is usually worn out bearings or seating areas.
When charging current is supplied, but the battery does not charge normally
Often the battery does not take a charge due to poor contact of the “ground” of the generator itself with the “ground” of the voltage regulator
This state of affairs may be a consequence of poor contact of the “ground” of the generator itself with the “ground” of the voltage regulator. Therefore, you need to check the reliability of the wire, as well as the tightness of the contacts. There may be a short to ground in the generator excitation circuit, which triggers the voltage regulator protection relay. It is necessary to find the location of the short circuit and fix the problem.
Checking the generator on the car
First of all, you need to see if the alternator belt is intact. If it is not torn, then the belt tension is checked. Then it's time for the battery. Using a tester (multimeter), we measure the voltage at the terminals. It should be around 12−12.7 volts. If everything is fine, start the engine. If the battery is discharged, charge it and start the engine again.
We measure the voltage at the battery terminals. It should be within specified limits, usually from 13.2 to 14.5 volts. But on modern cars these limits may differ. If you have an instruction manual, you can read it. Deviation from the specified values in any direction is a malfunction. These deviations can be of three types:
- Lack of charging current - the generator does not work.
- There is a charging current, but below the minimum value -
- Voltage above the maximum value means the battery is overcharged.
All three cases indicate an existing malfunction in the vehicle's electrical supply system. it is necessary to carry out a comprehensive check of the generator.
But before that, conduct a visual inspection of all the wires and cables that go from the generator to the battery. There should be no visible damage, breaks or oxidation of the electrical wiring. Be sure to check the terminals on the battery, starter and alternator. They must be clean and dry. Any oxidation, rust or dirt must be cleaned off. Often this helps restore lost contact and the car begins to work as expected. If this does not help, we proceed to a detailed check.
Using a Multimeter
For further inspection, it is better to remove the generator from the car. First of all, remove the relay regulator from the generator and check it. To check the voltage stabilizer, you will need a multimeter and a charger with regulated voltage. It would be better to use a power supply instead of a charger. Voltage adjustment from 0 to 16 volts will be sufficient.
Connect the plus of the power supply to the regulator - usually this is a male plug connection. Hook the minus to the minus, it is usually output to the ear of the relay mount. Connect the red wire of the tester to the positive wire of the power supply, the black wire to the negative wire. Connect two stripped wires to the brushes, one for each. A light bulb is connected to the other pre-stripped ends (it can be removed from the rear lights of the car during testing). The test bench is ready.
Continuity of the relay regulator
Connect the power supply to the network, carefully use the regulator knob to begin raising the voltage. At the same time, monitor the multimeter readings. The light bulb should not light up at the very beginning, but as the voltage rises it should light up, first at half-incandescence and as the voltage increases, the brightness should increase.
When the 14.5 volt mark is reached, the regulator should operate, cutting off the voltage. The light should then go out. It is generally accepted that the stabilizer is working if it cuts off the current at values from 14.2 to 14.8 volts. If this happens at lower or higher values, then the voltage regulator is faulty. The relay is also faulty if there is no current cutoff at all.
How to check the generator on a VAZ-2109 yourself
The generator in the car provides the generation of electricity through the power plant.
If it breaks, then first of all the battery runs out, and as a result the car simply cannot move. This article tells you how to check with your own hands the generator installed on a VAZ-2109 car.
It is worth noting that it makes no difference which engine is installed on the car - an injector or a carburetor. In both cases, diagnosis is made using the same algorithm.
In order to determine the nature of the breakdown at home, you first need to know how to diagnose the generator.
The first stage is carried out without removing the device from the machine. There are several options, but the best quality is a multimeter. True, for this it is best to involve someone you know.
First of all, you need to find out whether the voltage regulator is capable of doing its job. Experts note that most often it is because of this that the generator may not function properly. The problem with it arises due to excessive voltage in the electrical network.
The generator itself is tested like this:
- set the multimeter to volts;
- start the power unit;
- measure the voltage at the battery and at the generator terminals.
Normally, the device will show from 14 to 14.2 volts. After this, you will need to depress the gas pedal - the voltage increase should not exceed half a volt in this case.
An increase in this indicator indicates that the generator’s performance is impaired. Most likely, the voltage relay will need to be replaced.
Alternatively, you can also do this:
- start the engine and let it run for a while;
- press the gas and bring the crankshaft to 3 thousand revolutions;
- turn on the headlights (high beam);
- heated rear window;
- stove fan.
With such a load, the battery voltage should be more than:
- 13.2 volts (generator type – 9402.3701);
- 13,6 (37.3701).
Indicators different from normative ones indicate:
- winding faults;
- failure of the voltage regulator;
- brush breakage.
To exclude the regulator from the list, you need to de-energize all devices except the headlights and measure the voltage again. If the specified node is serviceable, then the indicators will be as follows:
- for 37.3701 – up to 14.6;
- for 9402.3701 – up to 14.7.
what diodes are in the VAZ 2110 generator
Hi all. The idea of changing my gene to a tenth gene has been brewing for a long time. It will be more powerful, and the AC pulley is poly-V-ribbed (I’ll be closer to the injector). Although mine is good, it has become lacking and he is eating decently. I ended up with a 2110 KZATE generator in my hands, for a symbolic adjustment.
I was immediately warned that while it was moving, the pulley jammed and the belt was eaten. Having disassembled the generator, I immediately saw the reason: both bearings had fallen apart. I bought bearings, like KRAFT, and changed them. Well, now about the improvements themselves. It was decided to make it 90 ampere.
In addition, there is a 14.5 volt regulator. Otherwise the stock 80 somehow doesn’t work. I read about the conversion to 90A on the blog, everything is clearly written there and also links to Autolada.
RU. I don’t see any point in describing it in detail, because the above-mentioned comrade already has everything laid out in detail, I’ll write briefly. Let's go: 1.
To increase the output to 90A, you need to disassemble the generator, separate the winding, and solder another terminal to it for the diode bridge, and also change the bridge itself to an 8-diode one with greater performance. I removed the winding and tore off a piece of insulation at the place to which the terminal was soldered. From a non-working generator, a terminal was bitten off from a winding. I extended the legs with copper wire of the same thickness. Soldered it.
Heat shrink. I went to the car market and bought an 8 diode bridge (it’s so damn hard to find here). Then a problem arose, bought it, didn’t even check it to celebrate, brought it home, installed it, assembled the gene. I took it to the electrician where I used to work, and they checked there was no charge at the stand.
I rang the bridge, but a diode or two on it did not ring. I went and exchanged it for the same one, it immediately rang and it turned out to be a worker, everything was ringing. I built a bridge. I attached a conder to it. 2. 14.5 volt voltage regulator.
It's easier here. I bought two regulators, one of ours is 14V. The second is German at 14.5, respectively.
This is what they gave me at the auto lot. Next, we drill out the rivets on the tablets. Unsolder the legs and separate the tablets. Solder the required tablet to the Russian regulator.
We fasten it tightly with screws. Here he is ready. Well, so, foolishly, I soldered our tablet to the foreign regulator, it wouldn’t go to waste. Well, everything is ready, let’s assemble the generator. I didn't check it, in theory it should work. I'll post it soon.
I bought the mounts at a disassembly shop. If anyone needs it, then to install such a gene you need the lower bracket of the generator 21082, the upper bracket with tensioner assembly 2115, the generator mounting bolt under the lower bracket, one screw for the upper mount, a belt, an 8-valve generator pulley. injection (I have no rubber band). Well, that seems to be all. While driving from the car market I saw a Chinese Mazda 3 on the road, it looks like it was made, I took a photo.
Good luck to all. Article c. https://www.drive2.ru.
Malfunctions of the VAZ 2108, 2109, 21099 generator
The generator is responsible for power supply to the entire on-board network of the car with the engine running. Signs of a malfunction of the generator of VAZ 2108, 2109, 21099 cars
After starting the engine, the battery discharge indicator lamp in the instrument panel lights up
The generator does not produce the required charging current. Simultaneously with the light on, the voltmeter readings tend to zero. The battery is constantly not recharged. Using a voltmeter (multimeter), we check the voltage at the battery terminals (the engine is idling). The voltmeter readings should be as follows: generator 37.3701 - 13.6 V, generator 9402.3701 - 13.2 V.
The “folk” method of checking a generator by removing the terminal from the battery while the engine is running is only suitable for carburetor engines. If the engine stalls after removing the terminal, it means the generator has stopped producing electric current.
If it is less, then the problem is not in the faulty wiring going to the control lamp and voltmeter, but in the generator. Next, sequentially, from simple to complex, from the most probable to the least probable, we look for the cause of the malfunction.
— The generator drive belt tension is loose
The belt slips on the pulley, and the generator rotor stops rotating at the required frequency. In this case, a “whistle” from the generator drive is possible. We check and adjust the belt tension if necessary.
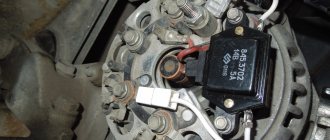
— The generator voltage regulator is faulty
There may be a short circuit between its terminals “B” (“D+”), “W” (“DF”) or “stuck” (the brushes of the brush assembly have worn out). The easiest way to check the voltage regulator is to install a known good one. We replace the faulty regulator with a new one. Read more: “Checking the generator voltage regulator for VAZ 2108, 2109, 21099 cars.”
— The diode bridge (rectifier unit) of the generator is faulty
Most likely there is a “break” in its valves or a short circuit in the negative valves. The power diodes of the excitation winding may also be damaged. The diode bridge can be checked using an ohmmeter (multimeter in ohmmeter mode) both directly on the car and on a removed generator.
Checking the diode bridge of the generator of VAZ 2108, 2109, 21099 cars
— The generator stator is faulty
“Open” or short circuit in the stator winding. We check the stator with an ohmmeter, and if there is a malfunction, replace it with a new one.
checking the stator windings of generator 37.3701 for “break”
— The generator rotor is faulty
Perhaps the leads of the excitation winding located on the rotor have become detached from the contact rings to which the brushes are pressed. We check the rotor and replace it with a new one if necessary.
generator winding terminals 37.3701 for VAZ 2108, 2109, 21099 cars
The battery is recharged and “boils”
The generator produces too much charging current, higher: generator 37.3701 - 14.6 V, generator 9402.3701 - 14.7 V, which is checked with a voltmeter at the battery terminals. The needle on the standard voltmeter is in the red zone at the end of the scale.
— The voltage regulator is faulty
Most likely there is a short circuit between its terminal “Ш” (“DF”) and “ground”. Replace the voltage regulator with a new one or a known good one.
The generator makes noise or “howls” when operating
The nut securing the generator pulley has come loose, the generator bearings are worn out, there is an interturn short circuit or a short circuit to ground in the stator winding (the generator “howls”), a short circuit in one of the generator valves.
Notes and additions
— The causes of such malfunctions as: the warning lamp does not light up after turning the key in the ignition switch and starting the engine (the standard voltmeter shows normal voltage) or the lamp does not light up and the voltmeter does not work (or the control devices do not work completely) are not a malfunction of the generator, but a burnout of the control panel lamp, a break in its power supply circuit, a blown fuse No. 5 (F16) in the mounting block (responsible for supplying current to the excitation winding of the generator), a break in the power supply circuit of the instrument cluster (orange and orange-blue wires), a malfunction of the ignition switch.
— If the discharge warning lamp lights up at idle, and goes out when you press the gas pedal and while driving, you must first check the tension of the generator drive belt, and if that doesn’t help, then the problem is most likely in the additional resistors located in the relay mounting block and fuses. If they fail, the generator is not excited at low speeds, and therefore does not charge. It is necessary to either completely change the mounting block, or unsolder additional resistors and replace them with new ones.
More articles on generators for VAZ 2108, 2109, 21099 cars
Diagnostics
Diode bridge of the VAZ 2109 generator
It is best to diagnose the diode bridge after removing it; this process is quite simple. Naturally, you can bypass dismantling, but then the check will be inconvenient. One of the methods for checking this bridge is to check the on-board control system for current leakage. Thus, if, with the motor turned off and electrical appliances inactive, the current consumption is 1A per hour, then most likely the problem will lie in the diode bridge.
Note! A detailed check is only possible when the diode bridge is removed.
Checking the relay regulator
Replacing the diode bridge of the VAZ 2109 generator
First you need to check the relay regulator, which helps maintain the optimal voltage value in the machine. Such a relay does not allow the voltage to increase to a critical level. So:
- The car starts.
- The power supply is measured using a multimeter.
- The device must be switched to the voltage measurement position and connected to the battery terminals or to the generator outputs.
- The voltage is considered normal if its readings fluctuate between 14-14.2 V.
- If, when you press the gas, this indicator increases by more than half a volt, then the relay requires replacement.
Signs and Symptoms of a Malfunctioning Alternator Overrun Clutch
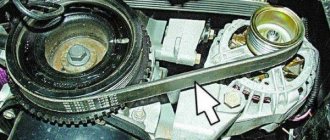
The generator overrunning clutch is a mechanism that dampens shocks from the pulsating rotation of the crankshaft in time with the power stroke of the piston. Installed on a number of cars that have additional units, for example, an air conditioning compressor.
The main symptoms of the malfunction are vibration and rattling felt inside the car when the air conditioning compressor is turned on. This symptom most often occurs if the car is in gear, the brake is pressed, or it is moving slowly.
The simplest and most accessible way to diagnose an overrunning clutch is to raise the speed to 3000-4000 and turn off the engine. If the clutch is working correctly, you can hear a delayed sound, reminiscent of a turbine stopping due to inertia. If you have an assistant, it is visually possible to see the inertial rotation of the generator when the drive belt of additional units comes to a complete stop.
The practical part is removing the generator, disassembling it, repairing it and reinstalling it.
Due to the fact that the generator is located under the hood of the car, it is necessary to turn off the engine, turn the steering wheel to the right all the way and open the hood. The electric generator on VAZ 2108 - 15 cars is installed in front of the engine, in the lower left corner of the engine compartment, between the engine and the cooling radiator.
Before dismantling the generator, it is necessary to disconnect the ground from the battery, i.e. negative contact.
Replacing VAZ generator brushes
Before removing the generator itself, in order not to do unnecessary work, we remove the charging relay from the generator housing and check the production of the generator brushes. The charging relay is installed in the rear of the generator housing, and is attached to it with two bolts. To unscrew them you will need a Phillips screwdriver. When unscrewing the bolts, be careful not to drop them on the crankcase guard, otherwise getting them out of there will be one big problem. To remove the relay, you need to disconnect the wire, the “female” contact. After removing the charging relay and visually inspecting the brushes, we decide to purchase a new generator voltage regulator relay or reinstall the dismantled one, depending on the wear of the brushes. For their normal operation, a brush length of at least 4 cm is required. Now we proceed directly to removing the electric generator from the engine.
- We disconnect the wires from the generator - as a rule, they are red and consist of two groups of wires, red. One group consists of two wires and is attached with a nut to a bolt on the rear wall of the generator. The other group consists of one wire and is connected to the generator terminal via a male-female contact, also on the rear wall of the generator.
- To remove the generator from the engine, you need to unscrew two nuts and one bolt in the following sequence: unscrew the nut attached to the generator belt tensioner bar (at the top of the generator), unscrew the bolt securing the tensioner bar to the engine block and remove it. The last step is to unscrew the nut from the bolt securing the generator bracket to the engine block.
- The generator mounting bolt should be pushed to the left, out of the bracket, until it stops against the body shell or the generator’s mud protection.
- On the right wheel side, you need to unscrew the two screws that secure the dust protection of the generator to the car body.
- If the generator mounting bolt still rests against any body parts, you should press on the engine with one hand, and at the same time pull out the bolt with the other hand.
Now your generator is completely disconnected from the engine, and you can begin to disassemble and repair it.
Disassembling the electric generator
When disassembling an electric generator, you need to have two important things on hand: a bearing puller and a vice. This will greatly simplify and speed up your work. Using a wrench set to “19”, unscrew the nut from the rotor shaft, which secures the impeller to the shaft.
To do this, you need to hold the impeller directly with one hand and unscrew the nut with the other hand, counterclockwise. It will take some effort, of course, but this nut needs to be unscrewed. The generator impeller is secured to the shaft with a key, and after removing the impeller from the shaft, it is necessary to remove this very key.
Now we turn the generator over with the back cover up, and unscrew the four nuts with an “8” wrench. We take out the released four studs and release the front part of the generator housing.
In the front part of the generator cover there is a “front” bearing secured by plates. We remove it by unscrewing the nuts and plates and knock the bearing out of its seat. The easiest way to do this is with a wooden plank, the size of which matches the diameter of the bearing.
Now we need a vice: screw a nut onto the rotor shaft and secure the generator, or something that we have not yet disassembled, in the vice. We tear off the back cover with a sharp upward movement from the bearing seat.
VAZ-2107. No battery charging. Generator repair.
Reasons for the battery not charging.
Diagnostics and repair of Generator VAZ, Gazelle, Volga, Sable, Lada, Priora
How to dismantle a diode bridge
- The negative terminal of the battery is removed, the wires that are connected to the plastic casing of the generator are disconnected (see Repairing the VAZ 2109 generator easily and simply).
- The wire block “D” is disconnected.
- The rubber protective cap is removed from the tips of the positive wires, after which the fastening nut is unscrewed. The wires are removed from the generator.
- Now you need to remove the plastic casing of the generator directly. First you need to unfasten the three spring clips, which are located around the perimeter of the block itself.
- The voltage regulator is unscrewed using a Phillips screwdriver.
- It is removed in assembled condition along with the brushes (see VAZ 2109: replacing the generator brushes yourself).
- Using a size 8 wrench, unscrew the three bolts securing the bridge.
- The leads leading to the stator winding are bent to the side for convenience. Use a Phillips screwdriver to unscrew the capacitor clamps.
- To remove the diode bridge using a 10-size wrench, you need to unscrew two nuts from the contact bolt. You also need to remove the bushings from this bolt, after which the bolt itself is removed from the bridge.
Now you can safely begin replacing the damaged part.
FUNCTIONAL PURPOSE AND FEATURES OF THE RECTIFIER
The diode bridge of the generator, depending on the type, can consist of either 4 or 6 diodes that perform the function of converting alternating current into direct current with a given pulsation frequency. The operating principle of the device is based on the bipolar rectification method, which is also widely used in a variety of electronic systems.
In addition to the conversion, the unit acts as a valve, the purpose of which is to pass current exclusively in one direction. With a properly functioning device, the current from the generator enters the fourteenth power network, but does not pass back to the stator. If the node fails, current leaks and flows in both directions. This will cause a constant lack of power, and the vehicle's systems that consume electricity will not be able to operate.
The VAZ 2114 is equipped with a three-phase rectifier, which has the following advantages:
- Converts alternating current into direct current with the lowest pulsation frequency: the lower the frequency, the more stable the vehicle’s electronic systems will function;
- Can be equipped with diodes of both bridge and half-bridge types;
- Makes it possible to install a current filter - a capacitor.
Article on the topic: Why the speedometer does not work on the 4: we check the speed sensor The cost of the diode bridge ranges from 500 to 1100 rubles, depending on the manufacturer. The market offers rectifiers both from Chinese companies, which have a low cost and questionable quality, and from well-known brands, the reliability of their products has been tested by many car owners.
As evidenced by reviews from the owners of the fourteenth, devices from LG have proven themselves to be the best. The best option in terms of price-quality ratio is the LG 0108 model. It can also be used as a diode bridge for a VAZ 2115 generator.
Basic faults
Quite often the following picture is observed - the ignition is on, but the generator light on the panel does not light up. This usually indicates that:
- there was a wiring break;
- The fuse has blown.
In this case, check all cables coming from the generator. If damaged wiring is found, it is replaced.
It also happens that:
- the light does not light;
- the battery drains quickly, even if it has just been charged;
- however, the remaining control devices operate normally.
All these signs clearly indicate a malfunction of the generator. Here it is possible that:
- the diode is shorted;
- contact on the winding was lost;
- the traction relay is broken;
- The brush holders have become unusable.
However, quite often all that happens is a wire break between the generator and the dashboard or a light bulb burns out.
If the lamp lights up when the ignition is on and the battery is charged, then you should pay attention to the serviceability of the voltage regulator. When the engine is running, the display lights up too brightly or, conversely, too dimly
Here, perhaps, the problem lies in the low tension of the drive belt. Normally, it should not give in when pressed with a finger more than 10 millimeters. It will also have to be replaced if signs of significant wear are visible on the surface with the naked eye.
When the engine is running, the display lights up too brightly or, conversely, too dimly. Here, perhaps, the problem lies in the low tension of the drive belt. Normally, it should not give in when pressed with a finger more than 10 millimeters. It will also have to be replaced if signs of significant wear are visible on the surface with the naked eye.
Sometimes the generator does not work because the stator winding is shorted to ground or the electrical circuit is broken.
In addition, at the anchor, sometimes the terminals of the contact rings move away from the winding. They can be soldered in place.
Loud noise from the alternator most likely indicates bearing failure.
Trouble-shooting
There are two main options for solving the problem. The first is accurate diagnostics on the bench: after detecting signs of burnt-out diodes, a check is carried out and it is determined which elements have failed. After this, the faulty diodes are soldered off, and new ones are soldered in their place. It is very important to take exactly the same brand; any analogues will not last long.
It is much easier to change the assembly, it is faster and of better quality, since you can be sure that the spare part will last for some time. The price of the part is low, for example, on a VAZ 2110 it is about 650 rubles. Replacement is not difficult and can be done independently.
Identifying a faulty diode bridge and replacing it is not difficult for any car enthusiast with a minimum set of tools. If the check shows a breakdown, it is best to remove the generator and carry out repairs. The process is simple and takes no more than an hour.
Source
Generator design on the VAZ-2114
Before you begin directly carrying out repair operations on the generator, you need to know the structure of this spare part.
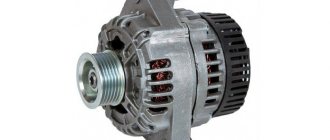
The generator for VAZ 2113-2115 cars is marked as 37.3701, and it is suitable not only for this family, but also for cars of the GAZ family. So, let's look at what parts this unit is made of.
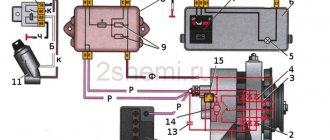
VAZ generator device
Generator 37.3701: 1 – cover on the side of the slip rings; 2 – rectifier block; 3 – rectifier block valve; 4 – screw for fastening the rectifier unit; 5 – contact ring; 6 – rear ball bearing; 7 – capacitor; 8 – rotor shaft; 9 – output “30” of the generator; 10 – output “61” of the generator; 11 – voltage regulator; 12 – terminal “B” of the voltage regulator; 13 – brush; 14 – stud securing the generator to the tension bar; 15 – pulley with fan; 16 – rotor pole piece; 17 – spacer sleeve; 18 – front ball bearing; 19 – drive side cover; 20 – rotor winding; 21 – stator; 22 – stator winding; 23 – rotor pole piece; 24 – buffer sleeve; 25 – bushing; 26 – clamping sleeve
Operating principle and circuit diagram of a car generator
The main elements of the generator are the rotor, stator, and covers: one on the slip ring side and the second on the drive side. The rotor is equipped with an excitation winding for the generator; its ends are routed to two slip rings. There are also two sealed ball bearings on the rotor shaft; they are filled with lubricant, which should last for the entire service life of the generator.
The stator core consists of electrical steel plates. In its slots there is a three-phase winding connected to the zero point terminal. This pin is used to connect a battery charging indicator. The main terminals of the stator winding are connected to a diode rectifier unit.