The on-board network and related electronic components and assemblies in VAZ cars have never been famous for their great reliability and workmanship. Quite often, electrical problems in cars arise due to a faulty alternator.
There are often situations when constant mechanical loads directly affect the mounting of the generator, which subsequently affects the operation of the unit and the condition of the on-board network of the machine. Other malfunctions associated with the generator usually arise due to premature wear of its elements (brushes, diode bridge, etc.), contamination, or due to improper installation and adjustment. In this article we will look in detail at the nuances that arise when installing electric generators on AvtoVAZ family cars and when setting them up.
Purpose of the generator
The electric generator in a car is one of the most important elements, since it is it that ensures uninterrupted operation of the electrical on-board network and charging the battery. All batteries installed in cars are not intended for constant power supply without recharging the main electronic components in the car (this includes: headlights, signal, wipers, music, heater motor, etc.). The generator plays a big role in this connection, converting mechanical energy into electrical energy and charging the electronic battery.
The operating principle of the electric generator is quite simple. Its main task is to generate electricity and supply it to the battery contacts. The generator can only be activated when the engine is running, but in several ways:
- through an individual belt;
- through the common belt of additional units.
An individual belt (or a belt of additional units) is fixed on one side to the generator pulley, and on the other, to the crankshaft or intermediate shaft pulley of the engine. The generator mounting may be different:
- on 2112 it is located below;
- on the “classic” - in the middle;
- on UAZ vehicles the mount is located at the top.
While the engine is running, the crankshaft (or shaft) rotates, which transmits energy through a belt to the electric generator and spins it. The resulting energy is converted into electrical energy and supplied to the battery contacts, thereby maintaining a stable battery voltage and protecting it from discharge and failure.
The battery acts as a kind of storage device that constantly accumulates and supplies electric current to the vehicle’s on-board network. When the engine is not running, the battery does not receive recharge and operates in recoil mode. Many car enthusiasts are familiar with situations when the engine barely turns and the headlights shine quite dimly. In such cases, inexperienced drivers immediately begin to blame the battery or other electronic components of the car. However, the culprit is not always so easy to find, because problems can be with the battery, or with the generator itself or the electrical wiring.
Don't worry ahead of time. If the car is parked outside for a long time and does not start, the battery will spontaneously discharge, and this is absolutely normal. Such problems especially often arise when the car is parked for a long time in winter, when negative temperatures have a negative impact on the condition of the battery.
If the car does not sit idle on the street, but constantly starts and drives, then the above problems (when the engine barely turns) can be caused by the following factors:
- serious problems with electronics (current leaks, poor connections, etc.);
- poor battery condition;
- a crack in the generator mount (often found on VAZ 2107 and 21213);
- malfunctions in the electronic part of the electric generator;
- belt stretching, incorrect installation or loose upper and/or lower fastening of the generator (on the VAZ 2110 and other front-wheel drive VAZs the problem occurs quite often).
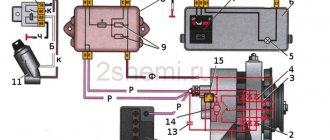
Electric generator device
The internal structure of a self-generator is very similar to a typical electric motor, but with certain differences. Moreover, differences in detail are present both external and internal. So, in the circuit of a self-oscillator there are such elements as:
- special voltage regulator;
- rectifier assembly (diode bridge).
In conventional electric motors, the above elements are rarely present, and their presence depends on the industry and the specific application of electric motors. But in autogenerators, the presence of such electronic components is simply necessary, since without them voltage surges can occur, as well as exceeding the maximum permissible voltage. Severely over or undervoltage in the on-board network negatively affects the condition of the on-board network, up to the fire of electrical appliances in the cabin (radio, subwoofer, alarm, etc.).
The self-generator is based on a rotor on which the primary winding with parts forming the poles is located. During operation, a magnetic field appears on the winding as a result of the supply of electrical voltage from the battery. The rotor is installed in the housing on special bearings, and a pulley for the belt and an impeller with blades for cooling are also attached to the rotor.
The second main element of the autogenerator is the stator; it is a round metal part (core) with special grooves through which the secondary winding (copper thread) is passed. The design also contains graphite brushes, which are responsible for transmitting voltage to the winding.
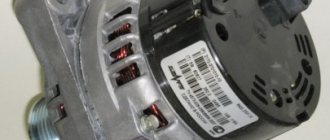
To regulate and output the resulting voltage, a diode bridge (converts alternating current to direct current) and a voltage regulator (does not allow overvoltage or undervoltage) are used. The external component of the autogenerator is a ventilated metal case, reinforced with stiffening ribs and having special fasteners for installation in the engine compartment.
Fastening design
The design of fastening elements for electric generators on AvtoVAZ vehicles varies. Differences in fasteners are caused by the peculiarities of the structure and location of the power unit. For cars of the VAZ classic and Niva family, with a longitudinal engine, the autogenerator is typically located longitudinally, along the block, near the first cylinder. The generator is driven through a belt from the crankshaft pulley. On front-wheel drive models with a transverse engine, the electric generator is located opposite the front right side member in the direction of travel.
The compatibility of the installation grooves on classic and front-wheel drive models differs, but depending on the specific model. The installation locations of the electric generator on classics and the first front-wheel drive cars (08, 09 and 99 families) are the same. However, to install an electric generator from a tens or Chevrolet Niva to a classic, you will need to purchase pulleys, a special strip and a mounting bolt for installing the generator. In other cases, the installation and fastening of generators from 21214 and other Nivas to rear-wheel drive VAZ models does not require additional work.
To install powerful devices from Kalina or Priora, the generator mount for other VAZ models will need to be changed. It is very important to select the appropriate components. For installation on the 08, 09 and 99 family, we select all generator mounts from VAZ (2110, etc.) for an 8-valve head, and not for a 16-valve one.
This nuance is very important, because it directly affects the compatibility and possibility of installing powerful electric generators on older front-wheel drive and rear-wheel drive car models.
The fastener itself is a metal L-shaped structure made of durable steel. The design provides special holes for its combination with the autogenerator itself. In addition, the mounting strip is equipped with a technological cutout into which a screw is inserted to align the device relative to the cylinder block.
The lower mount of the generator is presented in the form of a special metal bracket with technological holes (in the bracket itself and in the counter part of the generator). A bolt passes through these fasteners, which rigidly connects the elements together. This is necessary in order to avoid vibrations and belt slippage during engine operation.
Replacing the generator on a VAZ 2110 and its components
The procedure for replacing the generator set is carried out in the reverse order of removal. Before performing this task, you need to purchase a standard device, since it will fit in size and brackets for fixation.
In what cases is it necessary to replace bearings?
Replacement of the bearing elements will be required if an uncharacteristic hum or noise appears during operation of the generator set. Detailed device diagnostics are described above. When checking the parts, you need to make sure that they rotate without jamming and that there are no gaps.
How to replace bearings yourself?
To complete the task, do the following:
- The front and rear covers of the unit are disconnected. It is recommended to mark them with a marker so as not to confuse them during installation.
- Four screws are unscrewed; for this you need an 8 key.
- The covers are detachable and require a flat head screwdriver. The rear cover with the winding of the stator device is dismantled.
- To remove the front bearing device, apply an object of appropriate size to it. It is allowed to use a 27mm head or other product. Using a hammer, the bearing part is knocked out of its seat.
- The installation site of the device is treated with lubricant.
- Installation of a new part is carried out using the old bearing. This element is applied on top, after which the new component is installed by hammering the component with gentle hammer blows around the perimeter.
- To remove the rear bearing element, you will need a puller; if it is not available, you can use an open-end wrench of the appropriate size. The part must be picked up with a tool.
- Using a hammer, you need to knock on the key. This bearing device is dismantled from the pulley of the rotor mechanism. The installation procedure is performed in reverse order. For installation, a piece of pipe of the required size is used. Using a hammer, the part is pressed onto the pulley of the rotor mechanism.
Replacing the rectifier device
The procedure is performed using a set of spanners and a Phillips head screwdriver:
- Three screws are unscrewed, with the help of which the terminals of the windings of the stator device are fixed to the diode bridge. To do this, use an 8 key. Then unscrew another screw that secures the rectifier unit. When dismantling, you need to remember how the washers are placed.
- The conductors of the winding terminals of the stator device are moved to the side.
- The bolt that secures the capacitor device is unscrewed. To do this, use a screwdriver with a Phillips blade.
- The rectifier with capacitor is removed. The two nuts of the contact screw are unscrewed; for this you will need a 10mm wrench. Two bushings are disconnected from the bolt, then it is removed from the rectifying device. The contact screw is removed from the capacitor. The mechanism is being replaced.
Semyon Pedan spoke in detail about the nuances of replacing the diode bridge of the generator device on a VAZ 2110 car.
In what cases does the 2110 generator need to be replaced with a new one?
A complete replacement of the generating unit will be required if repair of the unit is impossible. Replacing the unit may be necessary if the brackets used to secure it are damaged. Finding new fixation elements on sale is problematic.
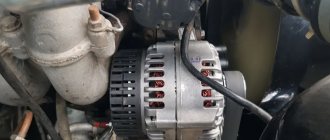
Removing the generator
The procedure for removing an electric generator from a car is simple, but its implementation requires basic skills in working with equipment and at least superficial knowledge of the units in the engine compartment. The stages of work can be divided into several steps:
- Disabling the electronic part.
- Removing the upper retaining device.
- Removing the lower mounting platform.
- Correct removal of the belt and tensioner.
You can remove the generator mount both on the VAZ 2110 and on other VAZ models if you follow certain instructions. Fundamentally, the process of working with autogenerators on VAZ cars is almost identical, and the main difference is only in the location of the power unit. On the VAZ family 2101 - 2107, 21213, 21214, the engine in the engine compartment is located longitudinally, and on front-wheel drive models the engine is installed transversely. The mount drawing for front-wheel drive models is identical, only the electric generators themselves, their power and pulley sizes differ.
Depending on the engine layout of your car, certain difficulties may arise. So, on classic VAZs, as well as Nivas, the procedure for removing the autogenerator is easier to carry out due to the accessibility of the components. While on front-wheel drive models, access to the components is difficult due to the transverse location of the power unit. There are often cases when it is not so easy to get to the soured bolts that fix the “gene”.
To carry out work on removing the generator on the VAZ 2115, 2114 and other front-wheel drive models, you will need a set of socket heads and open-end wrenches, a flashlight, WD-40 lubricant (or other similar) and a set of new components (belt, pulley, fasteners and bolts). It is worth remembering that on front-wheel drive VAZ models, access to the units is difficult, so an inspection hole or a lift may be required. If there is no access to a pit or a lift, you can jack up the car and remove the right front wheel (in the direction of travel) and after that access to the electric generator will be simplified.
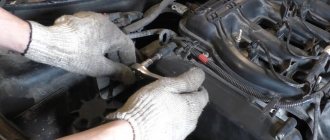
First of all, with the car turned off, you need to remove the terminals from the battery and remove it. This procedure is done in order to protect yourself and the car’s electronics from short circuits. After that, two wires are removed from the autogenerator - one is power (usually red), and the second is control (a thin wire with a white or gray connector). The power wire is located in a special thermal casing; it must be moved, only then will access to the terminal on the unit be opened.
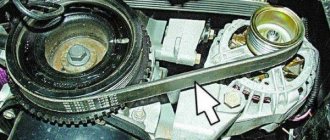
As soon as the wires are removed, we take them away so that they do not interfere with subsequent manipulations to remove the unit. Now you need to loosen the belt tension. To do this, unscrew the tension screw and move the generator to one side. While the generator is moving, check the degree of belt tension.
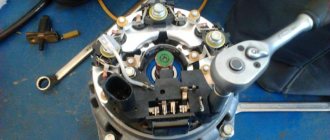
Replacing the front rotor bearings
All further operations are performed using lubricant:
- To do this, use a 24mm socket wrench to unscrew the nut securing the pulley, holding the rotor with a screwdriver. Do not damage the tin impeller blades.
- Remove the pulley, spring, flat washer and spacer sleeve.
- We return the nut to its place, screwing it flush with the end of the shaft. By hitting the nut with a hammer with a rubber pad, we knock the rotor out of the cover.
- Using a selected mandrel, carefully press the broken bearing out of the seat.
- We check the seat for the new bearing for jams; if necessary, use a scraper or knife to restore the chamfer of the seat.
- Using selected crimping, we install the new bearing into its seat until it stops. Installation forces should be transferred only to its outer ring. When striking, remember that the cover is fragile, as it is made of aluminum alloy.
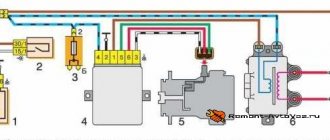
Installation of the generator with subsequent adjustment
When installing a generator on a VAZ 2109 (no matter the injector or carburetor) and other models, be sure to check whether the purchased clamps, bolts and nuts fit the installation locations. Also, we must not forget that the mounting holes on old-style electric generators are different from new ones. Therefore, when installing a modern autogenerator on front-wheel drive models of the first generations (08, 09, 99), you should purchase the appropriate fasteners.
The generator mounting mount cannot be taken from Grants or Prioras. You can take a new potassium generator and no additional modifications will be required, but the mounting plates must be type 21082. In addition, you will need to purchase a pulley 2110 and a tensioner type 21082.
The installation process is identical to the removal process. If the standard strips are worn out, they are replaced with new ones; this will require unscrewing several bolts and installing new strips.
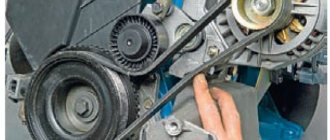
When installing the electric generator, start from the bottom fastening plate, tighten (but not completely) the fixing bolt (do not forget to put the bushing), put the belt on the pulley and move to the top. To fix the generator, install the top fastening, but do not screw it all the way. Then the tension bar is inserted. Then tighten the tension bolt, checking the belt tension.
The belt should not bend more than 1-1.5 cm when pressed with a force of 10 kgf. It is quite difficult to maintain these indicators in garage conditions, so you should focus on the gap between the frame and the tension bolt of 15–20 mm. There should be a small gap (15–20 mm) between the tension frame and the screw (from the thread side). Then turn the engine crankshaft two turns with a wrench and monitor the position of the belt and its tension.
If, after checking the engine by turning the key, the gap changes, then the bolts securing the electric generator should be tightened. As soon as, after a control rotation of the crankshaft with a key, the gap remains the same, and the belt bends slightly when you press it, the bolts of the upper and lower fastenings are finally tightened, a control rotation of the crankshaft is performed two turns, the wires are connected to the electric generator and the engine is started.
If, when starting the engine, the belt does not make unwanted noise or whistle, and the charge level is normal, then the installation procedure was completed correctly. If a whistle appears, then most likely the belt is too tight and should be loosened.
Video about tightening and adjusting the belt:
Installation of generator from 2110 to 2109/08/99 – video:
Did you manage to solve your problem using the recommendations from the article?
Yes!
45.18%
No. More answers required. I'll ask in the comments now.
38.12%
Partially. There are still questions. I'll write in the comments now.
16.7%
Voted: 467
Replacement process detailed instructions
We will look at options with 8- and 16-valve engines, which are present in the VAZ 2112 and 2110 models. Regardless of the number of valves, the same set of tools will be required for replacement. The list includes standard tools that can be found in almost every driver's garage.
Timing belt for VAZ 2110 16 valves
In addition to the timing belt itself and the roller for the VAZ 2110 or 2112, you will need:
- a special key that regulates the degree of tension of the roller;
- spanner set to “17”;
- key to “15”;
- key to “10”;
- installation, as an alternative - a powerful screwdriver.
Replacement on an 8-valve engine
Replacing the VAZ 2110 8 valve timing belt is as follows:
- First of all, we de-energize the battery - for this you need to get the negative wire;
- We unscrew the bolts that hold the timing belt protective casing, and then remove the casing;
- On the passenger side, it is necessary to remove the engine compartment mudguard along with the protective element and the right wheel;
- Our task is to ensure that the marks on the cover and, accordingly, on the pulley match, as indicated in all the diagrams. To do this, you need to twist the part clockwise;
- We go to the gearbox and remove the plug from it;
- We need to check the alignment of the marks in this hole;
- We block the flywheel - for this you can use a mounting tool or a powerful screwdriver;
- Now you can remove the timing generator pulley;
- We got to the nut that holds the timing belt pulley - it needs to be loosened, but not unscrewed;
- Now we have reached the required element of the VAZ 2110 or 2112 timing belt. Now it can be removed. All parts that it covered must be cleaned with detergent. After removing dirt, the area should be wiped with a clean rag;
- Next, a new timing belt and tensioner roller are installed - follow the direction indicated on the arrow. Sometimes it happens that the manufacturer does not indicate the arrows, in which case, you need to place the element so that the inscription is read from left to right;
- To tension, you need to turn the roller counterclockwise.
- The next step is to test the timing belt and its tension. You need to check the element with a cold engine, and the temperature in the garage or box should be within +15-+30C. We start the engine and inspect the timing belt.
If there are no unnecessary sounds or vibrations, then all the elements can be installed back - these are the wheel, casing and mudguard.
Replacement on a 16-valve engine
Despite the fact that there are more valves, replacing the timing belt is no more difficult than on the version with 8 valves. So, replacing the VAZ 2110 16 valve timing belt is performed as follows:
- As in the case of the VAZ 2110 or 2112, where there are 8 valves, we need to dismantle the belt protection. It is held in place by 6 bolts.
- Next, you need to remove the chip from the crankshaft sensor - unscrew the mount and take out the sensor itself. For clarity, you can study the photo.
- If you dismantle the gas distribution mechanism yourself, then you probably noticed the absence of one tooth. This is done so that the sensor can independently find the dead center. This feature can also be used to lock the crankshaft.
- Blocking can be done when a tube of a suitable size is placed in the hole under the sensor. Now the pulley is blocked, as a result, it can be safely dismantled.
- Next, the work scheme is practically no different from removing the 8-valve timing mechanism with your own hands - loosen the roller fastening and remove the faulty or worn belt.
- There are two ways to install a new element: remove the tension roller and then install the belt along with it, or do it by turning the camshaft.
- When the new element is installed, you can return everything to its original position. You should start by fastening the pulley - tighten the bolt and align the gear - the marks on the oil pump will help with this. If they are missing, then you can make a mark yourself.
- The parts must be combined carefully, since the timing gear should not get knocked out.
- Using a special wrench, we must tighten the belt. Not everyone has such a wrench, but as an alternative you can always take a powerful screwdriver and two nails. It is also worth remembering the nut, which must be tightened tightly.
- We check the tension; the rubber should move away from the gears, but there should be no folds.
- All that remains is to turn the crankshaft 2 times and make sure that the marks remain in the same place - the work is completed
Check the gas distribution mechanism every 10 thousand kilometers, and then you will not have to spend money on expensive repairs.