In my last post, I described the process of installing a multifunction steering wheel in my car. Everything went well and started working right away, but there was one more unfinished issue - the lack of indication of the operation of the CC and OS on the device. Even before installing the steering wheel, a super-wonderful entry appeared on the drive that you can flash the Vesta’s tidy yourself, and anyone can do this and you just need to find a USBDM programmer. In general, once again, thank you very much for this wonderful post. The author in it literally broke down the process of flashing the device firmware and attached the firmware files, in general, guys ura12345678 and RUPARADOX, thank you very much!
The search for a programmer led me to the well-known Aliexpress website. The cost of this programmer in China is around 800 rubles. After looking at different options and reading reviews, I decided to order here. On the 11th day of waiting, the programmer was in my hands:
I would like to warn you right away that this seller does not include a disk with the software and driver, so I am attaching links to my disk with the necessary files: - driver - flashing program - program for creating a backup of the current firmware version
If you decide to make a backup of the firmware, then here is a good article. Creating a backup is a slightly more complex and lengthy process than updating the device firmware itself. The main thing is to do everything strictly according to the instructions and take your time! I made a backup of my firmware, just in case... I would also like to note that I performed these operations on a PC running Windows 8.1 64-bit. By the way, users starting from Windows 8 and onwards, before installing drivers and software, do not forget to disable driver signature verification; how to do this, you can see, for example, here
When everything is installed, you can proceed directly to the firmware. First, let's disassemble the tidy. The back cover is secured exclusively with latches. If the tidy is of the old type (white), then we see a seal, which, as they say, can be easily peeled off by heating it with a hairdryer. I decided to try to do this. I’ll say this, I managed to peel it off without damaging it, but it’s noticeable that the seal is a little worn out, maybe I just overheated it:
In general, I’ll say this: in the end I broke the filling anyway :))) And there’s really no point in saving it, because The software version is written on the sticker on the back, i.e. You can still see the intervention:
Read also: Review of the Toz 34 gun video
Experts' opinions
In the first copies of the Lada Vesta, when the ignition was activated and the engine was started, the dashboard backlight did not light up. The reason was in the software, this function was not active by default.
When driving in sunny weather, during the daytime, it was difficult for drivers to read the readings of sensors, instruments, and indicators. For this reason, the owners did not notice the temperature rise, oil pressure warning lamp signals, etc.
After numerous requests to the manufacturer - AvtoVAZ, engineers developed and released new versions of firmware for the dashboard.
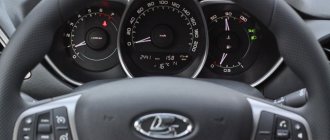
- when the ignition is activated, the instrument panel lights come on;
- green cruise control indicator, located in the right corner of the central well;
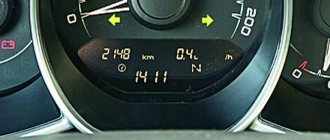
- actual mileage and fuel consumption are displayed online at the bottom of the central well.
On the first firmware of the Lada Vesta under the index “026” the indicated options were not available. The dashboard lights were activated together with the daytime running lights (DRLs), which was not always the case and there was no need for DRLs. In general, the “innovation” is positively approved by the owners of Lada Vesta. Now it has become much easier to read data and indicators from the instrument panel without distraction from driving the machine.
Video - Firmware update
On the first Lada Vesta cars, the instrument panel was not backlit in the daytime, which made reading the readings in bright light difficult. In addition, after installing cruise control yourself, there will be no corresponding indication on the panel. All these shortcomings can be corrected by updating the dashboard firmware.
Sequence of actions for self-flashing the dashboard on Lada Vesta
Preparatory stage
- programmer;
- laptop;
- software;
- cable for connecting the shield to a laptop;
- TORX key to “20”;
- spare diodes, indicators, if the old ones have burned out.
“12” steps of step-by-step instructions for firmware:
- Install on the laptop the software that comes with the equipment: Usbdm OSBDM V4.95 Programmer, HCS12 Programmer and USBDM driver.
- Remove the instrument panel, carefully peel off the factory seal, and remove the back cover.
- Activate the device, set the switch to the 3.3 V position.
- Connect the programmer with a laptop using a USB cable.
Connecting the Usbdm OSBDM programmer
- Launch the HCS12 Programmer program on the laptop, select the “Detected” item as active.
- In the “Target” line, indicate the location of the firmware. Make Auto Reload active, click Detect Chip.
- Check the box for “Unsecure”.
- In the “Device Operations” section, on the “Target” tab, select “Erase Selective”.
- Click “Program Flash” to activate the firmware.
- Refuse to connect the panel during the activation process.
- Disable the programmer and install the equipment in its original location.
List of firmware for Lada Vesta instrument panel
Previous firmware versions are not compatible with subsequent ones. This must be remembered when upgrading yourself. Incorrect selection of the version will damage the electronic engine control unit (ECU) and on-board computer.
| Software version | Gearbox type | Transmission |
| Lada Vesta 026 | 8450007022 | Manual transmission |
| 028 | 8450007022 | Manual transmission |
| 035 | 8450007022 | AMT |
| 036 | 8450007022 | Manual transmission |
| 019 | 8450030825 | Manual transmission |
| 022 | 8450030825 | AMT |
| 027 | 8450030825 | Manual transmission |
Read also: Camshaft gear bolt
As of March 2021, the firmware of the instrument panel on the Lada Vesta and the activation of the backlight in DRL mode are not carried out due to identified errors in the software.
Conclusion
Installing new generation firmware is extremely important for monitoring instrument performance, monitoring engine temperature, and reducing eye strain.
During the flashing process, be extremely careful not to break the sequence of actions. Remember about the compatibility of new generation firmware. If you encounter any difficulties during the upgrade, contact a service station specialist for help.
What can be changed in the firmware
For panels with white scales 8450007022, software – 26, 28, 35, 36:
- Activation of backlight during DRL.
- Activation of cruise control and speed limiter.
For panels with orange scales 8450030825, software – 11, 19, 22, 27:
- Activation of backlight during DRL.
- Display of REAL engine temperature.
- Activation of cruise control and speed limiter.
- Disabling the seat belt warning light.
For LADA VESTA CROSS with panels 8450032207, software – 126; 8450032268, software – 301; 8450032284, software – 501:
- Display of REAL engine temperature.
- Disabling the seat belt warning light.
For LADA VESTA SPORT with panel 8450032556, software – 226:
- Display of REAL engine temperature.
- Disabling the seat belt warning light.
Reviews
| № | Positive |
| 1. | Nikolay , 28 years old (drive2.ru), Sverdlovsk: I was one of the first to buy a car, the dashboard firmware was stock 026. I felt the lack of backlighting in the daytime catastrophically. On the advice of my comrades, I independently updated to version 036. The backlight has become adaptive; when the DRL is activated, the brightness decreases, which was so lacking before. |
| 2. | Mikhali , 33 years old (prom.ua), Samara: I have factory firmware with code 028. The problem with the backlight has already been fixed, but the cruise control indicator does not work stably and periodically gives an error. I plan to upgrade to version 036. |
| 3. | Alexander , 36 years old (autotoday.com), Krasnodar: I’ve been actively using Lada Vesta for four years now, code 026 is preinstalled. Of course, the problem with the backlight and DRL is familiar to me, but this does not prevent me from driving the car. |
| 4. | Valery , 47 years old (rozetka.ua), Rostov-on-Don: I didn’t know about the possibility of flashing before, my garage mates advised me. I drove with constant discomfort for two years, now I know how to fix the backlight “bug”. |
| 5. | Kirill , 45 years old, Kursk (avtoflit.com): when driving in sunny weather, the lack of illumination of the visor is obvious. Fuel level and consumption are not visible online. I heard that you can reflash the control unit with a new code. I'll contact the specialists at the service station. |
| 6. | Sergey , 43 years old, Saratov (autotoday.com): I didn’t update the program code myself, I turned to the workshop specialists for help. The guys did everything in 20 - 25 minutes in total. I am satisfied with the quality, there are no complaints about the operation of the electronic control unit. |
| 7. | Anatoly , 46 years old, Stavropol (drive2.ru): bought a car second-hand, one of the first models. I knew about the problem with the firmware, so the service station updated the code to version 036. Now the dashboard is brightly backlit; when the daytime running lights are activated, the brightness automatically decreases, which is very comfortable for the eyes. |
| Negative | |
| 8. | Vasily , 38 years old (prom.ua), Uralsk: I have negative experience of upgrading software code. The first time I flashed it myself, the installation went wrong. I went to the service station because the car couldn’t even start and had to be towed. |
| 9. | Nikiforovich , 44 years old, Moscow (avtoflit.com): even after updating to the latest current firmware version, the backlight randomly changes brightness. I don’t know what caused this. I contacted the service station after diagnostics and they recommended reinstalling the program code. |
| 10. | Vasily , 36 years old, St. Petersburg (drive2.ru): I updated to version 028 for the first time, the operation of the dashboard was unstable. On the recommendation of my comrades, I decided to re-flash it to 036, since now the equipment is working normally, without any breakdowns. |
| 11. | Gennady , 46 years old, Pskov (autotoday.com): even after updating to version 036, my backlight did not become adaptive. When activated, the DRL does not change brightness. Obviously, the problem is in the program code. |
Read also: Rear brake pads for Toyota RAV 4
FakeHeader
Comments 24
I know. worth it to the maximum...
The standard light, if everything is working properly, is quite enough. The LEDs are redundant. Is the generator voltage normal? If normal, then look for a bad connection. If there is poor contact, xenon will not help))
The diodes do not glare and are clearly visible. If you install diodes the size of standard lamps, and NOT glue tapes...
and will it be regulated if I install diodes:?
The adjustment on my VAZ is not very noticeable on the tidy, but the interior light (also a diode) dims smoothly. Need to try.
The standard light, if everything is working properly, is quite enough. The LEDs are redundant. Is the generator voltage normal? If normal, then look for a bad connection. If there is poor contact, xenon will not help))
the generator is normal, I can see from the work and charging... it lights up normally, but I want it to be brighter, more beautiful, and not dim
The generator may be normal. The question is how much the light bulbs reach. As for brightness, everything should be in moderation. If you overdo it, it will become stressful.
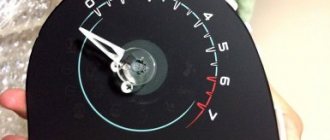
The Vesta instrument cluster has a unique design and modern lighting, which is based on LEDs. To prevent the sun from interfering with reading readings, all indicators are hidden in three large wells. On the other hand, in cloudy weather they may, on the contrary, leave some areas in the shade. In this case, a backlight is needed, but during the day it does not work with DRLs. What to do?
If the Vesta dashboard lights turn on only together with the low beam headlights and do not work during the day along with the DRLs, then reading the readings may be difficult. You can change the way the backlight works in several ways:
Attention! Tampering with the car's electrical system on your own will void the warranty. The author is not responsible, you do all actions at your own peril and risk
You will need to disassemble the shield. Next, we find SMD LEDs, which are responsible for illuminating the on-board computer (they light up when the ignition is turned on), they have constant power, and are controlled by ground. Next to them there is another SMD diode, which is responsible for illuminating all scales. Our task is to connect the contacts of these LEDs with a jumper (a piece of wire, as shown in the photo). If you solder it on the back side of the board, then you do not need to completely disassemble the panel (remove arrows, etc.)
A short jumper is responsible for illuminating the scales in the wells. The longer jumper is for illuminating the hands, an idea borrowed from user Atom308.
Such upgrades are not uncommon for LADA car owners. It is also necessary to solder jumpers in the case of hardware improvements to the Priora instrument cluster with navigation.
Refinement process on video (author):
According to the Lada.Online website’s own information, there are several types of instrument panels for Vesta. Some are distinguished by brighter backlighting, others have a modified backlight operating pattern (it turns on together with the ignition and DRL). Currently they are not mass produced.
Attention! Since the beginning of July 2021, LADA dealers have received firmware for the instrument panel, which allows the backlight to turn on along with the DRLs. You will have to pay extra for the firmware
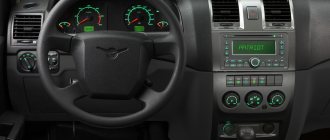
Are you satisfied with the Vesta instrument cluster? Let's remember that we previously looked at how to increase the brightness of the panel yourself, as well as change its backlight color.
Many car enthusiasts are not happy with the lighting of their dashboard in the evening and at night. But poor-quality lighting or its complete absence has a negative impact on road safety. Therefore, many craftsmen do auto tuning with their own hands, making additional lighting for their car. And first of all, the dashboard lighting is done.
Very often, LEDs are used for these purposes, which have many advantages and allow you to create high-quality lighting inside the car with your own hands. This article will tell you how you can install this type of lighting in the dashboard and the nuances that should be observed in this situation.