What does the electrical circuit of a VAZ-21213 or, in other words, Niva (carburetor) look like? This question worries mainly those owners who are trying to independently repair any element that has become unusable.
In reality, the circuit contains almost a hundred components and devices, so in this article we will only talk about individual electrical circuits that most often fail.
Circuit breakers
The block of protective devices in Niva is a board on which disposable fuses are installed, containing a fuse inside. Each of them protects one or more electrical circuits from overvoltage.
The unit is located in the cabin on the left side. Protective equipment is numbered. So, 1 is responsible for the work:
- windshield washer;
- stove fan;
- cleaners for all headlights;
- heating, wiper and washer for tailgate glass.
What do the numbers in the Niva index mean?
To understand the features of the wiring and electrical equipment of a Niva 2131 car or another model with an injector or carburetor, let’s look at the index designations:
Officially, Niva vehicles equipped with diesel engines have never been sold in the Russian Federation and the countries of the former USSR. The cost of such a vehicle, of course, was higher. Those fans of domestic SUVs who were willing to pay such a price could only purchase a car abroad.
Below is a diagram of the VAZ 2121. If you are interested in the electrical diagram of another model, for example, 2131, then it will have certain differences from this modification. For example, in the case of a carburetor, the electrical circuit for charging the battery and ignition system is not protected, unlike injectors.
Generator wiring diagram 2121
Dashboard
All control devices are interconnected. This combination consists in particular of:
- speedometer;
- tachometer;
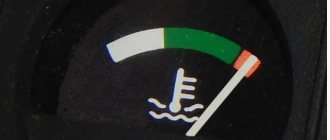
- coolant temperature indicator;
- 12 indicator lamps;
- battery charge sensor;
- fuel level indicator.
All of them are located on the panel.
The schematic diagram shows the combinations available on the instrument panel:
- tachometer (1);
- stabilizer (2);
- panel illumination (3);
- coolant heating indicator (4);
- gasoline level (5);
Warning lamps:
- toxicity reduction systems (6);
- heated luggage door glass (7);
- fog lights (8);
- high beam (9);
- outdoor lighting (10);
- turn signals (11);
- TG level (13);
- oil pressure (14);
- differential locks (15);
- fuel reserve (16);
- seat belts (17);
- parking brake (18).
D1, D2 are diodes (type IN4002).
Cars manufactured before 1996 also have a voltmeter (12 in the diagram).
Finally, there are two resistors:
- R1 – at 470 Ohm (0.25 W);
- R2 –51 Ohm, (5 W).
Diagnostics
You can diagnose problems without a special lift, but this requires hanging the suspected wheel. The use of high-quality bearings allows the car to have no play in the hub, or it can be insignificant (with certain wear, but not yet in critical condition).
After hanging the wheel, you need to forcefully try to shake it in different directions. A serviceable bearing will not give any play or it will be almost unnoticeable. A faulty one can have strong rolling, even without the use of force.
In this case, only replacing the wheel bearing in the field will help. Adjustment and any types of straightening will no longer be effective.
What do the numbers in the Niva index mean?
The only thing the owners complained about was the car’s insufficient power, which did not allow it to realize its full road potential. There were objective technical difficulties associated with a shortage of production capacity, which the automaker managed to overcome over time.
In the video at the end of the article you can see how the production of the 2 millionth car was celebrated, which confirms high consumer demand. In a word, the developers did not remain deaf to modern trends, proposing several modifications of power units for the VAZ 2121 Niva.
| Engine capacity | Injection system | Ignition system | Power, hp | Factory index |
| 1.6 l | carburetor | classical | 79 | VAZ-21210 |
| 1.7 l | carburetor | classical | 80 | VAZ 21213-1000260 |
| 1.8 l | carburetor 21073 Solex type or injector | contactless/injection - electronic with Bosch MP 7.0 controller | 82/85 | VAZ 2130-00 – carburetor VAZ 2130-20(26) – injection |
| 1.7 l | distributed fuel injection | contactless with BOSCH MP 7.9.7 controller. or JANUARY 7.2 | 83 | VAZ-21214-20 |
| 1.9 l | diesel XUD-9SD | — | — | VAZ-21215 |
To determine the engine type, you should look at its code on the block
For reference: The code on the VAZ 21213 and VAZ 21214 block always begins and ends with the symbol * (asterisk). Therefore, the block marking for these models consists of ten characters.
Accordingly, the cars themselves received new indices linked to the installed power unit:
For reference: In Russia and the CIS countries, a car with a diesel engine was not officially sold. The price of an SUV was higher than passenger models, but this did not stop buyers seeking freedom of movement.
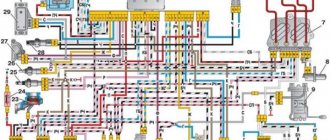
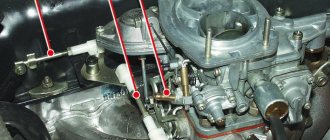
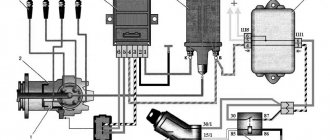
The photo below shows the wiring diagram of a VAZ 21213 with a classic carburetor power unit.
Diagram of a VAZ 21213 with a 1.7 liter carburetor engine
Note! The applied wiring diagram of the Niva VAZ 21213 differs from other modifications. In particular, on the carburetor model the battery charging and ignition circuits are not protected.
Main information devices
The instrument panels of the VAZ 2114 show information about the status of important operating components of the car. The main part is an information block with two round scales and several smaller indicators.
- The speedometer is the right round scale on the panel with marks from 0 to 200 km/h, which shows the speed of the car. The device sensor is located in the transmission assembly and is connected to the display in the cabin. Below the scale there is a window that displays the vehicle's mileage.
- The indicator to the right of the speedometer shows the level of gasoline in the tank. It has three main divisions - 1, ½ and 0. One - the tank is full, zero - empty. When the fuel is running low, the orange fuel icon lights up.
- The tachometer is the second large round scale, which is located on the left of the panel. Displays information about the crankshaft rotation speed - engine operation. Its norm is 3500-5500 rpm, everything beyond that is a critical value at which breakdowns of the engine unit occur. The indicator below the scale displays the air temperature around the engine.
- The small indicator to the left of the tachometer is the cooling fluid temperature sensor. Values from 50 to 130°C, where a value of 105°C and above indicates possible engine overheating.
Pinout of lock VAZ-2108, VAZ-2109, VAZ-21099
Pinout according to the old type
Lada Granta instrument panel pinout
Pinout of the VAZ-2109 ignition switch with unloading relay:
- comes +12V in position I, II, III (parking)
- comes +12V in position I, II, III (parking)
- comes +12V in position III (parking)
- position I, +12V goes out after turning on the ignition (contact 15/2), disappears at start (II);
- position I, +12V goes to the starter (pin 50);
- position I, +12V goes away after turning on the ignition (pin 15), does not disappear when starting II;
- +12V comes from the battery (pin 30);
- comes +12V constantly.
New pinout type
Pinout of the new VAZ-2109 ignition switch:
- comes +12V constantly
- comes +12V constantly
- +12V arrives after turning on the ignition (pin 15), does not disappear when starting II;
- +12V arrives after turning on the ignition (contact 15/2), disappears at start (II);
- position I, +12V goes to the starter (pin 50);
- +12V arrives after turning on the ignition (pin 15), does not disappear when starting II;
- +12V comes from the battery (pin 30);
- comes +12V constantly.
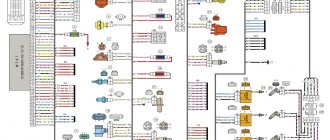
Features of electrical equipment
Generator Differences
It was already mentioned earlier that the wiring diagram of the VAZ 21213 had some differences, primarily related to the installed power unit.
In particular, fuel-injected versions required a more powerful generator, so:
They are structurally similar and are synchronous AC machines with a built-in rectifier and output voltage regulator . Electric generator circuit for the carburetor version of the Niva car
Wiring Differences
The VAZ 21213 engine compartment wiring is made in different designs to facilitate do-it-yourself maintenance.
Niva wiring harness for installation in the engine compartment
For versions with an injection power unit, the wiring on the VAZ 21213 has three additional connectors for the contactless ignition unit.
In addition, the VAZ 21214 model has 2 radiator cooling fans, so the wiring for them also has its differences from the “thirteenth”. A schematic diagram of connecting the elements of the cooling system is presented below.
Electrical diagram for connecting Niva fans
Source
Location.
On Niva DS is installed on the gearbox. This allows data to be read only while driving, turning off when the engine is in neutral.
The device itself consists of a plastic case, inside of which electronic components are located. For proper operation, it is placed in close proximity to the shaft. There is a built-in magnetic bar inside the shaft that creates electrical signals when rotated.
The product is quite fragile, so when dismantling or installing you must be extremely careful not to damage its body.
Attachments
Chandelier
An arc with additional headlights, called a “chandelier” among car enthusiasts, is sold in car dealerships. True, its price is not always adequate to the parts used, which forces car owners to use ingenuity and their own hands.
It is quite possible to make a similar mount for headlights yourself.
If you are one of these handy drivers, then the following information will allow you to make and correctly install this attachment yourself.
The arc itself can be made from:
- Old trunk. You can buy it at a car flea market;
- Or use existing fasteners;
- Use furniture fittings.
We will not dwell on this in detail, but will focus on the correct connection of additional lighting devices. A homemade arc, if done carefully, is no different from purchased products
Connection features
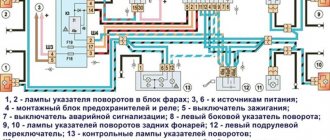
The first thing you should arm yourself with is a high-quality wiring diagram for the Niva 21213. It is shown in the photo below. Firstly, such a diagram is useful for maintenance, and secondly, with its help it is easy to determine the location for connecting the wiring harness.
Factory color scheme of electrical equipment VAZ 21213
The second important point is the frequency of use of the chandelier:
- Constantly, including traffic in urban environments;
- Only when driving outside urban and suburban highways (off-road). And here a proven diagram is absolutely necessary for an off-road vehicle.
The chandelier control output can be connected to a standard switch
The most preferable is the removable option, which provides for quick installation and dismantling of the chandelier, as well as its safe connection to the standard electrical wiring. The video in the article clearly demonstrates this process. Connection instructions are presented above.
But what you should pay attention to is the adjustment of the light flux. The fact is that when driving off-road, the hood of a car is often covered with dirt, which in the dark glares in the headlights, blinding the driver. Therefore, there are 2 options:
Therefore, there are 2 options:
- Install a special sun visor above the windshield;
- Move the chandelier back so that the edge of the light stream does not fall on the hood of the car.
Proper installation of the chandelier prevents glare
Checking the sensors.
In order to check the DC, you need to have a multimeter, then follow a certain procedure:
- Turn off the sensor.
- We connect the red (positive) probe to the DC contact.
- We connect the black (negative) probe to ground.
- We fix a tube of suitable diameter onto the shaft in order to be able to rotate it.
- We switch the multimeter switch to low voltage measurement mode.
- It is necessary to rotate the shaft and observe the readings: as the speed increases, the readings on the multimeter display will increase. If the readings do not change, the sensor is faulty.
Another method does not require removing the sensor. To do this, you need to jack up one wheel so that it is at a distance from the ground and can rotate freely. After this, you need to connect a multimeter to the DC connectors. You need to rotate the wheel and observe the readings of the device. A change in voltage will also indicate performance.
Removal and installation instructions
How to modernize a VAZ 2105, give it some zest and functionality using the instrument panel?
How to remove and install the dashboard on a Niva:
- First, you need to remove two plugs from the control panel lining and unscrew the screws. Next, unscrew the screws that secure the tidy visor.
- The right side of the panel facing is pulled out, the pads from the keys are removed, as well as the connector. Next, the control panel trim is removed from the left side; by doing this, you can dismantle the button for activating the side lights and optics. After this, the panel lining can be completely dismantled.
- The two screws of the tidy are unscrewed, the shield itself is removed, and all connectors and plugs are disconnected. If there are problems with the operation of the shield, they are resolved at this stage. The device is being repaired, it is soldered, and burnt-out light bulbs are replaced.
- Next, the shield is installed. When installing, keep in mind that the holes in the steel strip located under the tidy must line up correctly. Further installation is carried out in the reverse order of removal.
How to check the VAZ speed sensor
A failed speedometer sensor in a VAZ car is easily determined - in this case, the speedometer stops working, and it may also show some signs of life, but display incorrect information.
Using a tube, pliers or other available tools, rotate the sensor axis. In this case, you should see the voltmeter readings changing: the higher the speed, the higher the voltage (from 0.5 to 10 V). If this does not happen, the sensor requires replacement.
Malfunctions and repairs
Instruments or indicators may fail.
This could be part of the indicators or even the entire speedometer. VAZ 2110 owners rarely encounter this situation, since the dashboard works properly, especially in domestic cars. Before changing the instrument panel or repairing individual parts, you should make sure that the sensors are working properly - we use the on-board computer. Inaccurate installation leads to failure of elements. On the instrument panel board, the parts are attached using simple rivets, hence the negative result. The body is constantly subject to vibrations, so the installation simply “falls apart” and breaks appear in the circuit. Repair in this case involves soldering the rivets and thoroughly cleaning the contacts.
- It is necessary to remove the plug; the board does not need to be disconnected from the case.
- The next step is to apply flux to the places on the board with arrows (photo below). Both pads also need to be removed and thoroughly lubricated.
After soldering is completed, the instrument panel can be returned to its place. If you have free time, you can go through the contacts using sandpaper. On older cars they usually oxidize, which can prevent the devices from functioning properly.
You can see how to remove the dashboard in the video below.
Glowing VDO instrument panel from VAZ 2110
I missed the Latvian illuminated instrument cluster (CI) - I didn’t buy it in the summer of 1999, when it cost 600 rubles. And now the situation with them is quite tense, or more precisely, “... there is no delivery and is not expected.” They say that they are in Tolyatti, but for $80 with a speed sensor. Expensive…
However, in markets and stores there is an abundance of VDO instrument clusters for the VAZ 2110 car, model 2110-3801010-02, which is also installed on the 115 VAZ model. In relation to the “eighth” panel, it has disadvantages:
- Doesn’t fit very well; you’ll have to cut the torpedo visor, otherwise some of the lamps will not be completely visible;
- There is no built-in BSK (on-board control system);
- It is necessary to select a fuel level sensor with the appropriate resistance, otherwise the indicator may be “slightly misaligned”.
Otherwise there are only advantages
- All instruments are more accurate, especially noticeable in the fuel level and coolant temperature sensors;
- The speedometer and tachometer are located in the center, all arrows are controlled by stepper motors - the movement of the arrows is smooth;
- The fuel light doesn't blink like crazy, because... it is ignited by electronics, and not by a contact in the tank;
- The total and daily mileage are displayed on the LCD display - when the car is not started, the mileage is not visible on the instrument panel. Relevant for new cars.
- There is a self-diagnosis mode - you need to turn on the ignition while pressing the reset button for the daily mileage counter.
Another plus: the speedometer cable becomes unnecessary, which often makes various sounds - sometimes it clicks, sometimes it clicks... True, I also had to buy a DS (speed sensor, since I have a carburetor car). The sensor needs to be taken only with an iron pin and a connector identical to the connector of the Hall sensor - it is easier and much cheaper to buy a chip for it.
Connection
Three chips fit the standard CP: white (X1) and red (X2), also one smaller red one (for BSK). Before changing the wires, a bundle of wires from the red block was pulled through the window in the dashboard next to the wires of the white block. Otherwise, you won’t be able to remove the dashboard later—tangled wires won’t allow it.
All wire movements are recorded in tables. If you are not completely sure of success, you can sign each wire by sticking pieces of paper tape on them. As a result, only three wires will remain in their places...