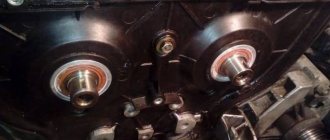
2. Disconnect the catalytic converter from the exhaust pipe (see above, “Catalytic converter - replacement”).
3. 13 mm
Unscrew the two nuts securing the clamping bar and remove it from the bracket studs.
4. 13 mm
unscrew the two bolts securing the bracket to the cylinder block.
6. Using a slotted screwdriver, bend the edges of the locking plates of the nuts securing the exhaust pipe to the exhaust manifold.
13 mm socket wrench
Using an extension, unscrew the four nuts securing the exhaust pipe to the exhaust manifold.
9. Remove the gasket from the studs.
The main sign indicating possible problems with the gasket of the VAZ 2114 pants is a changed sound (bass) from the exhaust pipe when the engine is running. When an element wears out, you will immediately hear and identify disturbances in the operation of the exhaust system. This will increase the noise level and exhaust sound. However, it is worth understanding that such signs may indicate failure of other components of the exhaust system (for example, the resonator). To accurately determine the possible causes, conduct a thorough diagnosis.
Fault diagnosis
To determine operational problems, you should start the car engine. It is best to carry out the activities together, so that one person sits in the driver’s seat and, at the command of the second, increases the operating speed of the engine. The second person should be located in the inspection hole or under the overpass exactly under the bottom of the car. When the speed increases, you need to carefully inspect the entire exhaust system line, record the source of increased noise and possible leakage of exhaust gases. If you have decided to replace the problem unit, read below for instructions on how to change pants on a VAZ 2114.
Removing and installing the catalyst
Removing and installing a catalytic converter on a VAZ 2115 is a relatively simple task. The procedure itself is carried out in several stages:
1. Using keys “17”, unscrew the fastening of the catalyst to the exhaust pipe of the exhaust manifold. We take out the bolts and spring washers;
2. Place a suitable stand under the catalyst. The fact is that the catalyst on the VAZ 2115 car is not fixed with the help of any rubber hangers, and therefore, in order for it not to fall on your head, after unscrewing the fastening bolts, it must be secured somehow. This can be done either by installing a stand under it, or by temporarily securing it with wire;
3. Now unscrew the catalyst from the inlet pipe of the additional muffler and carefully remove it.
We install the new catalyst in the reverse order.
How to replace a muffler on a VAZ 2114/2115
If you start having any problems with the muffler, it is better not to put it off for a long time. The life and health of the driver and passengers depends on how correctly the “glushak” works. In general, the replacement process itself begins with the selection of a new exhaust system kit. It is best not to save money, but to purchase an original factory one. This will delay the need for repeated replacement indefinitely.
In addition, it is recommended to change the fastening bolts during each replacement. It is necessary to choose products made from heat-resistant materials, since otherwise the bolts will quickly stick to the bottom and will be impossible to unscrew.
To ensure reliable operation, it is advisable to buy new rubber suspensions in advance.
What tools will you need?
To work you will need a simple set of tools:
two open-end wrenches for 13;
brake fluid or WD-40 lubricant;
screwdriver with a flat thin blade.
How to remove a muffler without a hole
The easiest way is to use an overpass or inspection hole - in this case, you can more conveniently crawl under the car body and carry out the necessary operations. However, drivers often do not have the opportunity to use such devices, so they use a regular jack.
To remove the “glushak” from a VAZ 2114/2115, you must:
Jack up the rear left edge of the vehicle.
Make sure the machine is stable.
Reach under the body and moisten all pipe connections and bolts with lubricant.
Wait 10–15 minutes until the liquid is absorbed.
After which you can begin to unscrew the bolted connections. If the bolts cannot be unscrewed with regular wrenches, it is recommended to cut them off with a chisel and hammer. However, you need to act extremely carefully so as not to catch the bottom.
After the pipe has been unscrewed, all that remains is to remove the part from several rubber hangers. To do this, the body is raised slightly. If the rubber band is tight, you can pry it off with a screwdriver.
The dismantled muffler is pulled out from under the car.
The muffler on the VAZ 2114/2115 is attached to the bottom with five hangers
How to install a new one and secure it correctly
Before you begin installing a new muffler, you need to clean all strategically important places under the bottom: hooks for attaching rubber bands, brackets for bolts. Install the product in the reverse order:
First, pull the muffler under the car body and position it in the position in which it will be fixed.
After this, hang the exhaust pipe and resonator on rubber hangers. Make sure that each connection is secure and the part will not fall off the hooks at the first road pothole.
Next, start tightening the nuts on the bolts. Screw it all the way, but without fanaticism, as you can break the thread.
Lower the car from the jack.
After this, it is recommended to check the performance of the VAZ. It will be enough to start the engine and rev it up a little.
Video: replacing the muffler
What is this?
Engine overhaul refers to the work of a master aimed at returning the engine to a state as close as possible to its original state. In this case, most of the nodes are changed or restored. This type of repair is resorted to when there is a lot of wear on the parts of the unit.
The list of work may include grinding the crankshaft journal and camshaft, installing new pistons and springs, and honing the cylinders. If too many engine components are faulty, then it is more advisable to completely replace it.
The following signs indicate that it is time to overhaul the engine on the VAZ-2114:
- The appearance of red, black or dark gray carbon deposits on the spark plugs.
- Increased oil consumption.
- The occurrence of knocking in the engine.
- Increased fuel consumption.
- The appearance of smoky exhaust.
- Bad traction.
- Engine overheating.
- At idle, the engine runs unevenly.
- Reduced power.
Major repairs proceed approximately according to this scheme:
- Preparing the engine for dismantling (disconnecting wires, hoses, gearbox).
- Removing the engine.
- Removal and inspection of the cylinder head.
- Disassembling the unit for diagnostics and cleaning.
- Block boring. Grinding the crankshaft. Application of hone to the cylinder walls.
- Weight distribution of connecting rods, pistons.
- Block assembly.
- Restoring the head (replacing caps and guides, straightening seats).
- Assembling the engine and installing it in the engine compartment.
- Connection.
- Functionality check.
Is it possible to repair the VAZ 2114 muffler?
Before purchasing a new muffler for your car, you need to evaluate the possibility of repairing it. Experience shows that these parts are quite repairable. If you decide not to rush into purchasing an expensive part, you need to remove the muffler, clean it thoroughly and carefully inspect it. The damage can be significant, including a pipe falling off the muffler barrel or in the form of cracks and small burnouts.
Repair of muffler VAZ 2114
The nature of the repair also depends on the results of the inspection, but in any case, having decided to repair the VAZ 2114 muffler. To do this, you need to purchase a muffler repair kit from a car shop.
If the damage is quite serious, and the metal from which the muffler is made is still strong enough, then it is recommended to weld the burnouts. A semi-automatic machine is used for welding; a metal plate up to 2 mm is used as an overlay. The seams are made thick to avoid burnout.
Small cracks are sealed with silicone-based sealant that can withstand temperatures up to 1000 degrees. You can cover it with fiberglass, filling it with epoxy resin with special, heat-resistant additives. With this repair option, after installing the muffler, you need to start the engine and idle for an hour to allow the epoxy to set.
The procedure for removing the muffler for repair and its subsequent installation is similar to the procedure for replacing it.
Symptoms of a problem
The main sign indicating possible problems with the gasket of the VAZ 2114 pants is a changed sound (bass) from the exhaust pipe when the engine is running. When an element wears out, you will immediately hear and identify disturbances in the operation of the exhaust system. This will increase the noise level and exhaust sound. However, it is worth understanding that such signs may indicate failure of other components of the exhaust system (for example, the resonator). To accurately determine the possible causes, conduct a thorough diagnosis.
Fault diagnosis
To determine operational problems, you should start the car engine. It is best to carry out the activities together, so that one person sits in the driver’s seat and, at the command of the second, increases the operating speed of the engine. The second person should be located in the inspection hole or under the overpass exactly under the bottom of the car. When the speed increases, you need to carefully inspect the entire exhaust system line, record the source of increased noise and possible leakage of exhaust gases. If you have decided to replace the problem unit, read below for instructions on how to change pants on a VAZ 2114.
How to replace a muffler on a VAZ 2114/2115
If you start having any problems with the muffler, it is better not to put it off for a long time. The life and health of the driver and passengers depends on how correctly the “glushak” works. In general, the replacement process itself begins with the selection of a new exhaust system kit. It is best not to save money, but to purchase an original factory one. This will delay the need for repeated replacement indefinitely.
In addition, it is recommended to change the fastening bolts during each replacement. It is necessary to choose products made from heat-resistant materials, since otherwise the bolts will quickly stick to the bottom and will be impossible to unscrew.
To ensure reliable operation, it is advisable to buy new rubber suspensions in advance.
What tools will you need?
To work you will need a simple set of tools:
two open-end wrenches for 13;
brake fluid or WD-40 lubricant;
screwdriver with a flat thin blade.
How to remove a muffler without a hole
The easiest way is to use an overpass or inspection hole - in this case, you can more conveniently crawl under the car body and carry out the necessary operations. However, drivers often do not have the opportunity to use such devices, so they use a regular jack.
To remove the “glushak” from a VAZ 2114/2115, you must:
Jack up the rear left edge of the vehicle.
Make sure the machine is stable.
Reach under the body and moisten all pipe connections and bolts with lubricant.
Wait 10–15 minutes until the liquid is absorbed.
After which you can begin to unscrew the bolted connections. If the bolts cannot be unscrewed with regular wrenches, it is recommended to cut them off with a chisel and hammer. However, you need to act extremely carefully so as not to catch the bottom.
After the pipe has been unscrewed, all that remains is to remove the part from several rubber hangers. To do this, the body is raised slightly. If the rubber band is tight, you can pry it off with a screwdriver.
The dismantled muffler is pulled out from under the car.
The muffler on the VAZ 2114/2115 is attached to the bottom with five hangers
How to install a new one and secure it correctly
Before you begin installing a new muffler, you need to clean all strategically important places under the bottom: hooks for attaching rubber bands, brackets for bolts. Install the product in the reverse order:
First, pull the muffler under the car body and position it in the position in which it will be fixed.
After this, hang the exhaust pipe and resonator on rubber hangers. Make sure that each connection is secure and the part will not fall off the hooks at the first road pothole.
Next, start tightening the nuts on the bolts. Screw it all the way, but without fanaticism, as you can break the thread.
Lower the car from the jack.
After this, it is recommended to check the performance of the VAZ. It will be enough to start the engine and rev it up a little.
Video: replacing the muffler
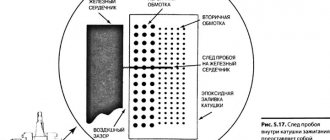
Should high-voltage wires be replaced and when?
No matter how well the armored wires are made, they also have a limited service life. According to current regulations, they must be replaced after every 30,000 km traveled. In practice, many motorists ignore this rule, continuing to travel with wires that have already outlived their useful life.
Such inattention can cause a whole host of problems, including:
- poor ignition;
- overclocking problems;
- engine tripping;
- inability to start the car.
All these troubles are caused by one single factor - an increase in the electrical resistance of the core of high-voltage wires, as a result of which it becomes “more difficult” for the impulse from the coil to reach its destination.
You can check whether you can still drive with the old wires or not - at home.
To do this you need:
- Turn off the ignition.
- Remove one of the armored wires.
- Measure its resistance using a megohmmeter or multimeter in the appropriate mode.
- If the resistance turns out to be equal to or close to the figure indicated on the wire insulation, then it is in good condition, but if it turns out to be greater, then the wire should be replaced.
- Repeat this operation on the remaining three wires.
It should be remembered that if only one of the wires is faulty, then all four should still be replaced.
Also, do not forget about the cleanliness of the contacts of high-voltage wires - they can also cause ignition problems. If oxides are noticeable on the metal tip, they should be cleaned with fine sandpaper or a cloth moistened with kerosene. By following these simple rules for caring for armored wires and replacing them, you can almost completely avoid troubles associated with the ignition system.
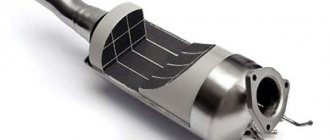
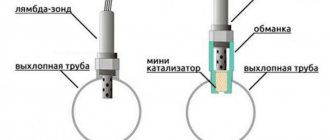
Silencer - purpose, device, operation
An important element of the exhaust system is the muffler; operating a car without it is impossible. As a rule, the muffler is located at the rear of the vehicle and, in conjunction with the exhaust system, serves to remove harmful gases from the engine, bypassing the vehicle interior.
Car mufflers are made from stainless, aluminized and regular black steel. Stainless steel “silencers” are practically not available for sale due to their high cost and long service life (their service life is 10–15 years). Aluminized mufflers are installed on VAZ 2114/2115. They are common in the domestic and European markets (service life 3–7 years). Regular black steel mufflers are cheap substitutes and last only a few months, so are rarely used.
What does the price depend on?
Motorists who need engine overhaul of a VAZ-2114 are faced with different prices for such a service. The cost depends on the influence of factors:
- Engine capacity.
- The prestige of the service company, its pricing policy.
- Urgency.
- Scope of work.
- Difficulty of repair.
- The need for a specialist to visit.
- Cost of spare parts.
- Equipment used.
- Automotive technician qualification level.
The more work is required to restore the engine of a VAZ-2114 car, the more expensive the service of a specialist will cost. You will have to pay extra for urgency and a specialist visit.
What is a car muffler for?
Regardless of the make and year of manufacture of the car, all its systems serve one purpose - to ensure stable operation of the engine and movement. The exhaust system may seem insignificant compared to systems such as the brakes or fuel. However, it is the vehicle's exhaust system that has the most direct impact on engine performance.
The muffler is an integral part of the exhaust system . Its main purpose is to remove exhaust gases outside the car. In addition, the part also serves to reduce noise, since residual fuel can burn in the exhaust system pipes.
The pipe comes out from the rear left side of the car
How to attach
The muffler on the VAZ 2114/2115 is attached to the car body. To ensure that the pipe is securely fixed and does not vibrate during movement, two fastening methods are used:
- bolted;
- on rubber suspensions.
Bolts and nuts for fastening the muffler pipes are made of special heat-resistant alloys
The muffler is attached directly to the exhaust manifold with bolted connections, which guarantee complete tightness of the joints. The middle part is also fixed with bolts and nuts. And the resonator and exhaust pipe are suspended on special hooks on the bottom with elastic bands. These suspensions are easy to remove and put on, but at the same time provide rigidity even when driving on uneven roads.
Schematic design of the exhaust system on a VAZ 2114/2115
The gas exhaust system of the VAZ 2114/2115 consists of several parts. Connecting to each other in series, all parts ultimately serve one purpose - reducing noise and removing exhaust emissions outside the body.
1 — bracket for fastening the exhaust pipe; 2 - gasket; 3 — clamping device for the bracket; 4 — additional muffler; 5.7 — “pillows” for muffler suspension; 6 — main muffler; 8 — clamp connecting the muffler pipes; 9 - neutralizing device; 10 — hinge sealing ring; 11 - sensor that monitors the oxygen concentration in emissions; 12 — exhaust pipe for mufflers
Causes of breakdowns of the VAZ2114 exhaust pipe
Since the unit is attached directly under the bottom of the car, and our Russian roads leave little to be desired, the most common occurrence is driving into a hole (even worse if it is hidden under a puddle) with subsequent damage to both the exhaust pipe itself and the place where it connects to the muffler. The second most common reason is the vulnerability of the gasket itself. The fact is that it is constantly exposed to a strong influence of hot exhaust gases, therefore, in an aggressive environment, the destruction of the product (burnout) accelerates. “Please note that if you have diagnosed wear or damage directly on the pipe itself, you should replace not only the unit that is damaged, but also the sealing gasket. This approach will ensure the best durability and wear resistance of the entire pipe section, and the old gasket will not become a bottleneck in the entire exhaust pipe.”
Do-it-yourself exhaust system and muffler repair
As a rule, the main reason for muffler failure is that it burns out and holes appear in the housing. Also, the enemy of the muffler is corrosion, mechanical damage, etc.
Moreover, even if the muffler 2115 or 2114, as well as other cars (both domestic and foreign cars) looks normal on the outside, it is also destroyed on the inside. When the engine is running, you can hear ringing and rattling in the muffler, especially when revving the engine. If the problem is not in the suspensions, then this indicates the destruction of the internal partitions.
Occasionally, mistakes can be made when repairing the exhaust system, that is, a knock appears after replacing the resonator or exhaust pipe. In this case, you need to make sure that gaskets, connections, etc. are installed correctly.
For example, pipes are connected using a clamp, while there is a spherical ring inside. This connection is not flexible. In this case, you can change the angle between the pipes, thereby changing the center of gravity. You can also change the slope of the pipe arc, moving it away from the fuel tank. In fact, with such simple manipulations you can already get the desired result.
- Let us also add that during operation, dirt may accumulate in the muffler. Over time, this soot and dirt clogs the muffler. In this case, the exhaust does not come out in full, there is no normal ventilation, and the car begins to “stupid” when accelerating.
Technical characteristics of the VAZ 2114 engine model 2111
- ICE type - in-line;
- four cylinders, two valves per cylinder;
- cylinder diameter - 82 mm;
- compression ratio - 9.8;
- ICE volume - 1.5 liters;
- engine power - 78 hp. With.;
- maximum torque - 116 Nm at 3000 rpm;
- average fuel consumption in mixed mode is 7.3 liters per 100 km;
- ICE weight - 127 kg;
- the service life of the power propulsion system is 150 thousand kilometers, during practical operation the service life reaches 250 thousand kilometers;
- real engine tuning is possible in various ways and without loss of service life the power can be increased to 120 hp. s., there is the potential to increase the power of the internal combustion engine to 180 hp. pp., but with a significant loss of power plant life.
Video on replacing the exhaust pipe:
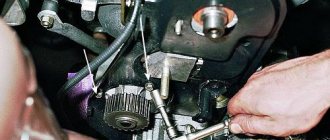
On vehicles equipped with a distributed fuel injection system with and without feedback, the attachment of the exhaust pipes to the exhaust manifold is the same. The only difference is how the pipes are attached to the resonator or to the catalytic converter.
NOTES The operation is shown on a vehicle equipped with a distributed fuel injection system without feedback (no exhaust gas converter). For fastening the exhaust pipe to the exhaust gas converter, see “Replacing the catalytic converter.”
You will need: a screwdriver, a 13mm socket, a wrench, an extension, a 13mm wrench.
1. Place the car on a lift.
2. Unscrew the two nuts securing the exhaust pipe to the bracket under the bottom of the car. Then remove the two bolts securing the bracket to the body and remove the bracket.
3. Bend the ends of the locking plates of the nuts securing the exhaust pipe to the exhaust manifold.
4. Unscrew the four nuts securing the exhaust pipe to the exhaust manifold.
- Replacing the exhaust pipe on a VAZ 2101-VAZ 2107
5. Unscrew the two nuts and remove the clamp.
6. Disconnect the exhaust pipe from the muffler and the resonator pipe by removing the O-ring. Replace the damaged ring. Remove the exhaust pipe.
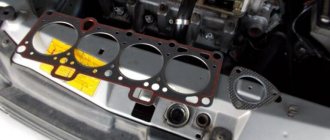
7. Replace the torn or burnt exhaust pipe flange gasket.
8. Check the flatness of the exhaust pipe flange. To do this, draw the edge of a metal ruler along the surface of the flange. If in some places the ruler does not fit tightly, it means that the flange is warped and the receiving pipe must be replaced.
9. Install the exhaust muffler pipe in the reverse order of removal. When installing, replace the nuts securing the exhaust pipe to the exhaust manifold and the exhaust pipe gasket. Tighten the nuts securing the exhaust pipe to the exhaust manifold to a torque of 21–26 N·m (2.1–2.6 kgf·m).
10. After installing the pipe, lock the nuts securing it by bending the edges of the locking plates.
VAZ cars of the 14th and 15th models are still in demand among Russian drivers today. The machines are easy to use, do not require vigilant attention and rarely require repairs. However, they also have a “sore spot” - the mufflers. Therefore, VAZ 2114/2115 owners need to be prepared for the fact that sooner or later they will have to repair or replace the silencer on their car.
Malfunctions
- Various mechanical damage;
- Burnout of asbestos gasket;
- Fatigue and wear of the metal and, as a result, burnout;
- Defects at the joints;
- Cracks.
Considering the above, first of all, the driver must determine the source of infection and work out a schematic way to eliminate it. Let's imagine that the muffler on your car has burned out.
, this is the most common phenomenon on many cars and the VAZ 2115 is no exception.
{banner_content}
How to repair a “glushak” with your own hands
The muffler on the “fourteenth” and “fifteenth” is considered one of the most vulnerable points of the car. The fact is that due to exposure to high temperatures, the metal quickly burns out, that is, the tightness of the system is broken. Therefore, the part must be changed as soon as there is a suspicion that it is not working.
Reasons for failure
Most often, mufflers “burn out” - that is, due to hot exhaust, the metal inside the housing begins to thin out, which ultimately leads to the appearance of holes. However, this is not the only reason why the silencer may fail:
- using a homemade device - handicraft products do not differ in quality and long service life;
- mechanical shocks from uneven roads - dents and deformations of the pipe also lead to loss of tightness;
- Rust and corrosion sooner or later affects even the highest quality original mufflers.
In general, all of the above factors influence service life to some extent. The car owner can easily identify all of the above faults - just drive the VAZ into the inspection hole and visually examine the muffler. In addition, when deformations, burnouts and corrosion reach their “peak”, the part will begin to make characteristic sounds when moving - gurgling, sharp pops, knocking.
Why is the muffler knocking?
This part on the VAZ 2114/2115 can make knocking noises only in two cases:
- it hits the body;
- When moving, it touches the gas tank housing.
In any case, it is necessary to immediately take measures to eliminate this malfunction. Most often, the problem lies in severe wear of the rubber suspensions. It is enough to change them and the muffler will again return to its normal position under the bottom of the car.
Pendants are inexpensive, so you can buy new products without spending any money.
In some cases, the silencer begins to knock when its elements have been installed incorrectly - for example, after replacing the resonator or exhaust pipe. In this case, you will need to double-check that all fasteners and gaskets are installed correctly.
What to do if the plug is clogged
During vehicle operation, dirt, soot, fuel impurities and other sediments will inevitably accumulate in the exhaust system pipes. Gradually, they will settle on the walls of the muffler and clog its working space.
The driver can notice this only by the behavior of his car:
- At first, it will be difficult to gain speed when overtaking.
- Then, even with uniform movement, the car will have difficulty maintaining the set speed limit.
- Black exhaust from the pipe, loss of engine dynamics.
Cleaning the muffler is a tedious and time-consuming procedure. In addition, if the pipes are clogged, then, most likely, after cleaning, other defects will be revealed - such as rust or burnouts. Therefore, it is more advisable to simply install a new one.
Thermal insulation is completely burnt out
The car owner needs to carefully ensure that the resonator coating is always sealed. The barrel is covered with special thermal insulation materials, which sooner or later burn out during the operation of the machine. If you do not change the insulation in time, you will soon have to change the muffler itself.
To do this, the pipes are dismantled from under the car and separated in parts. A special heat-resistant cloth is glued to the surface, which can be purchased at any auto store. Such protection will ensure a longer service life and significantly reduce the noise of the motor.
Features of the 2111 (1.5i) engine power system
Location of elements of the 2111 (1.5i) engine power supply system in the engine compartment:
1 - receiver; 2 — vacuum supply hose to the fuel pressure regulator; 3 — throttle assembly; 4 - fuel rail; 5 — fuel pressure regulator; 6 — air supply hose to the throttle valve; 7 - adsorber; 8 — air filter; 9, 10 and 11 — hoses of the crankcase ventilation system; 12 — throttle valve drive cable; 13 — diagnostic fitting
Read more: Resistances for 12V LED
combined with the fuel level indicator sensor into a single unit - fuel module
(often called an electric fuel pump). The pressure pump delivers fuel from the tank through the fuel filter to the fuel rail.
Engine Fuel Module 2111 (1.5i):
1 — fuel level indicator sensor; 2 — connecting block; 3 — inlet pipe; 4 - outlet (discharge) pipe; 5 — module cover; 6 — module cover guide; 7 - electric fuel pump in a plastic casing; 8 - intake chamber
Fuel rail for engine 2111 (1.5i) complete with injectors:
1 — diagnostic fitting; 2 - fuel rail; 3 — fuel supply tube to the fuel rail; 4 — fuel pressure regulator; 5 — tube for draining (draining) fuel into the tank; 6, 7, 8 and 9 - injectors
Fuel pressure control
installed on the fuel rail. Excess fuel is returned to the tank through the fuel return line.
Engine power supply system diagram 2111 (1.5i):
1 - nozzle; 2 - fuel rail; 3 — diagnostic fitting; 4 - adsorber; 5 - check valve; 6 — throttle assembly; 7 - gravity valve; 8 — safety (two-way) valve; 9 - separator; 10 - filler pipe; 11 — fuel filter; 12 — fuel drain line; 13 — fuel line hose connecting the outlet pipe of the fuel module to the fuel filter; 14 — fuel module; 15 — fuel tank; 16 — fuel line connecting the fuel filter to the fuel rail; 17 - fuel pressure regulator
Design of the VAZ 2114 exhaust gas system.
| 1 | exhaust pipe mounting bracket |
| 2 | pad |
| 3 | bracket clamp |
| 4 | additional muffler |
| 5 | muffler suspension cushions |
| 6 | main muffler |
| 7 | muffler pipe connection clamp |
| 8 | exhaust pipe |