This article with video instructions tells how to replace the pump on a VAZ-2115 car with your own hands.
A water pump is a mechanism for circulating fluid in a car's cooling system. Failure of the pump (pump) to work can lead to a change in the temperature regime inside the motor and lead to more serious damage. To avoid this, it is recommended to carry out regular preventative checks and visual inspection of the engine in order to identify faults and timely replace the pump.
Water pump design
The design of the water pump in passenger cars is essentially the same, this especially applies to Russian car models. So there is no need to look for the location of the pump, knowing that it operates from the timing belt and is located next to the radiator.
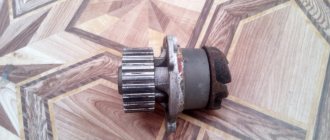
Technically, the pump looks like this: a shaft with an impeller mounted on it is fixed in the cover, the rotation of which leads to the movement (circulation) of liquid in the engine cooling system. On the opposite side of the shaft there is a drive pulley. By means of a timing belt drive and a drive wheel (pulley), energy from engine rotation is supplied to the shaft. In turn, the shaft drives the impeller.
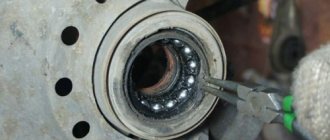
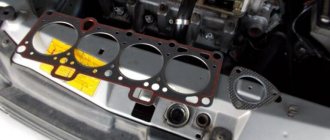
A seal (oil seal) is mounted in the space between the impeller and the housing, damage to which leads to problems with the water pump. Leakage of liquids (antifreeze, antifreeze) through a poor-quality (damaged) oil seal to the bearings causes the lubricant to be washed out, resulting in faster wear, leading to pump jamming, and subsequently to rupture of the timing belt and bending of the valves.
As a result, the entire engine cooling structure stops functioning, overheats and fails. This entails significant financial costs and labor-intensive, expensive work than a conventional water pump replacement.
Tools for replacing the pump on a VAZ:
- car keys for 10, 17 and 19;
- head number 10;
- flat screwdriver.
Detailed instructions for replacing the pump on a VAZ-2115
Replacing a water pump is a fairly simple operation, provided you follow the instructions properly and have the tools prepared in advance.
- The car is driven into a viewing hole. Before starting repairs, the engine is given one to two hours to cool down. The protection is removed from the crankcase, using keys 17-19, the protective casing is removed.
- The hood rises.
- Coolant (antifreeze, antifreeze) drains through the open valve located on the left side of the radiator.
- Unscrew the bolt on the cylinder block. Through the resulting hole we drain the coolant from the engine. It will be a little easier if you loosen the clamp on the radiator pipe and drain everything into a basin, and then add a new one, thereby completely replacing the fluid.
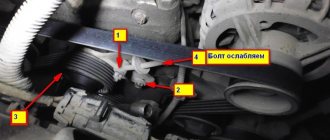
- Using a 10mm wrench, unscrew the three bolts that secure the outer casing of the timing belt. Using a 17 key, we tear off the bolt of the toothed pulley (the main thing here is not to lose the key, having set the marks in advance).
- Using the same wrench (17), unscrew the belt tensioner roller nut.
- Remove the belt tensioner.
- We move the belt on top of the standing toothed pulley and pump, moving it towards the radiator.
- We unscrew the bolt holding the toothed pulley and remove it (again paying attention to the safety of the key, it is better to remove it and put it aside). Using a small ratchet and a 10mm socket, unscrew the required number of bolts and nut holding the rear belt cover.
- We remove the protection.
- Use a flat screwdriver to carefully lift the pump and remove it.
- In the cylinder block we remove possible remnants of the old oil seal.
- We clean the future installation site of the new water pump. It is very important to thoroughly clean the area in the cylinder block, because if this is neglected, the pump will be installed unevenly (crooked) at the end of the work, which will lead to new leaks in the future. That is, all the work will go down the drain.
- We lubricate the new seal on both sides with a special automotive sealant and return it to the pump seat.
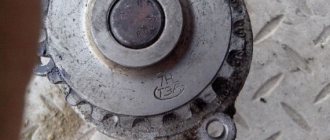
- We install the new pump in place so that the marking on it is on top.
- We install the parts obtained during disassembly in the reverse order.
Do-it-yourself replacement of a VAZ-2115 pump: features of the repair
Cars September 6, 2017The VAZ-2115 pump must be replaced when it is worn out excessively or based on the mileage of the car. During normal operation, the pump can last no more than 90,000 km. It is also necessary to focus on the service life of the timing belt - it is about 50,000 km. Therefore, the water pump is changed simultaneously with every second belt. This replacement scheme is the most acceptable, since the pump is driven by this belt.
What is a pump for?
Using a liquid pump, forced circulation of antifreeze is ensured through the circuits of the cooling system. With the help of this simple mechanism, the elements of the piston group and cylinder head are cooled much better. The service life of the liquid pump on a VAZ-2115 car can be almost anything; it depends on many factors. The maximum service life can be just over 100,000 km. The pump consists of a lightweight aluminum body and flange. In the inner part there is a bearing, which is mounted on the shaft. To prevent antifreeze from leaking out, a seal is installed in the housing. There is an impeller on the inside of the shaft, with its help antifreeze is pumped through the cooling system. On the outside there is a gear drive for the liquid pump.
Features of the VAZ-2115 liquid pump
The pump is installed on the right side of the engine, on the timing belt side. On cars with 8- and 16-valve engines, the design is the same, but the liquid pumps are not interchangeable. Therefore, when purchasing a part, be sure to make sure that it is suitable for your car. If the seals are faulty, the coolant comes out and contaminates the timing belt. As a result, it begins to wear out very quickly. If the liquid pump has exhausted its service life and is jammed, the timing belt inevitably breaks. In this case, the pistons meet the valves, causing these mechanisms to be destroyed.
Engine repair in such a situation is simply inevitable.
Thanks to integration into the timing belt, the engine size has decreased. On VAZ-2101 and similar cars, the pump is located above the generator and is driven by its drive belt. This increases the size of the power plant.
Video on the topic
How to diagnose
Before you begin troubleshooting, you must remove the plastic cover that covers the gas distribution mechanism. But you can recognize some signs that indicate problems with the pump:
To make an accurate diagnosis, you need to use a “10” wrench to unscrew the bolts that secure the protective cover of the timing mechanism. After this, you need to use a key set to “17” to loosen the belt tension. To do this, unscrew the nut on the roller. Grasp the liquid pump drive pulley with your hand. If there is play, the pump must be replaced. But if there is no play, but there are traces of antifreeze under the casing of the gas distribution mechanism, be sure to replace the VAZ-2115 pump (8 valves). Try to diagnose the fluid pump every time you replace the timing belt.
Work stages and materials
In general, the entire repair can be divided into the following stages:
To replace the pump on a VAZ-2115 with your own hands, you will need the following tools and materials:
You will also need a sealant. But it must be used carefully, in small quantities.
How to remove a fluid pump
To dismantle you will have to perform the following steps:
The pump seat on the engine must be thoroughly cleaned so that there are no traces of sealant or old gasket left there. It is advisable to replace the timing belt and pump on the VAZ-2115 at the same time. This will make repairs easier.
Installing a new pump
Before proceeding with installation, it is necessary to apply a thin layer of sealant to the gasket. The holes in the block and the flanges match only in one position. It is enough to combine them, and then tighten the bolts. The final tightening of the bolts must be done after about 20 minutes so that the sealant hardens a little. In this case, you will ensure maximum tightness of the assembled assembly. Further assembly is carried out in the reverse order of dismantling. Try to install all the fasteners, nothing should remain. This completes the replacement of the VAZ-2115 pump, the cooling system will function in normal mode. Query failed: connection to localhost:9312 failed (errno=111, msg=Connection refused).
Results of the work carried out
After the work is completed and the time allotted for the sealant to harden, we start the car (VAZ-2115) and conduct a test drive a short distance, preferably on an uneven section of the road. If you don’t smell antifreeze in the car’s interior, and there are no extraneous noises or knocking coming from the engine, then the work to replace the cooling system pump has been carried out efficiently.
Thus, you have gained experience in replacing the water pump of your own car 2115 and saved about one thousand rubles, which would have been required when replacing it at a service station.
How to install a pump on a VAZ 2113, 2114, 2115
VAZ 2114 and VAZ 2115 are considered a kind of “star” of AVTOVAZ in the early 2000s. These models are truly distinguished by their unpretentiousness and durability. Every owner who closely monitors his four-wheeled friend understands how important it is to provide timely care for the mechanisms. To maintain engine operation in normal mode, it is enough to change the oil on time and monitor the cooling system. However, if changing the oil usually does not present any difficulties for drivers, working with the cooling system and, in particular, with the pump can cause some difficulties.
Why do you need a pump in a car?
Speaking about engine operation, one cannot help but appreciate the functionality of the cooling system. After all, it is thanks to its high-quality work that it becomes possible to operate the engine in any weather and in any mode.
The engine is a very complex component of any car. Constant friction of the pistons leads to the fact that the engine parts quickly heat up, this can lead to their “jamming”. There is only one way to prevent engine overheating - by constantly maintaining the standard temperature. It is for this purpose that the cooling system was created in the machine.
Coolant is poured into the expansion tank (on VAZ 2114, VAZ 2115 cars, both antifreeze and antifreeze can be used with the same success). From the tank, the liquid flows through tubes into the water pump (its second name is a pump), and from there into the radiator and to the cylinder block. It is the circulation of liquids that ensures high-quality and timely cooling of the engine.
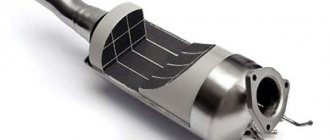
The standard product in a metal case is equipped with an impeller to create antifreeze pressure in the system
The water pump is set in motion after the power unit is started. On VAZ 2114, 2115 it is located in the timing system, that is, the pump impeller is driven by the timing belt. The impeller rotates the blades, due to which the antifreeze begins to circulate throughout the system. If there were no pump, then there would be no point in the entire cooling system.
The pump serves one single purpose - to create the necessary pressure in the system for uninterrupted circulation of antifreeze.
What is a pump for?
Using a liquid pump, forced circulation of antifreeze is ensured through the circuits of the cooling system. With the help of this simple mechanism, the elements of the piston group and cylinder head are cooled much better. The service life of the liquid pump on a VAZ-2115 car can be almost anything; it depends on many factors. The maximum service life can be just over 100,000 km.
The pump consists of a lightweight aluminum body and flange. In the inner part there is a bearing, which is mounted on the shaft. To prevent antifreeze from leaking out, a seal is installed in the housing. There is an impeller on the inside of the shaft, with its help antifreeze is pumped through the cooling system. On the outside there is a gear drive for the liquid pump.
Replacing the pump on a VAZ 2114 (8 valves)
Replacing the water pump is a rare procedure that any car will need sooner or later. The design of the pump is a very simple device, which is why it breaks down infrequently. However, over time or due to aggressive driving style, any unit can fail.
How to check the pump
On VAZ 2114,2115 it is very easy to identify a faulty water pump. You do not need to have any special knowledge, since there are only three signs that you need to pay attention to.
Engine overheating
If even in the winter, when driving short distances, the fan cannot cope with cooling, then this sign may indicate that not everything is in order with the pump. If the gauge needle at the engine temperature is constantly above the operating mark of 90 degrees, then it’s time to carry out checking work:
- Start the engine and warm it up to operating temperature.
- Turn on the stove.
- If cold air immediately begins to flow from the stove, then the circulation in the cooling system does not work normally.
- It is necessary to replace the pump, as the malfunction is associated with damage to the impeller.
The appearance of fumes and heat from under the hood is a clear sign of severe engine overheating
Timing belt wears unevenly
When examining the hydraulic distribution mechanism of a VAZ 2114, VAZ 2115, you may notice uneven wear on the belt. Indeed, due to the fact that the pump is directly driven by the timing belt, it wears unevenly (for example, only on one side) - this symptom also indicates a breakdown of the water pump.
You will need to remove the belt to verify the reality of your guesses. Due to wear of the pump bearings, it can become loose and therefore quickly break. While the pump itself can still perform its function normally for some time.
Ideally, the timing belt should wear evenly on both sides
Pump leaking
If the water pump sits on the car for a very long time, then sooner or later the oil seal will wear out so much that it will begin to leak. An antifreeze leak in the timing belt under the pump is one of the signs of a pump malfunction. When a few drops are released per day, the situation cannot be considered critical: the pump generally copes with its job, providing high-quality cooling of the engine. However, if a large amount of antifreeze leaks from under the pump, you need to change the pump urgently.
Abundant leakage indicates a loss of sealing of the pump and its failure.
In some cases, leaks can occur both due to wear of the oil seal, and due to improper installation of the gasket when replacing the pump.
Engine overheating
Another symptom of a faulty water pump in a VAZ 2115 is engine overheating. This is often accompanied by heating and even boiling of the antifreeze. The first sign is the appearance of steam from under the hood. It is not recommended to continue driving the car in this case, because operating in this mode can severely damage the engine. As soon as an increase in engine temperature becomes apparent, it is necessary to diagnose the pump and the entire cooling system as soon as possible.
Preparing the tools
Regardless of what specific problem arose on your car, the only solution to fix it is to replace the pump. This work on a VAZ 2114, VAZ 2115 can be done independently, since the convenient design of the machine makes it possible to carry out all stages of work without special skills.
First you will need to prepare a simple tool:
- wrenches 10, 17 and 19;
- socket head 10;
- flat screwdriver with a thin blade.
Without this tubular socket wrench it will be impossible to unscrew the hard-to-reach bolts on the pump mount
How to change the pump
The procedure for working on a VAZ 2114, 2115 with an 8-valve engine is determined as follows:
- Remove the protective cover from the timing belt.
- Slightly loosen the tensioner roller.
- Slightly reduce the tension on the alternator belt, and then remove the alternator belt and timing belt.
- Disconnect all hoses from the pump (antifreeze may leak out, so it is recommended to place a container under the pump in advance or cover the area with a rag).
- Drain the antifreeze from the system (just unscrew the cap from the radiator so that the liquid flows out in 10 minutes).
- Disconnect the pump protective cover and pull out the pump.
- After dismantling, be sure to clean the flange surfaces from smudges and dirt, and also remove the remnants of the old rubber gasket.
- Next, you will need to perform all work on installing the new pump in reverse order.
It is necessary to change the rubber gasket even if it shows no signs of wear or damage. To ensure reliable sealing, it is recommended to coat both the pump mounting location and its junction with the cylinder block with a heat-resistant sealant.
It is recommended to ensure that the new and old pumps are completely identical.
How to change pipes on a pump
Replacing the pipe on the water pump is advisable in cases where the hose is swollen or has small cracks through which antifreeze leaks out. A significant disadvantage of changing the pipes is that they are located below the pump - that is, you will have to jack up the body and crawl underneath.
The old pipes are removed after the antifreeze has been drained and the pump itself has been dismantled. It is important to clean the landing site from dust, dirt and coolant leaks. Then connect new pipes to the new pump, installing a new gasket at the junction. It is recommended to use heat-resistant sealant to ensure reliable connections.
Before installing new pipes, it is necessary to drain the antifreeze from the cooling system.
Work stages and materials
In general, the entire repair can be divided into the following stages:
- Preparatory part. This can include preparing tools and places for repairs.
- Draining the coolant system.
- Dismantling an old device that has become unusable.
- Purchase and installation of a new coolant pump
To replace the pump on a VAZ-2115 with your own hands, you will need the following tools and materials:
- Socket and open-end wrenches.
- Sockets and ratchet.
- Jack, supports, wheel chocks.
- Cone-shaped pliers.
- Screwdriver.
- Capacity of at least 10 liters.
- Clean rags.
How to install an additional pump on a VAZ 2114, 2115
Experienced VAZ owners know that the “fourteenth” and “fifteenth” are ideal for conducting a variety of experiments on installing this or that equipment. For example, if the standard heating on a VAZ 2114 through the stove is not enough for the owner, then you can install a second (additional pump). The essence of this procedure is that the pump will pump antifreeze in a small circle, thus providing better engine cooling and maintaining the temperature in the cabin in winter.
A second water pump keeps the cooling system running at peak efficiency.
Installing an additional pump takes a maximum of 10 minutes, but the procedure will increase slightly in time due to the fact that you will have to drain the antifreeze from the system.
You will need to purchase the following spare parts in advance:
- water pump (for models 2114 and 2115, the ideal solution is a pump manufactured by Bosch 0 392 020 034);
- elements of electrical equipment;
- several hoses of different lengths (depending on the diameter of the small circle) with clamps;
- fastening for the pump.
Assembling the structure
In this case, you will already need some experience in independently servicing a VAZ. So, to install an additional pump, you need to:
- Assemble this unit itself from three parts - a pump and two pipes (the shortest hose works for the outlet, the longer one for the suction of antifreeze).
- Next, drain the coolant from the system.
- Near the bottom of the car, feel for two hoses coming from the stove, remove the one that works for the outlet.
- Instead, connect the assembled unit.
- After this, attach the pump itself to the crankcase of the manual gearbox. It is better to use brackets and screws for this.
The final stage is pouring new antifreeze.
To mount the pump, you can use any type of fastener, the main thing is to ensure the reliability of the connection
Video: DIY water pump replacement procedure
It is necessary to change the rubber gasket even if it shows no signs of wear or damage. To ensure reliable sealing, it is recommended to coat both the pump mounting location and its junction with the cylinder block with a heat-resistant sealant.
How to change pipes on a pump
Replacing the pipe on the water pump is advisable in cases where the hose is swollen or has small cracks through which antifreeze leaks out. A significant disadvantage of changing the pipes is that they are located below the pump - that is, you will have to jack up the body and crawl underneath.
The old pipes are removed after the antifreeze has been drained and the pump itself has been dismantled. It is important to clean the landing site from dust, dirt and coolant leaks. Then connect new pipes to the new pump, installing a new gasket at the junction. It is recommended to use heat-resistant sealant to ensure reliable connections.
How to install an additional pump on a VAZ 2114, 2115
Experienced VAZ owners know that the “fourteenth” and “fifteenth” are ideal for conducting a variety of experiments on installing this or that equipment. For example, if the standard heating on a VAZ 2114 through the stove is not enough for the owner, then you can install a second (additional pump). The essence of this procedure is that the pump will pump antifreeze in a small circle, thus providing better engine cooling and maintaining the temperature in the cabin in winter.
Installing an additional pump takes a maximum of 10 minutes, but the procedure will increase slightly in time due to the fact that you will have to drain the antifreeze from the system.
You will need to purchase the following spare parts in advance:
- water pump (for models 2114 and 2115, the ideal solution is a pump manufactured by Bosch 0 392 020 034);
- elements of electrical equipment;
- several hoses of different lengths (depending on the diameter of the small circle) with clamps;
- fastening for the pump.
Assembling the structure
In this case, you will already need some experience in independently servicing a VAZ. So, to install an additional pump, you need to:
- Assemble this unit itself from three parts - a pump and two pipes (the shortest hose works for the outlet, the longer one for the suction of antifreeze).
- Next, drain the coolant from the system.
- Near the bottom of the car, feel for two hoses coming from the stove, remove the one that works for the outlet.
- Instead, connect the assembled unit.
- After this, attach the pump itself to the crankcase of the manual gearbox. It is better to use brackets and screws for this.
The final stage is pouring new antifreeze.
Replacing the pump on a VAZ 2114, VAZ 2115 (16 valves)
The procedure for replacing the water pump on 8 and 16 valve engines will be slightly different. The fact is that on a VAZ 2114 with 8 valves there is only one crankshaft pulley, and on cars with a 16-valve engine there are two. That is, the designs of cars with different types of engines are somewhat different from each other.
In this regard, you need to be extremely careful: pumps for VAZ with 8 or 16 valves cannot be considered interchangeable. That is, when purchasing a new water pump, you should make sure that it is suitable specifically for your type of VAZ engine.
Water pump replacement procedure
First you will need to remove the plastic timing belt protection cover, but this is not as easy as on a VAZ with 8 valves:
- In order to remove the casing, you will need to remove the pulleys from both crankshafts.
- And you also need to disconnect two timing rollers - support and tension.
- It is impossible to remove the pump without dismantling the pulleys and rollers.
- You will also need to remove the right front wheel. It is recommended to use a jack to raise the body to the desired height. This is the only way to get to the bolted connections that secure the timing case to the engine.
- Next, you can be guided by the diagram that is given for 8-valve engines.
The work of replacing the water pump on a VAZ 2114 and VAZ 2115 is not particularly difficult. The main thing is to carefully approach each stage of the procedure and work only with serviceable tools. Replacing a pump yourself is a job that does not require special training.
If you find an error, please select a piece of text and press Ctrl+Enter.
Replacing the pump on a VAZ 2114, VAZ 2115 (16 valves)
The procedure for replacing the water pump on 8 and 16 valve engines will be slightly different. The fact is that on a VAZ 2114 with 8 valves there is only one crankshaft pulley, and on cars with a 16-valve engine there are two. That is, the designs of cars with different types of engines are somewhat different from each other.
In this regard, you need to be extremely careful: pumps for VAZ with 8 or 16 valves cannot be considered interchangeable. That is, when purchasing a new water pump, you should make sure that it is suitable specifically for your type of VAZ engine.
Water pump replacement procedure
First you will need to remove the plastic timing belt protection cover, but this is not as easy as on a VAZ with 8 valves:
- In order to remove the casing, you will need to remove the pulleys from both crankshafts.
- And you also need to disconnect two timing rollers - support and tension.
- It is impossible to remove the pump without dismantling the pulleys and rollers.
- You will also need to remove the right front wheel. It is recommended to use a jack to raise the body to the desired height. This is the only way to get to the bolted connections that secure the timing case to the engine.
Next, you can be guided by the diagram that is given for 8-valve engines.
The work of replacing the water pump on a VAZ 2114 and VAZ 2115 is not particularly difficult. The main thing is to carefully approach each stage of the procedure and work only with serviceable tools. Replacing a pump yourself is a job that does not require special training.
Pump selection
Repairing the cooling pump on a VAZ 2114-15 does not make much sense. Its design does not involve replacement of parts. Of course you can change the bearing. But it will probably have to be repaired again soon. Therefore, the easiest way is to purchase a new part, install it, and forget about it for a long time. Fortunately, the cost of spare parts is low. It can range from 600 to 1000 rubles. Moreover, cost is not always an indicator.
Try to purchase parts only from trusted stores. When purchasing, always check the completeness and presence of holograms.
Why do you need a pump in a car?
The pump promotes the movement of fluid (antifreeze or antifreeze) in the cooling system. There is a shaft inside the mechanism. An impeller is attached there, and when it rotates, circulation occurs.
On the opposite side, a pulley is attached to the shaft. The system is activated by the rotation of the part in the gas distribution mechanism (GRM). When the pump becomes unusable (most often jams), the car engine may overheat. In case of some breakdowns, antifreeze begins to leak from the device.
In cars, a centrifugal type water pump is most often used. This option is characterized by its simplicity of design and durability.
How to determine pump wear
Experienced motorists will easily notice wear and tear on the water pump. It is difficult for beginners to identify a faulty part. Signs of wear are described below.
Engine overheating
When the engine temperature on the dashboard is above 90 degrees, the pump is faulty, especially if overheating occurs in winter.
This symptom, accompanied by a light on the dashboard, indicates a faulty part. Antifreeze boils and steam comes out of the radiator. The car cannot be driven.
To verify the source of the malfunction, you must:
- Warm up the engine to 90 degrees.
- Set the stove control panel to hot air and turn it on.
If the pump is working properly, heat should flow. If cold air comes out at the operating temperature of the engine, this is a sign of a broken impeller. The pump needs to be replaced.
Uneven timing belt wear
The mechanism is started by the timing belt. If there is a problem, the neoprene product may wear unevenly. You can verify this by removing the belt and inspecting the product. On one side there will be more wear.
The problem is related to the exhaustion of the life of the pump bearings. The part itself may still work properly.
Uneven wear may be due to a bent fastener. You can check for misalignment by holding a ruler or other flat object to the belt.
Leakage
The most common pump problem faced by VAZ 2114 owners is a leak. It can come from under the oil seal, impeller or housing. Liquid will be observed on the device body, mounts or engine protection.
If you notice drops that accumulate for a long time, the problem is not critical and does not need to be fixed urgently. If there is a lot of fluid, intervention is necessary.
Sometimes antifreeze leaks after replacing the pump. This means the gasket is installed incorrectly.
Another indicator of a pump malfunction is the smell of antifreeze in the cabin. It may also indicate other faults.
Attention! The listed signs indicate not only a pump malfunction, but also a malfunction of the cooling system, which is recommended to be checked.
The water pump is a non-repairable part of a car. If it breaks, only replacement will help.
Uneven timing belt wear
A breakdown in your vehicle's water pump can cause the timing belt to wear unevenly. This is easy to detect by examining the part. It will be obvious that the belt is worn more on one side than the other. If you cannot visually determine the problem, you can try the following method: install a ruler or something similar in the same plane as the pump and tension rollers. A mismatch between the axes will indicate a malfunction; It also provokes rapid wear of the belt. However, the cause of the breakdown may lie elsewhere, for example, that some parts are installed incorrectly. Having identified uneven wear on the timing belt, it is recommended to carefully check the entire mechanism and diagnose the pump. This problem should not be ignored as it can lead to belt breakage.
Dismantling
Before starting work, you need to understand where the part is located. The water pump is located on the left side of the engine compartment, under the camshaft pulley, so when it jams, the timing belt flies off.
The removal process is simple; the engine must cool down before doing this.
In a vehicle with an 8-valve engine, the following actions are required:
- Disconnect the terminal from the battery.
Disconnecting the terminal from the battery
- Remove the timing case (held on by 3 bolts).
Removing the timing case
- Place a mark on the camshaft so that it aligns with the mark on the engine. You need to jack up the car and slowly turn the right front wheel, having previously installed 4th gear.
- Move the timing belt. The product needs to be loosened; the tension roller will need to be removed.
- Unscrew the ignition module mounting bolts without disconnecting the contacts. This is necessary to get to the antifreeze or antifreeze drain plug.
- Prepare a container where the liquid will flow and a hose.
- Unscrew the plug with a key set to “13”. Place the hose, which should be directed into the container.
- When the pressure becomes weak, the lid can be screwed back on. There is no point in draining all the liquid; to make the process easier, you can leave a little.
- Then remove the container.
- Remove the thin pipe. The part is connected to the throttle valve heating unit.
- Remove all heating pipes.
- Wedge the camshaft gear teeth with a screwdriver and unscrew the fastening bolt.
- Remove the pulley.
Pulley removal
- Remove the metal casing (secured with 5 bolts).
- Unscrew the pump. Using a wooden block, tap the device body and dismantle it.
- Clean the sealant from the seating area.
Attention! During the replacement process, it is recommended to check the timing belt and pulley. If the condition of the parts is poor, they must be replaced along with the pump.
Before installing a new pump, you need to check the old one for play. Check the tightness of the oil seal. If there is no play or leaks, the old pump can be reinstalled.
Replacing the pump on VAZ 2113, 2114, 2115
When replacing a new part, a high-temperature sealant must be applied to the flange and the gasket that must be installed in the socket.
A new pump for a VAZ 2115 car is mounted as follows:
- Screw the bolts and tighten them onto the pump flange.
- Install a metal casing. Tighten the fastening bolts.
- Install the camshaft pulley. Tighten the bolt.
Installing the camshaft pulley
- Install the tension roller and timing belt.
Installing the tension roller and timing belt.
- Use pliers to adjust the tension level of the product, which should not turn sideways by more than 90 degrees.
- Install the protective cover of the timing mechanism made of plastic.
- Fill with coolant until it begins to flow out of the removed throttle body pipe.
- Install the pipe, tighten the fastener.
- Fill with antifreeze or antifreeze to the required volume.
After replacing it yourself, you need to start the engine and warm it up. Then it will be clear whether the pump is working properly or not.
Since 2011, some modifications of the VAZ-2113 and 2114 have had 16-valve engines installed. The pump changes on them in the same way, but there are some differences:
- It is necessary to remove two camshaft gears.
- The support roller needs to be removed.
- To get the protective cover, you need to remove the wheel.
The 16-valve modification of the “fourteenth” model is demanding in terms of correct marking.
Attention! Water pumps for engines injector 8 and 16 valves are different.
Replacing a pump on a 16V engine
When replacing the pump on a VAZ 2114/15 with a sixteen-valve engine, several additional operations are added to the recommended procedure:
- removing two camshaft gears instead of one;
- dismantling the additional support roller;
- To access the pump, the wheel and the lower part of the protective casing are removed through the arched opening.
On a 16V engine, two camshaft gears and a metal plate are removed
When reassembling, pay attention to the position of the marks on the camshaft pulleys. A maximum lateral deviation of half a tooth is allowed. After tensioning the belt, you need to rotate the crankshaft several times to ensure that the marks are aligned correctly.
Installing an additional pump
To increase the efficiency of the interior heater, some car owners install an additional electric pump from the GAZelle on the VAZ 2114. After such tuning, the stove begins to heat the interior at an antifreeze temperature of 50 °C.
To install an additional pump you will need:
- 4-pin relay and additional connector;
- fuse socket;
- copper stranded wires;
- rubber pipes for connecting the pump.
The additional pump is attached with a bracket to one of the gearbox bolts
Before installation, it is recommended to remove the cover of the electric pump and “place” it on the sealant - on GAZelle, a leak often occurs in this place. The pump is then screwed to one of the transmission mounting bolts.
After this, the heater supply pipe is disconnected from the motor and connected to an additional pump. A second pipe is inserted into the gap between the engine water jacket and the new unit. The electrical connection is made to any button on the dashboard.
To turn on the pump together with the ignition from the button, the electrical connection is made through a relay
Replacing pipes
When replacing the pump, pay attention to the condition of the pipes. If there are cracks or damage resulting in coolant leakage, the product must be replaced. It is recommended to do this when the pump is removed; there is no need to drain the antifreeze a second time.
The main disadvantage of the replacement is that the hoses are located low; to get there, you need to lift the car.
Replacement process:
- Drain the coolant.
- Remove the water pump.
- Clean the seats.
- When installing at a joint, install a new gasket using high-temperature sealant.
Replacing the water pump (Pump) on VAZ 2113, VAZ 2114, VAZ 2115
Welcome! Water pump - popularly called simply a pump, it is responsible for circulating liquid throughout the entire cooling system, and if this pump fails, the liquid will stop circulating or will circulate, but will do so very slowly and reluctantly, therefore the car’s engine will begin to quickly heat up and will no longer maintain an operating temperature of 90°C, but will constantly overheat, which will have a very bad effect on it, in addition, the pump may also jam when the car is moving or even when it is standing still but with the engine running, the pump jamming is very scary, for 8 valve cars it’s not, but for 16 valve cars it’s really very scary, because when the pump jams (no matter how many valves your engine has), the timing belt either breaks or simply flies off, and if it breaks, it can bend the valves, damage the pistons, scratch the cylinder walls, etc., but for 8 valve cars this is not scary (Not for all 8 valve cars this is not scary, because there are also models on which the valves oppression when the belt breaks, for example on the 21081 engine which was installed on the entire Samara family), on them the belt will either fly off or it will break (Then until you replace the pump, you will not be able to drive the car and on top of all this, a new belt you will have to buy it, so just in case, take the pump with you and a new belt, otherwise you never know what will happen on the road, and if you are still far from home, then for any reason you will need to change the pump or drag the car to a service center or to the house for tug).
Note! To carry out the procedure for replacing this item, you will need to take the following set of tools, namely: A set of all kinds of keys, screwdrivers, a rag, an extension cord with socket heads, a wrench, and for small things you can stock up on a bucket, for example (Small), in which you will put all the screws and nuts, otherwise when performing work, small nuts sometimes get lost and therefore we recommend that you put them all in one place!
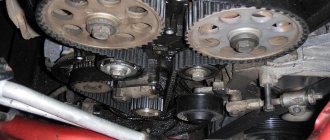
Where is the water pump (Pump) located? On cars of the classic family, the pump is located next to the generator and when it fails (When it gets jammed, for example), the generator belt breaks and no current flows to the battery, and also because the pump is jammed, the liquid does not circulate through the cooling system and in connection with this, the car begins to get very hot, but as for front-wheel drive cars, in fact it doesn’t even matter what kind of car it is, VAZ 2110 or VAZ 2114, on all of them the pump is located in the same place (Indicated in the photo below with a red arrow , the camshaft pulley is indicated in blue for clarity) and it is no longer driven by the generator belt, but by the timing belt, and if suddenly the pump jams, then the first thing the belt either breaks or flies off, the entire car is immobilized (the engine in this case will work at idle), but with regards to classic cars (We are just disassembling them as an example), then with a jammed pump and an immobilized generator on the car, it will be possible to continue driving, it’s just that soon either the battery will run out or the car will boil.
When do you need to change the water pump (Pump)? Over time, it begins to make noise, and so much noise that you yourself will immediately hear and understand that something is wrong with the engine, but the pump does not always make a lot of noise, sometimes it can even work quietly and at one moment jam, but this is not always the case, in general the pump jams only in the case when the lubricant from the bearings that are located inside the pump is all gone, in addition to noise, there are also several signs that the pump needs to be replaced, for example, if you grab it with your hands and shake it, then it may have play that shouldn’t exist (This is the kind of play that appears from time to time, and with it the pump becomes much louder) or another sign, if you see that liquid is leaking through the pump (This means the pump seal no longer holds), then this is a clear sign that it needs in replacement and if you put off this replacement, then soon all the liquid will pour out of the system or you will simply have to add it very often, we would like to introduce you to one interesting video that clearly shows how the pump has become unusable and is noisy due to this, By the way, if you hold it with your hand (this is even in the video), you can feel a backlash, which, as we said earlier, should absolutely not be there.
Note! You can also remove the pump and check it in full detail, but it’s up to you to decide whether to do this or not, because removing the pump from the car takes a lot of time (If this is not the first time you’ve done the job, then you’ll get it done quickly), and the coolant will have to be drained, and therefore if you are still not sure about the pump and decide to remove it, then immediately replace it with a new one so as not to remove it again in the near future, but although if it is in normal condition, then you can install it back ( We’ll also tell you how to troubleshoot a pump in the article; we’ll tell you right away what the word troubleshooting means if you don’t already know, and this means a kind of check, looking for defective parts in certain systems)!
Do-it-yourself replacement and maintenance of the pump in a VAZ 2114
There are many elements in the cooling system of the VAZ 2114, one of which is the water pump. Among motorists, the unit is better known as a pump. The pump rarely fails.
But if this happens, then operating a car with a faulty pump can lead to overheating of the power plant.
To keep all elements of the engine and cooling system in working order, you need to carry out regular inspection. This also applies to the water pump.
Appearance of the pump (water pump), which is used in the cooling system of VAZ cars
Once you understand the purpose of the pump, you can easily check its functionality. There are a lot of ways to check, but most motorists prefer to do this using the upper radiator hose. It must be clamped while the engine is running. If a pulsation of coolant is felt inside the hose, then the pump is working properly and replacement is not required.
Symptoms of a problem
There are four signs by which you can understand that the water pump in a VAZ 2114 car has failed:
- Coolant drains quickly. This sign indicates that the pump is damaged. The leak may also be in another place, for example, in the pipes or in the radiator itself. The entire cooling system must be checked for leaks.
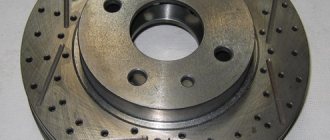
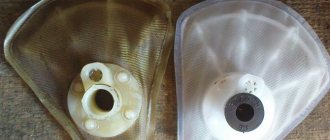
- Rotor damage. To check this part, you need to inspect the back of the water pump. If the rotor blades are partially or completely destroyed, the performance of the entire assembly deteriorates.
- Liquid on control vent. If antifreeze oozes from this compartment, the pump seal is worn out. If dark deposits are detected around the oil seal, it must be replaced.
- Howling noise when the VAZ 2114 engine is running. This defect most often appears when the pump shaft bearings wear out.
Location of the pump under the hood. When replacing the pump, a new timing belt must be installed.
If it is necessary to replace the pump, you need to ensure that you have a new timing belt. Before starting disassembly, you need to make sure that you have a set of screwdrivers, wrenches on hand, purchased replacement parts, gaskets, sealant, etc.
The process will be much easier if the driver removes the right front wheel. It is better to dismantle it along with the protection. Preparation also includes removing the timing belt cover, which is bolted on. Afterwards you can remove the belt, pulley and generator roller.
In general, the belt tension mechanism should be removed.
Instructions
- The replacement begins with dismantling the camshaft gear in the VAZ 2114. You can get it out using a socket wrench, which is placed in one of the holes. This action will “lock” the gear, and it will be possible to unscrew all the mounting bolts.
You need to remove the four bolts that hold the camshaft pulley cover in place.
Usually the gear sits loosely, but if there is resistance, it can be helped with a hammer. You also need to be especially careful when dismantling, since the locking key is located at the bottom of the gear. You can determine where the bottom is and where the top is by the gas distribution marks. You need to make sure that the key does not fall out, since the part is small. The easiest way to get it out is with a flat-head screwdriver.
- Then you need to drain all the antifreeze from the system.
Once the liquid has been drained, the metal shield can be removed. The metal shield is held in place by several bolts and a nut. These elements are marked with arrows - The driver can now remove the inoperative water pump mechanism.
Replacement may be delayed, since it is not always possible to remove the mechanism manually. A wooden pointer and a hammer can help in this matter. The pump must be removed when nothing is holding it. A screwdriver can simplify the process, but if there is noticeable resistance, you should not press with the tool, as the aluminum body can damage other elements. You need to turn the cover and carefully remove the pump from its seat - Once the mechanism is removed, you can begin installing the new pump.
The place must be thoroughly cleaned of old sealant, and the old gasket must be removed. A layer of sealant should be applied to the new gasket and placed together with the new pump. The number indicated by the arrow must be on top for the mechanism to work properly.