Replacing the fuel pump mesh on Grant
I think there is no need to explain once again that the design of the fuel pump on Kalina and Grant cars is not at all different. That is why the entire process of replacing the components of the fuel pump on the above cars will be the same. Also, it is worth noting that when compared with the models of the 10th VAZ family, there are some points that differ.
Causes of clogged strainer on Grant
It is not necessary to change the grid so often, since when refueling with normal fuel, it can easily travel more than 100,000 km. But symptoms may appear that indicate a clogged fuel pump mesh:
- poor engine start
- insufficient pressure in the fuel system
- dips when pressing the gas pedal
- the engine began to slowly gain speed
If you begin to notice the problems described above, then the first thing you should do is look at the mesh filter and, if necessary, replace it.
Procedure for replacing the fuel pump mesh on a Lada Granta
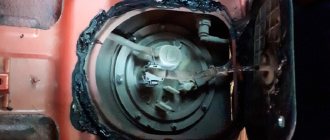
Since the fuel filter on a Lada Granta car is located directly in the tank, it must be removed from there. To do this, one half of the rear seat is folded back, after which the two screws securing the hatch are unscrewed. Below it is the fuel pump. To remove it, you need to do the following:
- Relieve pressure in the vehicle's power system
- Disconnect the block with power wires
- Disconnect the two fuel pipes from the fuel pump cover.
- Move to the side the retaining ring that secures the pump in the tank
- Pull out the entire module assembly
After this, you can begin removing the mesh filter without any problems.
We move a little to the side three latches - latches, which are clearly shown in the photo below.
Now we move the lower container to separate the module into two parts, first disconnect the tube, which is shown in the photo.
Now we completely separate the two parts of the module.
Now we have full access to the mesh, and it is enough to pry it with a screwdriver so that it moves away from its seat. You may have to apply a little more force than expected, but you can remove it without any problems.
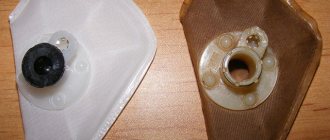
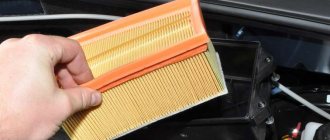
As a result, we obtain a removed strainer, which, as can be seen, is quite heavily contaminated, although in this example we are considering a car with only 65,000 km mileage.
Now we take a new mesh and install it in its place in the reverse order.
In the photo above you can see the black rubber plug. Of course, it must be removed before installation. Also thoroughly rinse the pump container inside and out so that there are no particles of dirt or other debris left on it!
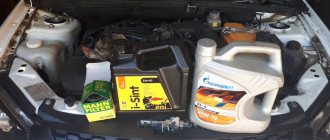
To do this, it is best to use a special carburetor or injector cleaner, such as the one shown above. Then you can assemble the entire structure and install it in the gas tank.
Before starting the Granta engine for the first time, it is necessary to pump fuel several times without starting the engine: pumping two or three times is usually enough. Now you can start the engine and check the result of the work done. The mesh should be replaced regularly, as this example shows that even with a short mileage it is already quite dirty.
The price of a new fuel pump mesh for Grant is about 50-70 rubles.
Procedure for replacing the fuel pump mesh on a Lada Granta
Since the fuel filter on a Lada Granta car is located directly in the tank, it must be removed from there. To do this, one half of the rear seat is folded back, after which the two screws securing the hatch are unscrewed. Below it is the fuel pump. To remove it, you need to do the following:
- Relieve pressure in the vehicle's power system
- Disconnect the block with power wires
- Disconnect the two fuel pipes from the fuel pump cover.
- Move to the side the retaining ring that secures the pump in the tank
- Pull out the entire module assembly
After this, you can begin removing the mesh filter without any problems.
We move a little to the side three latches - latches, which are clearly shown in the photo below.
Now we move the lower container to separate the module into two parts, first disconnect the tube, which is shown in the photo.
Now we completely separate the two parts of the module.
Now we have full access to the mesh, and it is enough to pry it with a screwdriver so that it moves away from its seat. You may have to apply a little more force than expected, but you can remove it without any problems.
Fuel mesh filter for electric fuel pump (1.6L) for VAZ 2110, Granta
- Manufacturer: Motorika
- 0 reviews
- Description
- Characteristics
- Video
- Reviews 0 ? '(' + product.reviewsCount +')' : »>>
Dear customers, in order to avoid errors when sending an electric fuel pump, in the “Comment” line indicate your car model, year of manufacture, engine capacity L 1.4 or L 1.5 or L 1.6.
The fuel pump is based on an electric motor. If the resource depended only on it (and this is roughly what happens in Western cars), then the gas pump would last for about 150 - 200,000 kilometers.
An electric fuel pump uses the fuel itself as a lubricant, and our fuel is somewhat abrasive:
— it is full of tiny particles, which over time grind down the working elements of the pump, and it begins to lose its working properties long before the electric motor fails;
- if the fuel filter is dirty enough, the situation gets even worse.
The wear rate can be reduced by timely cleaning of the fuel system and regular replacement of the fuel mesh and fuel filter.
The mesh of the electric fuel pump acts as a filter, that is, when the fuel in the gas tank is pumped into the car engine, it first passes through the mesh, which in turn cleans the gasoline from dirt and small debris, which have a very detrimental effect on the fuel system when it gets into the engine car.
The fuel mesh 21101 (1.6 L) of the electric fuel pump needs to be changed from time to time, because when it is clogged, the fuel pumps into the engine with reduced pressure, that is, it passes very poorly through the clogged mesh and therefore the car drives jerkily and sometimes even doesn't start well.
Wear of the electric fuel pump is accompanied by a rather interesting symptom: fuel consumption decreases. But at the same time, the engine’s throttle response also decreases, so there’s nothing to be particularly happy about.
One of the main reasons for a clogged mesh is poor quality fuel poured into the car, which may contain particles of debris, various types of deposits, etc.
Do not delay replacing the fuel grid to avoid clogging the fuel system. The fuel pump grid is located directly in it, that is, it is located at the bottom of the electric fuel pump.
In order to replace the strainer, you need to remove the fuel pump from the tank. To do this you may need the following tools:
— Flat and Phillips screwdrivers;
— 7 mm socket and extension;
— Ratchet or crank;
— Wrench 17 (if the fittings are on nuts).
When removing the fuel pump, carefully inspect the internal condition of the tank, and if necessary, thoroughly clean or rinse it to get rid of foreign particles and formations.
After replacing the fuel grid of the electric fuel pump, turn the ignition key until the electric fuel pump pumps gasoline into the fuel system, and then start the car!
VAZ 1117-1119, VAZ 2170, VAZ 2190, Kalina 2, Largus, Datsun, Vesta, except GM .
Other article numbers of the product and its analogues in catalogues: 21101113920000.
Any breakdown is not the end of the world, but a completely solvable problem!
How to independently replace the fuel grid of an electric fuel pump with an engine capacity of 1.6 liters on a VAZ family car.
With the online store Discounter AvtoAzbuka, repair costs will be minimal.
Just COMPARE and BE SURE.
Don't forget to share the information you find with your friends and acquaintances, because they may also need it - just click one of the social networking buttons located above.
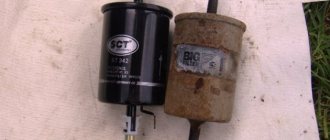
Fuel filter for Lada Granta
- 8 2 14k
- 2 763
The fuel filter on the 1st generation Lada Grant (2011-2018 production) is located separately from the pump, outside the gas tank. The same fuel filter is installed on 16 and 8 valve gasoline Grants.
How many fuel filters are there on the Grant, where are they located and which one to install?
On the Lada Granta, as on most modern cars, the fuel system has 2 fuel filters - the main one (fine filter) and the pump mesh filter (coarse filter).
Granta's main fuel filter is located in the rear under the bottom of the car, near the gasoline tank, next to the body sill. By design, the stock filter, which is installed from the factory, has a black plastic housing. There is an arrow on it indicating the direction of fuel movement, which should be followed when replacing. Part number - 2190-1117010, price - 320 rubles. Manufacturer: Motorika company.
What is noteworthy is that exactly the same filter with a plastic housing is rarely found on sale. More often you can find its complete analogue in a metal case, which is also intended for the Chevrolet Niva - 21230-1117010-81. In terms of characteristics, dimensions and design (except for the body material), they are the same and are interchangeable. Filters similar in size and design were originally installed on other AvtoVAZ cars - Priora and Kalina. Also, if necessary, you can install a fuel filter from Lanos, Chevrolet Aveo or Nubira, Opel Astra G. They are all similar in size and characteristics.
| Dimensions of fuel filter LADA 2190-1117010 | ||
| Height, mm | Inlet/outlet diameter, mm | Case diameter, mm |
| 163 | 8 / 8 | 55 |
The filter element of the Granta fuel filter uses special high-quality paper. There is also unconfirmed information disseminated by many drivers that it does not allow water to pass through, while all other analogues do, but most likely this is pure marketing.
Despite this statement, as a rule, when replacing the main Granta filter, drivers more often use analogues than the original. The table below shows the most popular of them.
| Manufacturer | vendor code | price, rub. |
| MAHLE | KL83 | 530 |
| MANN | WK512 | 420 |
| Filtron | PP905 | 280 |
Filter mesh LADA 21101113920000
In fact, there is no difference which filter to install. The degree of purification for all is almost identical. Therefore, both the cheap Filtron and the more expensive MAHLE will work equally well. The main criterion is that the spare part must not be a counterfeit and must be replaced in a timely manner.
The mesh filter (coarse) is located in the fuel tank. It is attached to the pump, which is located in a special plastic module immersed in the gas tank. To access the coarse filter, you need to lift the rear seat and unscrew the cover holding the fuel module with the pump and sensors. Article number of the original spare part - 21101113920000, price - 50 rubles. The same mesh is installed on Kalina. The most popular analogue is Krauf KR1012F, price - 150 rubles.
When and how to replace the fuel filter on a Grant?
According to the Grants maintenance regulations, the manufacturer recommends replacing the main fuel filter every 30 thousand kilometers. Many drivers are of the opinion that for a longer engine life, it is better to do this every 15-20 thousand km, especially considering that the quality of domestic fuel is not always high. Before replacing it, it is advisable to relieve the pressure in the fuel rail. To do this, you need to pull out the fuel pump fuse F21 (blue 15 A), start the car, and wait until it stalls. Then try to start it 2-3 more times, and if it doesn’t start, proceed with replacement.
Replacing the mesh filter is not separately regulated, but it is recommended to change it approximately every 70 - 80 thousand km. And at each maintenance, it is advisable to simply rinse it with carburetor cleaning fluid.
Replacing fuel filters
The frequency and sequence of replacing fuel filters on a Lada Granta car does not depend on the body type or engine modification. Before performing work, you must disconnect the battery from the car body.
Replacement frequency
Most manufacturers of cars with gasoline engines have recently sought to maximize the service life of fuel filters. The Lada Granta car uses “eternal” coarse filters. That is, the strainer is not subject to maintenance during the entire service life of the fuel pump and is replaced along with it.
However, to strictly follow the manufacturer's recommendations, it is necessary to refuel the car with clean, high-quality fuel. In practice, various impurities often enter the tank, significantly reducing the throughput of the filter. Therefore, the grid should be checked, cleaned or replaced every time the fuel module is removed from the tank and when diagnosing the causes of unstable engine operation.
The fine fuel filter is a consumable item. The Lada Granta operating manual recommends changing it every 30 thousand km. In reality, the condition of the filter depends on the purity of the gasoline. Typically, car enthusiasts change it much more often - every 15 thousand kilometers or once a year.
Symptoms of a problem
The throughput of a dirty fuel filter is noticeably reduced. This manifests itself in a decrease in pressure in the fuel rail of an injection engine. Its normal value, measured by a pressure gauge connected to the rack fitting, is 3.8–4 KGS/cm². Since the filter does not accumulate dirt immediately, the pressure also decreases gradually, and this goes unnoticed for some time.
The quality of the fuel-air mixture entering the cylinders depends on the pressure. Due to the lack of gasoline, the mixture becomes leaner, which, in turn, affects the performance of the engine.
The engine reacts to clogged fuel filters as follows:
- unstable work;
- spontaneous stops at idle speed;
- unstable, high and low idle speed;
- low power and sluggish dynamics;
- jerks and dips.
If these symptoms appear, the pressure in the fuel rail should be measured. If it is below the recommended values (3.8–4 KGS/cm²), it is necessary to replace the fuel filters. The fine filter is easier to change, so it’s better to start with it. If after replacement the pressure does not increase, check the condition of the fuel pump grid.
A dirty mesh negatively affects the operation of the pump. Not enough fuel is supplied to the fuel pump. Trying to compensate for the lack of gasoline, it increases speed, irrationally using its limited resource. The situation is aggravated by the fact that the fuel is used as a coolant and lubricant for the fuel pump. The latter is thus overloaded, simultaneously deprived of lubrication and cooling. The loud noise coming from the pump is a consequence of a dirty strainer.
Initially, the car had the working name Low Cаost, but for a number of reasons it was not suitable for the final product, just as another faceless index was not suitable. AvtoVAZ has announced a competition for the best name for the future people's car. In 2010, the winner was given a Lada Kalina as a reward.
Reduced fuel pressure
In operating condition, the fuel pressure in the system is significantly higher than atmospheric pressure. To prevent uncontrolled spills of gasoline, all work related to depressurization of the system is carried out with the pressure released. To relieve pressure, first turn off the fuel pump by removing the fuel module power connector or removing the fuse. Then the engine is started and the remaining fuel is exhausted. Without additional actions, the pressure drops on its own 2–3 hours after the ignition is turned off.
To work, you will need a flathead and Phillips screwdriver. The procedure for releasing pressure is as follows.
Replacing the fine fuel filter
To replace the fuel filter, you only need a container to collect fuel from the removed filter. The replacement algorithm is as follows.
Video: replacing the fuel filter
Replacing the fuel pump strainer
To replace the mesh you will need a Phillips and flathead screwdriver, a hammer and a drift. Replacement is carried out in the following order.
- Remove (throw back) the rear seat, lift the trim flap, unscrew the fasteners and remove the fuel module hatch cover.
The rear seat is removed, the trim valve is lifted, the fasteners are unscrewed and the fuel module hatch cover is removed. - Clean the module cover from dust.
- After releasing the latch spring, disconnect the power connector.
Release the locking spring and remove the power connector - Relieve fuel pressure.
- Disconnect the battery from the car body.
- By pressing the latch, disconnect the two fuel pipes in series.
If you cannot release the lock with your hands, press the button with a screwdriver, and use a second screwdriver to hook and remove the tip of the fuel pipe. By pressing the latch, the fuel pipe tubes are sequentially disconnected - Use a screwdriver to hook and slide the fuel module retaining ring counterclockwise.
If this does not work, place a drift against the protrusion of the ring and move it with light blows of a hammer. The fuel module retaining ring moves counterclockwise - Remove the retaining ring.
- Remove the fuel module from the tank.
Drain gasoline from the glass (intake chamber) of the module. The fuel module is removed from the gas tank - Disconnect the drain tube from the glass.
The drain tube is disconnected from the glass - Press the four latches and disconnect the fuel pump along with the lid from the glass.
The fuel pump together with the lid is disconnected from the glass - Using a screwdriver, use a screwdriver to remove the fuel pump strainer.
- Install a new filter.
New strainer being installed - Reassemble the fuel module in reverse order.
- Remove and inspect the tank flange O-ring. A hardened or damaged ring must be replaced.
- Install the fuel module, pointing the arrow on its cover towards the trunk of the car.
- Tighten the locking plate with light hammer blows.
Malfunctions in the fuel system lead to problems with starting the engine, jerking when driving and unstable operation of the engine. In addition, a consequence of a faulty fuel pump and fuel filter is the inability to start the engine and a drop in power due to excessive fuel consumption.
This article will talk about replacing the fuel filter with your own hands.
and repair of the Kalina fuel pump.
- First you need to purchase a new fuel filter and a new fuel pump. You can find out which brand is needed in the vehicle’s operating manual or in the technical documentation. You can also get advice from an auto shop employee.
- Remove the black rubber band.
Replacing the fuel filter Lada Kalina. Fuel pump repair: replacing the mesh
- Remove the rear seats, remove the 4 mounting screws, and provide access to the cover under which the fuel pump is located.
Replacing the fuel filter Lada Kalina. Fuel pump repair: replacing the mesh
- Remove dirt with a vacuum cleaner or damp cloth.
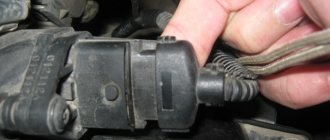
- The photo shows the place where the fuel hoses need to be removed.
Replacing the fuel filter Lada Kalina. Fuel pump repair: replacing the mesh
- To remove the fuel hoses of the fuel pump, use a screwdriver to press the lock on one side. On the other side, you need to pry off the fuel hose, focusing on the direction of the arrow. You need to remove it carefully to avoid damage.
Replacing the fuel filter Lada Kalina. Fuel pump repair: replacing the mesh
- Clean the pump.
- Remove the gold-colored retaining ring. In the photo you can see the direction in which you need to unscrew it. To get the ring to move, you will most likely have to use a hammer and screwdriver.
Replacing the fuel filter Lada Kalina. Fuel pump repair: replacing the mesh
- Carefully remove the fuel pump. It is better to lay down any rag so that spilled gasoline does not get into the cabin. The pump will be covered with a characteristic yellow coating.
Replacing the fuel filter Lada Kalina. Fuel pump repair: replacing the mesh
Worth checking out:
Replacing the fuel pump on a Lada Granta with your own hands
The fuel pump for the Lada Granta is not a consumable item and usually does not bother car owners. Replacement is simple, but the price tag for the fuel pump is steep, but more on that below.
Replacing the fuel pump on video.
| TOP 15 most useful products for Lada Granta - OUR EXPERIENCE! |
- 1 replacement tool
- 2 Replacing the fuel pump in detail with a description of each step 2.1 An alternative option for relieving pressure in the fuel rail
Replacement tool
We will need:
Replacing the fuel pump in detail with a description of each step
The algorithm of actions is as follows:
- Remove the negative terminal from the battery. A mandatory requirement if you carry out any work that affects the electrical system of your car.
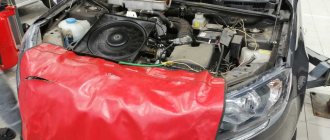
- The fuel pump is located under the rear seat. The rear seats need to be raised, I remove them altogether. It comes off easily. You need to “pull the string” in the center of the seat and remove it.
Pull the loop and pull it up
Relieving pressure from the fuel rail using a screwdriver
4 bolts securing the plastic fuel pump cover
Removing hoses from the fuel pump
An alternative option for relieving pressure in the fuel rail
The main method is a little inconvenient and dangerous. Since gasoline can ignite, and if the muffler pants have not yet cooled down, it can cause a fire in the engine compartment. Therefore, there is an easier way.
- Disconnect the power supply from the fuel pump.
- Start the car and let it run until it stalls on its own.
This method also relieves pressure in the fuel rail. Its advantage is that if you have a 16-valve engine, you do not have to remove the cover from it to get to the nipple!
Choosing a fuel pump for the Lada Granta
The fuel pump is universal and fits all models of the VAZ family.
There isn't much choice. There are two models on the market, and according to reviews, they do not cause problems. You can take any one.
The fuel pump on Kalina, Priora and Grant is the same!
Replacing the fuel pump on Grant
Before changing the fuel pump on a Lada Granta, the motorist must relieve the pressure inside the fuel lines. To “zero” the car’s fuel system, you must:
- Put the Granta at neutral speed;
- Apply the parking brake;
- Remove the rear sofa;
- Disconnect the wiring from the fuel pump;
- Start the Lada and wait for it to stall;
- Crank the starter for a few seconds.
To work with the fuel filter, the car enthusiast will need:
- flathead and Phillips screwdrivers;
- spanner set to “10”;
- hammer;
- rags.
After resetting the fuel lines, it is necessary to remove the terminals from the battery so that the possibility of supplying power to the fuel pump is completely excluded.
Installing a new fuel pump
The first step is to open the fuse panel (on the left side of the front panel) and remove the element responsible for the operation of the unit.
Next, dismantle the rear sofa and remove the plastic trim. Below it is the fuel tank flap (on the right side). The hatch cover is held on by four screws - remove them using a screwdriver. Next, disconnect all the fittings from the cover of the old fuel pump.
Using a “10” wrench, unscrew the nuts of the pressure ring of the fuel pump, of which there should be 8 pieces along the entire diameter of the ring. Next to the clamping ring there is a pin with which the ground wire is in contact. We throw off the wire, and then completely remove the clamping ring. The ring unscrews counterclockwise; for ease of dismantling, it needs to be tapped with a hammer.
You need to make sure once again that all wires and lines adjacent to the part are disconnected. Only then can you remove the used unit and place a new one in its place. You also need to install a new O-ring between the tank opening and the pressure ring - it is made of rubber and wears out quite quickly.
Installation of a new pump is carried out in the reverse order. Before disassembling, draw a diagram or photograph the original location of all fittings and hoses on the fuel pump cover.
Filter mesh for fuel pump Lada Granta / Kalina / Priora, Datsun
- Description
- Reviews (0)
- Question answer
Filter mesh for fuel pump Lada Granta / Kalina / Priora, Datsun
We recommend watching
LADA electric fuel pump with increased performance. Applicable to all injection LADA and Datsun vehicles..
New items
Body reinforcement for cars Lada Kalina, Kalina-2, Granta, Datsun from the manufacturer TechnoMaster is designed using ma..
Set of rear drum brake pads for Lada Vesta cars. The pads are produced under the LECAR brand (the company's own brand..
Set of front brake pads for Lada Vesta (all versions), Lada Largus (all VAZ engines, as well as Ren..
Set of 2 mudguards for the rear wheels of Lada Vesta (sedan, SV, except Cross versions). Mud flaps protect against dirt emissions,...
On a new car, the doors are fixed in the extreme and middle positions, but after a few years the fixation is lost. The reason is wear and tear..
On a new car, the doors are fixed in the extreme and middle positions, but after a few years the fixation is lost. The reason is wear and tear..
LED license plate light. Installed to replace the standard backlight. Applicability: Lada Kali..
Winter thermocouple LUZAR with an opening temperature of 92°C for thermostats: Granta (all engines) Kalina-2 (all engines..
Original factory washer reservoir for Lada Vesta cars (in any body). The kit includes a tank, lid and fi..
M6 flange mounting bolt. Used in Lada Vesta, Granta, Kalina-2, Datsun and Largus cars (with VAZ engines) for fastening..
Connector for connecting the handbrake limit switch of a new type on Lada Vesta and Granta FL cars. ..
The cap for the Lada alloy wheel is dark gray with an X pattern. Suitable for alloy wheels Lada Largus Cross, Granta FL, XRAY. Specialist..
The cap for the Lada alloy wheel is silver with the inscription CROSS. Suitable for alloy wheels Lada Largus Cross, Granta FL, XRAY. ..
Left front bumper cover (installed instead of PTF) for Lada Granta FL. The plug will be needed to replace a damaged one.
Right front bumper cover (installed instead of PTF) for Lada Granta FL. The plug will be needed to replace a damaged one..
This item is shipped on prepaid basis only (not available for orders with payment on delivery, i.e. cash on delivery). ..
This item is shipped on prepaid basis only (not available for orders with payment on delivery, i.e. cash on delivery). ..
Standard factory lower bumper grille for Lada Granta Sport. ..
Heater control panel (backlight light guide) Lada Kalina, Kalina-2, Granta (except FL) for cars with air conditioning. ..
Heater control panel (backlight light guide) Lada Kalina, Kalina-2, Granta (except FL) for cars without air conditioning. ..
- Guarantees
- About Us
- Payment Security Policy
- Regulations on the cumulative discount system
- Shipping and payment
- Contract of sale
- Personal data processing policy
- Write to us
- Site Map
- Personal Area
- History of orders
- Our partners
- FAQ
- Manufacturers
- Articles and news
- Checking order status
- Didn't find the product you were looking for? Leave a request!
st. Dzerzhinskogo, 70, entrance 3, Mon-Fri, from 10 to 18 (Samara time)
Phone: +7-8482-90-33-63 (online store with delivery of orders)
Phone: +7-8482-44-42-33 (pickup and retail store)
Engine Lada Granta
If the engine power of a Lada Granta car drops, increased noise occurs, or whines are periodically heard when the fuel pump is operating, then most likely the fuel pump has failed.
First, check the pressure in the fuel supply system by connecting a pressure gauge to the fitting on the fuel rail in the engine compartment. If the pressure in the power system is higher than 400 kPa (4.0 kgf/cmg), then the pressure regulator installed in the fuel pump module is faulty and must be replaced (see “Repairing the fuel module of Lada Granta.”) If the pressure in the power system is lower 380 kPa (3.8 kgf/cmg), replace the fuel filter (If this does not help, try removing the module and washing its receiver screen.
If in this case the pressure does not increase, the fuel pump must be replaced.
Tools needed to replace the Lada Granta fuel pump
You will need: Phillips screwdriver, drift, hammer.