Using the Scanner
Using a scan tool is the easiest way to reset your check engine light. Here are 5 simple steps:
- Connect the scan tool to the OBD connector under the steering column. A laptop or tablet with the appropriate software is installed in the holder;
- Then turn on the car’s ignition and turn on all the gadgets accordingly;
- On your mobile device, in the appropriate section, press the “READ” button to view engine error codes. We write down the codes with a pen in the order in which they were received. This will be necessary for subsequent repairs.
- We delete the error code. Press the “ERASE” button on the scanner. The Check Engine light will turn off when all error codes are cleared. Some scanning tools have many options, such as freeze frame, which captures the sensor readings. When deleting codes, these readings will also be deleted. Note: in some scanners, the option to clear codes may be automatic and the “CLEAR” or “YES” button instead of the “ERASE” button.
- Be sure to turn the ignition on before clearing codes.
What's the result?
Ease of use and accessibility allow adapters for the diagnostic connector to significantly simplify the procedure for checking a car, reading and decoding ECU errors. It is also worth noting that the error can be quickly reset without having to disconnect the battery terminals, erase a critical error, etc.
Finally, we would like to add that among the commercially available adapters, there are devices that may not read errors recorded in the ABS unit and Airbag airbag modules. In other words, information on these items may not be available. For this reason, before purchasing an adapter, it is necessary to separately clarify the possibility of reading errors from the memory of the above and other ECM modules by one or another device.
Battery disconnect method
Disconnecting the battery is an old way to reset the check engine light. Here are three steps to clear the check using this method: Step 1: Disconnect the cables from the battery. At this point, you should use a wrench to unscrew the positive and negative cables.
Step 2: Discharge the remaining electricity. The next thing you should do is press and hold the car horn for about 30 seconds. This action will help drain the car battery.
Step 3: Wait and reconnect the battery. After disconnecting the battery cables and draining the remaining electricity, all you have to do is wait about 15 minutes and then plug the battery back in. Error codes will be cleared. (Note: This method may not work on some vehicles.) If after this procedure the “check” lights up again, this may mean that the problem is still much more serious.
How to fix the problem
To resolve the error, do the following:
- Check the sensor for functionality. If it breaks, you simply need to replace it.
- Make sure there is no plaque on the contact. If it is there, you need to clean it.
- Check the operation of the on-board circuit and make sure that it has contact.
- A random error can only be corrected by flashing the on-board computer, but to do this you need to go to the nearest service station.
So, you can solve this problem yourself, however, as practice shows, this does not always work out. It is worth noting that this code often appears in winter, if the car has been standing outside for a long time and not in the garage. It is noteworthy that it does not matter which engine is installed - 16 valves or 8 valves.
Allow the check engine light to go off on its own.
Wait until the “check” goes out on its own. The simplest method because you don't have to do anything. The computer system in most vehicles will automatically recheck for problems that may activate the error light. If it is a minor problem, it will automatically correct itself and the check will go off. However, if the check light is still on after three days, you need to apply the methods mentioned above to reset it.
If this continues to happen despite the following reset procedures, you should take your vehicle to your nearest auto repair shop and have it diagnosed by a professional mechanic. Professional diagnostics use more sophisticated tools and can identify precise problems.
REMEMBER: You can always contact our car service center, where your car will be happy to receive professional technical assistance. You can also make an appointment with us for a scheduled technical inspection! Please familiarize yourself with our car repair and diagnostic services.
Diagnostics
Priora diagnostics can be carried out at any service station. This allows you to identify problems with the engine, namely the culprit of the problem. It will help save money, time and effort to find the cause yourself or at random.
Such engine scanning at a service station is carried out with an expensive and advanced scanner, which is quite expensive. Checking the Priora ECU for errors in a specialized service will cost from 1000 rubles and more.
How to reset a check on a Priora yourself
Probably every VAZ owner has encountered such a problem when, out of the blue, the “chek” error comes on. Here many people immediately panic. Don't worry, there's nothing wrong with it. Firstly, this error appears when any sensor fails (here you will have to suffer and determine which one), but all this is determined by changes in the behavior of the car: dynamics, consumption, etc. Secondly, this error appears when the wrong mixture enters the combustion chamber. This can happen in two cases: some sensor is not working correctly, or low-quality gasoline. Try using higher quality fuel the next time you fill up.
However, even if you correct the problem, the “check” will continue to light up. Many people go to computer diagnostics to clear an error, where they pay about 150-200 rubles per minute. Although it’s not a lot of money, why? If you can reset the error yourself, spending the same minute on it, and you don’t have to go anywhere. Don’t know how to reset the check error yourself? Very simple, read below.
We reset the error.
- To do this, turn on the ignition without starting the car.
- Open the hood and remove the positive terminal of the battery.
- We wait from 10 seconds to a minute and seat the terminal back.
- Close the hood.
- Turn off the ignition.
- Turn on the ignition and start.
And then a miracle, the error light stopped lighting.
Even if you cannot decide why your check light came on, do not immediately run to diagnostics. Try to reset this error using the method described above. There are simply cases of accidental operation (there was an impurity in gasoline and the like). And then after the reset the error simply will not appear again. And if, nevertheless, there is some kind of problem, then the “check” will pop up again, after 50 kilometers.
Check Engine Light comes on when your vehicle's computer detects a problem with the powertrain. This may indicate a serious or minor complication, but ignoring it will definitely make the problem worse, leading to significant damage and costly repairs. You can avoid all troubles if you know the reasons for the signal. However, it sometimes does not turn off despite solving the problem. In this case, it won’t hurt you to find out how to reset the “check”.
Most drivers get annoyed if the check light still does not go off, even if the car problem has been corrected. In this case, your car's computer is faulty and a little intervention is required to resolve the issue.
How to clear an engine error
Let's start with the fact that engine errors can occur for various reasons, since the control system includes a large number of sensors and controls the operation of individual components, systems and mechanisms. It should also be taken into account that different vehicles may differ in terms of the complexity of a particular system. On some cars, the “check” lights up, for example, only in the event of serious or critical errors (malfunctions in the operation of the air flow control valve, engine detonation error when the knock sensor is faulty, etc.).
At the same time, the check may not light up if there are problems with oil pressure, there are certain deviations from the norm in the throttle operation, etc. On simple cars the light comes on, on more technologically advanced cars in a similar situation the error “loss of engine power” or “oil pressure error” appears in the engine. For this reason, reading engine errors is a necessary diagnostic and preventative procedure, regardless of whether the check light is on or not.
Now about the reset. On many cars, especially in the budget segment, to reset the error in the ECU, you should perform the following steps:
- warm up the power unit to operating temperature;
- remove the “plus” terminal from the battery for 5-15 minutes, then connect the terminal back after the specified time;
- insert the key into the ignition switch and turn it to the last position before starting the internal combustion engine from the starter (the lights and indicators on the dashboard should be on);
- leave the key in the lock in this position for 1 minute, then return the key to its original position;
Such actions in some cases allow you to remove errors from the computer. Now you can start the engine (the check should go out after starting) and let it idle for 2-3 minutes (do not press the gas pedal while running). Now you should turn off the engine, and then repeat the procedure of starting and stopping the engine a couple more times.
Note that this method allows you to remove the “check” when the cause of its ignition was the operation of the engine with a disconnected or faulty sensor, refueling with the wrong type of fuel, ignition failures due to non-functioning spark plugs, etc. If otherwise, a problem occurred and the check light came on. The driver then found and corrected the cause and then reset the engine error.
To do this, you need to use a special diagnostic connector into which additional equipment is connected. Note that the vast majority of cars produced after the 2000s have a standard connector. This connector is called OBD2. The location of the connector may be the area near the pedal assembly, under the steering column, etc. For an accurate determination, you need to look at the technical manual for a specific vehicle model. On older models, such a connector may be located in the engine compartment and other places. Please note that to connect equipment in such a case, you may need a special adapter.
Using the Scanner
Using a scan tool is the easiest way to reset your check engine light. Here are 5 simple steps:
Priora: why the check is blinking or on - the main reasons
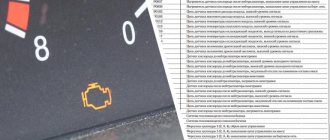
The diagnostic connector will help you “talk” to the electronic control unit and find out why the check light is on. Well, before you start diagnosing, check out the list of the most common Priora “errors”:
- Low Oil Level – Low oil levels ultimately lead to increased engine wear. If the oil level turns out to be normal when checked, then it needs to be replaced and the integrity of all Priora components checked. Faulty fuel pump or fuel filter. You can’t always “hear” this, but diagnostics, replacing the filter, and checking the fuel pump will “cure” the breakdown.
- An error in the operation of the exhaust gas system - this is not something to joke about - it is better to start repairs as soon as possible.
- The ignition coil does not produce a spark / the catalytic converter is unstable.
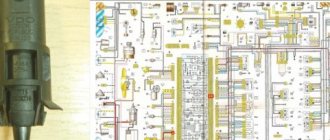
- Wiring problems - high voltage wires can give an erroneous signal to the ECU - "Check" will light up on the dashboard.
- Malfunction of sensors - unfortunately, they very often fail. The “check” lights up due to the fault of the mass air flow sensor (MAF), two oxygen sensors (after the fuel afterburner and in the exhaust manifold), the crankshaft sensor and the camshaft sensor. In frosty weather, the “Check” may light up because three cylinders are turned on first, and then, during normal startup, it does not go away. This is due to the fact that soot particles remain on the contacts - they disappear after a few days.
- False sensor activation due to high humidity
- The engine starts running when cold and the check light comes on.
The reasons for the “Check” fire on a Priora (16 valves), as we see from the list, can be serious. There is no need to panic: when the “Check” light comes on, you need to immediately reach for the diagnostic connector. It’s funny, but earlier diagnostics were carried out in the service with special software, but today any error code can be displayed on your smartphone, deciphering it using a mobile reading device.
There is another reason for engine malfunction - low-quality gasoline.
If this causes the spark plugs to flood, you will see the “check” blinking. Low-quality gasoline can be sold at any gas station; experienced car enthusiasts advise carrying a couple of candles with them. Sometimes the “Check” light comes on due to gasoline and the engine stalls. If he continues to work intermittently, things will be bad.
“Check” should light up when the ignition is turned on. A malfunction is also considered to be the case when the check light does not light up when the ignition is turned on, that is, the ECU does not send a system check report stating that “the system is ready for operation” - there is a problem in the wiring. You need to get rid of the chek icon not so as to “hide all the problems”, but so that the process of processing the fuel mixture occurs in order. Otherwise, you will have to seriously repair the car.
Battery disconnect method
Disconnecting the battery is an old way to reset the check engine light. Here are three steps to clear the check using this method: Step 1: Disconnect the cables from the battery. At this point, you should use a wrench to unscrew the positive and negative cables.
Step 2: Discharge the remaining electricity. The next thing you should do is press and hold the car horn for about 30 seconds. This action will help drain the car battery.
Step 3: Wait and reconnect the battery. After disconnecting the battery cables and draining the remaining electricity, all you have to do is wait about 15 minutes and then plug the battery back in. Error codes will be cleared. (Note: This method may not work on some vehicles.) If after this procedure the “check” lights up again, this may mean that the problem is still much more serious.
Error 1602
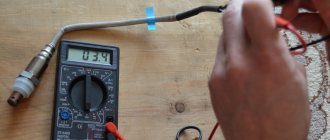
If error 1602 appears on the on-board computer of the Lada Priora 16 valves, this means that the on-board voltage in the controller has dropped. As the experience of VAZ 2170 owners shows, error 1602 does not affect the operation of the car; if you remove the terminal from the battery, then 1602 will disappear, but after a while it will appear again. There may be several reasons for 1602:
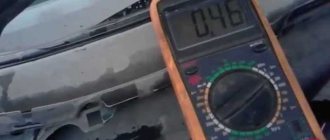
- Problems with the generator. Measure its voltage; in good condition it produces 13.7-14 V.
- A large voltage drop during engine starting also leads to the appearance of 1602. The ECU records the voltage drop and automatically adjusts the time. First of all, you need to check the ground on the electronic control unit.
- Codes 1602 appear when the security system blocks one of the electrical circuits.