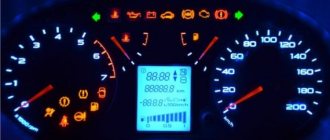
The Lada Granta is equipped with a standard on-board computer, called “State X1 M”, which works thanks to the E-Gas system. The main element of the device is a trip computer with an output to the display. It displays indicators such as:
Thanks to this, you will know exactly how long you are driving and how critically empty your tank is.
The on-board computer installed in the Lada Granta car is equipped with a diagnostic tester, which contains system diagnostic codes. In addition, thanks to it you can obtain information about the engine temperature and adjust its parameters. It also contains data on the position of the damper, the voltage in the car’s electrical network, as well as a tachometer and speedometer.
Under the hood of the Lada Grant, which is equipped with this device, there are sensors. In case of any violations, all information will be displayed on the on-board computer, which will warn you about them. In particular, you may receive warnings:
In addition, the device is equipped with a supervisor who is always ready to remind the driver that his lights or turn signals are not turned off. In addition, it will immediately give a signal if the car begins to move forward or backward on its own.
Description
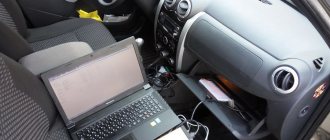
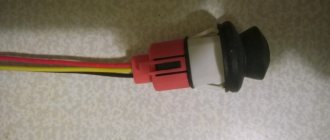
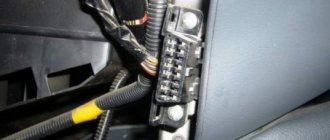
The on-board computer on the Grant is easy to select and install. This car has an OBD-2 diagnostic connector, to which the BC is connected using a standard connector (usually included in the kit). There is a model BC State x1, which are installed instead of a button plug in the panel. The connecting wires are connected to the diagnostic block (located near the front passenger's left leg). Universal on-board computers are installed on the dashboard or windshield. There are also models installed instead of a radio.
This is the best thing that has ever been created in Togliatti. Harmony, originality, budget price - this is the Lada Granta 2190. The car replaced three “classic” models - VAZ 2107, Kalina and Samara. Not a high price is the main priority of this model. To do this, the company used technology that allows you to reduce the number of parts that make up the car. For example, the front part consists of only three parts, and the instrument panel consists of 40 parts. The Lada Granta is 22 centimeters longer than the Kalina and has 5 mm less ground clearance. The car is already arousing great interest, and the queues for it are huge.
It would take a lot of time to list all the advantages of the car, but still, how can we not mention the spacious interior and beautiful modern panel from Renault Logan. There is enough space for a tall driver, there is enough space both above the head and on the sides. The seats are better in shape and design, and have an upright seating position. The same front panel now has a stylish dark color, round ventilation holes, and laconic shapes. The steering wheel contains three spokes, just like foreign cars.
The doors also acquired a more complete composition and meaningful design. The beautiful door handles finally began to resemble themselves. Large side mirrors provide good visibility, and this is very important for drivers. It will probably be interesting to many, but it was in the Lada Granta that another interior detail appeared, which had never been on VAZ cars before, these are two cup holders.
The package can be found in three versions: Standard, Norma, Luxury. The “Standard” kit contains manual windows and unpainted bumpers. And the “Norma” kit also contains an airbag for the driver, an electric tailgate, an on-board computer, and an alarm system. The “Lux” package contains full power accessories, heated mirrors, air conditioning, heated front seats, airbags, ABS+BAS. Each configuration has its own engine, all of them with a volume of 1.6 liters, but with a power of 80, 90, and 98 horsepower.
Whatever one may say, the Lada Granta is a modern car, which is distinguished by a spacious interior, a new panel, seats, and a large trunk. And although technically the car is far from perfect, it is a new and most importantly affordable product.
Multitronics in Lada Granta
State Uni Comp 620 in Lada Granta
The “simplest” on-board computer for the Lada Granta is the BC STATE X1-G. It is compatible with ITELMA M74, M75 units, as well as BOSCH ME17.9.7. The connection is made to the OBD connector, which is located in the cabin. No additional power is required. We will look at how to install it, as well as how to update the firmware. Sometimes you need to update it immediately to get compatibility with a new car. Therefore, read the review carefully.
All functions of BC STATE in one video.
How to install an on-board computer on a Granta
In the time of Karl Benz, the man who showed the world the first prototype of a modern car, the design of cars was quite simple. Engine, transmission, body, brakes, steering - these are all the simple components that have remained unchanged in our time. There was no talk of safety, comfort, or accessibility of cars in those days.
But a modern car is a complex technical device. Modern electronic systems of this “organism” monitor almost all parameters and record the slightest deviations in their operation. The driver’s participation in this comes down to monitoring the instruments and, in case of any deviation, contacting a car service center. The device that monitors the parameters of the car is the car computer. What it is, what it serves, and how to install an on-board computer on the Grant will be discussed in this article.
What is the on-board computer used for?
An on-board or trip computer is designed to calculate vehicle movement parameters. These can be not only cars, but also bicycles, mopeds, and motorcycles. Modern on-board computers are multifunctional devices; they can not only measure the speed of movement, but also have options such as turning on the front running lights when moving away, activating the windshield wipers if there is a rain sensor, calculating fuel consumption, travel time and much more.
An alternative on-board computer on the Grant can complement the main one, in which most options are cut down. A significant part of trip computers are connected directly to the vehicle controller, but may also have their own power source. Such computers determine parameters thanks to a built-in GPS sensor and can even be installed on bicycles and scooters.
Why install an on-board computer
It would seem that all modern cars are equipped with standard computers. Even in a car like the Lada Granta, an on-board computer is installed by the manufacturer. But what do we really have? Not all trip computers display the necessary parameters. In the “norm” or “standard” configuration, the BC options are very limited. At best, they show the fuel level, time, gasoline consumption and the distance that can be covered with the remaining gas.
Such computers do not even show the coolant temperature, which is very important for the driver. It is precisely for this reason that an on-board computer is installed on the Grant as an alternative to the standard one.
Types of alternative on-board computers
There are manufacturers that produce BCs that are exclusively suitable for all cars. These trip computers can also replace the standard BC; they differ only in the mounting method, functionality and price. Such BCs can be mounted on the dashboard, on the windshield, or in the standard places of the radio. Staff X1 - the on-board computer on the Grant is installed instead of plugs on the instrument panel; it looks like a regular button.
Installing BC on “Granta”
Before installing the BC on Granta, you need to decide on the choice of this device based on your needs. Know that the cheaper the on-board computer for the Lada-Granta, the less its functionality. However, inexpensive models may also have functions that are not available to regular standard bookmakers. For example, heating candles in winter or adjustable activation of a cooling fan. The choice of such models is quite wide, and it all depends on the needs of the buyer.
On the Grant, the on-board computer can be installed either in a standard location or in an alternative location on the instrument panel. The “STATE” type BCs are mounted instead of button covers on the front side of the torpedo. There are trip computers that can be installed in the floor tunnel, on the instrument panel instead of the radio, mounted on the windshield, or even completely replace the instrument panel. To install such a trip computer, just secure it according to the instructions and connect it to the connector on the car controller. On the Lada Granta, this connector is located in front of the passenger seat in the left corner.
Conclusion
This article raised the question of how to install an on-board computer on a Granta. As it turned out, this is not a difficult operation at all, and any car enthusiast can do it, regardless of his experience. It is enough to choose a bookmaker that satisfies the car enthusiast in terms of parameters and price. Any modern trip computer is equipped with detailed instructions for its installation. You just need to carry out the actions prescribed in it and not invent anything unnecessary.
Setting up and unlocking
You can unlock the onboard vehicle using the same firmware. Setting up the device is a simple task if you follow the instructions included with the device. You can also find out the answer to your question on the manufacturer’s official website or watch training videos.
Using the instructions, you can not only quickly set up the device, but also find out the codes of all possible errors. This will help to diagnose the malfunction in time and take measures to eliminate it.
In comparison with the standard BC on the Granta dashboard, any other on-board vehicle will be distinguished by its expanded functionality. You can do without them, but in this case, if you need to diagnose the car, you will have to contact a service center. By installing an on-board computer, the owner of the Grant can independently monitor all engine operation processes, diagnose malfunctions and activate some parameters.
Transmission malfunctions
| Code | Description of the error |
| P0717 | In this case, the BC reports incorrect operation of the turbine speed control device. |
| P0706, P0705 | The on-board computer reports the absence of a signal or several simultaneous signals coming from the automatic transmission selector. |
| P0720 | A failure of the output signal speed control device has been registered. |
| P0973, P0974 | BK detected an open circuit or short circuit in the wiring of the gearbox on/off solenoid. |
| P0962, P0963 | The motorist is notified of an open circuit or incorrect signal coming from the transmission pressure control solenoid. |
New Lada: Lada Granta 1.6 MT Standard (06.2017 - 07.2018)
On-board unit installation
The STATE model provides for installation of the router directly on the instrument panel, which prevents the warranty of a new car from being violated in the event of damage to the trim. Installation is carried out by removing the plug under the button, then installing a device with connected wiring in the free space. The other end of the wire is connected to the diagnostic connector. This device also has a built-in tester that allows you to monitor the condition of the electrical circuit, which helps to anticipate a possible short circuit in the wiring.
Installing the device into a standard connector
Low cost, ease of operation, and compactness are quite convincing arguments for purchasing the STAT X1 device for your car. This will make using the car convenient and safe.
How to install the device?
By purchasing the “State” controller model, the owner becomes able to install the device independently after purchasing the Lada Granta; detailed instructions will help with this. This eliminates concerns about loss of warranty service, since the Lada Granta panel is already equipped with the appropriate connector from the factory. After installing the controller, the entire list of electrical devices integrated into the panel is not damaged.
Installation is carried out after removing the factory plug in the designated place on the panel. This device with the attached wiring is installed inside the niche that appears. The end part of the controller cable is brought out to the location of the diagnostic block and connected to its connector. The diagnostic socket is located in the lower part near the passenger seat.
The on-board computer has gained popularity due to the presence of such important and balanced consumer qualities as:
- relatively low price;
- compact dimensions;
- ease and accessibility of installation for the vast majority of Grant owners.
Having decided to purchase this particular model, the owner of the Lada Granta ensures comfortable and safe operation of his “iron horse”.
Video instructions about the operating features of this controller will allow you to study this device in sufficient detail. But more than one “State” can be equipped with a LADA Granta panel. Among alternative products, you should consider the Multitronics model. Various versions of this device are endowed with versatility due to the possibility of their installation in the places of the car’s interior that the owner likes (windshield, panel, etc.).
Installing this option in the Din socket of the panel causes some difficulties due to the need for careful routing of the wiring to the place where the diagnostic block “habits”. For these purposes, it will be necessary to dismantle the dashboard to make technological holes for the wiring “route”. It is recommended to resort to these manipulations using a heated knife, which will avoid noticeable deformations of the panel. The wiring should be firmly fixed to the inner surface of the panel in order to prevent the noise it creates when moving. The case itself, which has a standard computer, is best attached to the panel using liquid nails.
After connecting the router cables to the diagnostic block connector, the device must be adapted to the network, which implies determining a complete list of on-board settings. If this process is not observed for some time, the firmware version should be changed in order to provide it with the ability to support protocols in the “CAN” format.
We update the BC firmware ourselves
First of all, you will need to buy a USB- K- Line adapter. The software you will need is firmware, a program to install it, and a driver for the adapter. If you already have all this, assemble a diagram as in the photo.
Only three wires are used
Note that toggle switch T1 is closed “at the request” of the program itself. The rest of the time it will be open.
A computer can also act as a power source - just connect to the Molex connector. And for the BC, a terminal block removed from a computer cooler (2 pcs.) is suitable.
Update process
First, connect the adapter to the USB port. Install the driver. Make a note of which “virtual COM port” will be used. Then proceed like this:
Versatile alternative
You can install other models of devices on the Lada VAZ 2190 car. A good alternative in this regard would be the Multitronics router. Various types of device housing allow it to be installed in any place convenient for the driver. However, when mounting grants into the dashboard, it may be difficult to pull the wiring to the diagnostic block. The panel will need to be removed and holes drilled, which may void the machine's warranty. If the device cannot determine the specified settings, it will need to be reflashed, and this can already be attributed to the disadvantages of the model.
Multitronix has a very convenient user interface and simple settings, as well as clarity and speed in operation. Naturally, under the supervision of such an “assistant” the car will always be under vigilant control. Its price will be higher than that of the STAT on-board vehicle, which is more adapted to the Grant.
Since the release of the Lada VAZ 2190 for sale began at the end of 2011, it was quite difficult to initially purchase some electronic components for this car. This circumstance slightly slowed down the growth of the popularity of this car. However, today you can buy a router for a VAZ 2190 from almost any supplier of automotive products.
Lada Granta models in the “Norma” and “Lux” configurations are equipped with an on-board computer with a large display and good information content. The computer collects, processes and displays information useful for the driver, including gasoline consumption in the fuel tank with an accuracy of one liter, basic traffic statistics, problems with the operation of the main vital systems of the car, air temperature indicators in the cabin and outside.
On-board computer firmware Grants
You can update the software yourself. To do this, you will need a USB-K-Line cable, the firmware itself, a diagram of the Lada Granta ECU, an installation program and a driver for connecting to the adapter.
BC connection diagram for firmware
Schema collection algorithm:
The firmware process looks like this:
To download all the software necessary for flashing the firmware, just go to the official website of the manufacturer of the Lada Granta on-board computer. You can also find all the necessary drivers there.
Which company's on-board computer should I choose?
Car manufacturers do not produce such devices. The technology has been mastered by manufacturers of tuning electronics and spare parts.
Among them:
The Moscow enterprise produces not only on-board computers, but also diagnostic equipment. The production has been in existence for 30 years, there is an established dealer and service network. The buyer enjoys free after-sales support: only the software is updated 10 times a year.
2. Research and Production Enterprise "Orion SPB"
The company from St. Petersburg produces on-board computers without restrictions on the make of the car. You can always choose the right model from the compatibility catalog on the manufacturer’s website.
The company offers a series of on-board computers under the Prestige brand. It is preferable to use it on domestic cars, but there are also universal models. There is support for major protocols.
A company from the city of Tolyatti specializes in the production of BCs for GM AvtoVAZ cars. There is permission for installation on warranty vehicles. There are also universal models.
On-board computer State X1-G - A reliable friend and assistant to the car owner
seemed biting to me... Yes, and BC
I need it to look at fuel consumption (even with an error), daily mileage, engine/coolant temperature, the ability to read errors and reset them, set the temperature on. "CARLSON". :D:D:D
I chose for a LONG time and painfully, almost from the time I bought the car.
The choice was m/y: 1. Multitronics; 2. STATE.
— Yes, it’s cool, but there are many functions, the ability to connect parking sensors has been “touched” (so to speak). «-«
- one and significant for me
PRICE
2.
“+”
- Relatively cheap, also functional (compared to the 1st). "-"
— With my white backlight, such a light garland doesn’t quite fit into the interior: D: D: D
Many people have read that they set up BC State X1 and enjoy life.
After thinking about it, I also decided to buy it. BUT
In general, I went there for weeks and combined business with pleasure.
BC STATE X1-M UNIVERSAL - Designed for installation instead of a button plug in cars of the 2110 families with a Europanel, Samara 2, Chevrolet Niva, Kalina (All types of controllers, including M73, Bosch ME17.9.7, M74 with E- gas)
STATE X1-M UNIVERSAL
STATE X1-M UNIVERSAL - installation configurator
I haven’t tried all the optional features yet, so here’s what HE CAN:
Capabilities of STAT X1-M
Regarding installation, what can I say...: Everything is beautifully and colorfully described in the “Installation Guide”.
CAN ANYONE TELL HOW IT CAN (AND IS IT POSSIBLE) TO RE-LIGHT IT?
PS: Now during the following. weeks have spent it STUDY
to be with him on YOU! :)))
Thanks to all! No nail, no rod.
Additionally, those owners of Lada cars who are not satisfied with the minimal information content of its built-in instrument panel do not miss the opportunity to buy a route route. All the subtleties when purchasing lie in what kind of car router is needed, since the supply of models on the market is small. Nevertheless, they are enough for the on-board computer on the Grant.
General information and features
Remaining fuel in the tank Forecast of mileage on remaining fuel Fuel meter Travel time Travel time Average fuel consumption per trip Average speed per trip Diagnostic codes of the system Engine management Engine temperature On-board voltage Throttle position Digital tachometer Digital speedometer Plasmer Tropic Alarm Dangerous engine overheating Crash on-board network Exceeding the speed threshold Non-volatile memory
Supported cars - Lada Granta, Kalina-2, Priora-2, Datsun Compatible with Itelm M74 controllers Official website Installation and operation manual Staff X1-G
The BC is installed in a standard connector instead of a plug.
The X1-G state is connected to the standard diagnostic connector. No additional connection required.
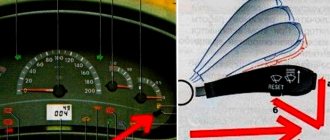
The functions are distributed on both buttons, as in the photographs.
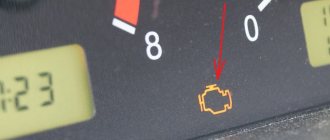
In diagnostic mode, if there is an error, its code is displayed on the display. A description of the error and possible malfunction can be found in the instructions for the bookmaker or download the program for the mobile application.
Functionality on board the vehicle
The manufactured models of onboard vehicles for the Lada Granta have a wide information memory and are equipped with a monitor. This significant advantage is beneficial even for drivers with poor vision and women who are not very confident in the functioning of the car. In this regard, the on-board computer can help the car owner. He points to:
In addition to these functions, the on-board computer on the Lada Granta has volatile memory, a malfunction indicator, a supervisor (warning about unplanned vehicle movement, unswitched headlights and direction indicators) and afterburner. The latter resets the memory when switching to the gas pedal when accelerating the Lada to its original settings when using gasoline no lower than 95.
The standard on-board computer of the Lada Grant, namely the State X1 M (Multi-Set) model, is considered the highest priority on-board computer for the Lada family. Compact dimensions allow it to be built into the instrument panel in the recess of the button cover. If a car owner wants to buy a State on-board computer, then, in addition to the device, the kit will include instructions and wiring.
The filling of the State X1 M model consists of a built-in trip computer, in which all the necessary information on the operation and diagnosis of Lada mechanisms will be processed.
A diagnostic tester can provide a lot of information about the car's condition.
The on-board computer diagnostic tester is equipped with a plasma, digital tachometer and speedometer. Using the tester, it is easy to clarify the position of the throttle valve and the state of the electrical network on board, which will help prevent possible damage and fire to the vehicle's electrical wiring.
What device is used on the VAZ 2190
The Lada Granta is equipped with a standard on-board computer, called “State X1 M”, which works thanks to the E-Gas system. The main element of the device is a trip computer with an output to the display. It displays indicators such as:
- Amount of fuel.
- The amount of mileage a car can travel on the remaining fuel.
- Travel time.
- Distance traveled.
- Fuel consumption meter.
Thanks to this, you will know exactly how long you are driving and how critically empty your tank is.
The on-board computer installed in the Lada Granta car is equipped with a diagnostic tester, which contains system diagnostic codes. In addition, thanks to it you can obtain information about the engine temperature and adjust its parameters. It also contains data on the position of the damper, the voltage in the car’s electrical network, as well as a tachometer and speedometer.
Under the hood of the Lada Grant, which is equipped with this device, there are sensors. In case of any violations, all information will be displayed on the on-board computer, which will warn you about them. In particular, you may receive warnings:
- about overheating;
- about problems in the electrical circuit;
- about speeding.
In addition, the device is equipped with a supervisor who is always ready to remind the driver that his lights or turn signals are not turned off. In addition, it will immediately give a signal if the car begins to move forward or backward on its own.
Bumper tuning for Lada Granta
Diagnosis of errors
When you begin to notice something unusual in the behavior of your car, or there are obvious problems in its operation, then it certainly makes sense to have it diagnosed. Naturally, the OBD-II diagnostic connector will show errors most efficiently and accurately. however, not everyone has pads to control this connector and has to use the standard one.
In order to enter self-diagnosis mode, you must:
Error codes (decoding)
These are the most common error codes that can appear if there is a malfunction on the Lada Kalina.
VAZ 2110 error codes are presented numerically on the display, and they are transmitted from phase sensors to the on-board computer. This is convenient, but a novice driver will not understand much and will not be able to figure out how to use this equipment. But you need to know and be able to do this, since the system, thanks to the built-in self-diagnosis function, will help to identify a malfunction in the early stages, which means it is possible to eliminate it in a timely manner.
Basic device errors
Setting up such an on-board computer is not something extremely difficult; detailed instructions are always attached to it. If some points are not clear to you, you can always find a video of this process. At the same time, the device can also upset you with an error, despite the fact that there is not always time to look for instructions. Here's an example of a few common device errors you may encounter along the way:
- P0030, 0031, 0032. Errors in the oxygen sensor before the heater. In this case, the on-board computer checks for an open circuit, as well as a possible short circuit to the ground or to the on-board network, respectively;
- P0036, 0037, 0038. In this case, you will be signaled by a sensor located behind the heater. The description of the errors is similar to the previous ones;
- P0112.0113. Intake air temperature sensor signal. In this case, we are talking about too low or high signal, respectively;
- P0116, 0117, 0118. Alert from the coolant temperature sensor. The code signals either that the signal is out of range, or that the readings are too low or too high;
- P0122, 0123. In this case, throttle valve sensor No. 1 signals you, notifying you that the signal level is too high or low.
These and other errors must be indicated in the instructions, so try to always have it with you if you do not know them by heart (which is highly unlikely due to their large number). With the manual at hand, you can always determine which error code means what. Thanks to them, you can always quickly identify a particular malfunction in your car, quickly fix it and continue on your way with minimal delay.
On-board unit installation
If you buy the State device after purchasing the machine itself, you can install it yourself. At the same time, you do not need to worry about the supposed “failure” of the warranty of the purchased car, since the Lada panel has a corresponding connector for such an on-board device. When installing it, the panel will not be disturbed or damaged.
The on-board computer is installed by releasing the recess in the panel from under the button cover. The State on-board computer with the wiring already connected to it is inserted into the freed niche. The end of the wiring is brought out and connected to the diagnostic block below, near the passenger seat, where the passenger's foot is usually located.
Not too high a price, compactness, ease of use, ease of installation - these are significant factors for buying a State on-board computer for a Lada and making the operation of the car completely convenient and safe. A video on how to operate the on-board computer will help you get acquainted with the device in more detail.
However, the VAZ 2190 car can be equipped with other similar computer installations, for example, Multitronics routers. Their various modifications are considered universal, since they allow the driver to attach and install them in places where it is convenient for the car owner (on the windshield, inside, on the panel, etc.).
During installation, you will need to remove the dashboard to cut the appropriate hole.
Installing the Multitronics on-board computer on Granta in the Din-place (in the panel) will be complicated by the fact that here you will have to very carefully route the wiring to the diagnostic block. In this case, it will be necessary to remove the dashboard and make holes for the wires. In this case, it is convenient to use a heated knife to minimize the deformation of the panel. The wires must be secured in the panel itself to avoid the noise they make when the car is moving. It is better to secure the on-board computer to the panel with liquid nails.
After the on-board connector is connected to the diagnostic block, it is necessary for the computer to identify all on-board settings. If this does not happen within a certain time, it is necessary to change the computer firmware so that it supports the CAN protocol. Therefore, this will require reflashing the Multitronics, and this is already a significant disadvantage.
Two methods for installing the on-board computer
On the Lada Granta, installation of the STATE on-board computer is carried out in two ways. In the first case, the BC is fixed on the central panel, in the second - on the lining of the floor tunnel. The BC housing is installed instead of the plug (see photo).
Torpedo and tunnel, two options
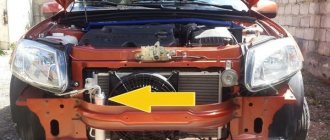
The wiring harness that comes with the kit must connect the OBD connector (see photo) to the computer connector. First, find the required connector, then disconnect the battery.
What's above the tunnel on the right?
To perform the last action you will need a key “10”. You only need to disconnect the minus terminal.
Before installation
First, let's check whether our BC turns on and whether it is compatible with the machine. We carry out the standard connection, and then connect the battery. The on-board computer on the Lada Grant will show the firmware version.
Here is version “027”
Note that the version display time is limited to two seconds.
In “new” firmware (“019” and newer), you can find out the software version like this: press the right BC button, “scroll through” all the functions, reach the inscription “dro”, press the button for a long time.
The point is that “old” versions are not compatible with new equipment: firmware “026” is not suitable for the 27th engine, etc. Check operation: select “function 2” (degrees Celsius), wait for the readings to appear. Typically, if incompatible, “minus 40” is displayed.
Computer in the tunnel
To mount the BC into the tunnel, unscrew the two screws located on the right side of the casing. You will also need to remove the lever cover.
Remove the casing using a screwdriver
In the version with automatic transmission, more actions are required. Here you need to unscrew two screws on the right and left, and then remove the handbrake trim (3 screws). When it is removed, unscrew the screw holding the limit switch. And then the screw on the casing is unscrewed through the hole in the end switch.
Everything is ready for installation of the BC
When the lever niche is open, you can reach the plug, which replaces the button. The plug can be easily removed.
A wire is pulled from the button hole to the corner of the casing. Wires are tied to the wire and pulled out. The terminal block should protrude 2-3 cm from the hole. Make all connections: the computer to the “white” terminal block, and the “black” terminal block to the OBD connector.
At the last step, the BC module is installed in the niche. But first you need to secure the casing. We looked at how to install an on-board computer on a Lada Granta with any “box”.
Installing an on-board computer on a “torpedo”
To install the BC on the dashboard, you do not need to unscrew anything. We simply dismantle the plug and extend the wire to the corner of the tunnel. Then a tourniquet is tied to the wire, and so on.
The wiring harness goes under the dashboard
All actions are illustrated in the photo.
For those who cannot cope with the task, we recommend doing this: you need to open the glove compartment, empty it completely, and then unclip the two stops on the back wall. Then the entire structure “opens”, and through the appeared slot the plugs are reached by hand.
When connecting the harness provided in the kit, it is almost impossible to make a mistake - all connectors are made asymmetrical. It's a pity that the wiring cannot be completely hidden.
A couple of wires remained visible
Decoding combinations
Well, now it’s time to tell you about decoding fault combinations.
Diagnostic connector for connection to the on-board computer
Decoding codes after diagnostics with a scanner
As stated above, if the measured characteristics do not differ from the standard ones by more than 20%, then everything is in order with the car. What are the standard parameters?
| Parameter | Meaning |
| UACC | Shows battery voltage. To understand whether there is an error in this case, it is necessary to activate all devices that consume the most voltage. Allowable voltage is from 13.9 to 14.5V. If it is less, then it is necessary to check individual circuits of the network. |
| THR | Throttle position parameter. As a rule, if it is faulty, the driver will know about it without diagnostics, since the car will move jerkily and the engine power will constantly drop. Press the gas pedal without starting the engine, but turning on the ignition. The TPS readings should gradually increase to 90% (or slightly less). If everything is so, then the sensor is working; if not, it needs to be replaced. |
| FREQ | Crank pulley rotation speed parameter. The rotation speed is up to 840 rpm. If this sensor fails, the operation of the motor will be impossible. |
| AIR | Mass air flow parameter. It should not exceed 12 kg/hour. Start the engine and press the gas pedal so that the number of revolutions increases to 5 thousand per minute. In this case, the parameter should increase to approximately 250 kg/hour. Naturally, if the device is working properly, then the indicator will be like this. |
| UOZ | Represents the ignition timing angle. It should change in the range from 6 to 15 degrees. |
| INJ | This parameter bk represents the duration of the injection pulse (the time required to open each injector so that gasoline enters the cylinder). Ideally, this parameter should be between 3 and 5 milliseconds when driving at neutral speed. If the readings obtained during diagnostics are much higher, then, most likely, the injectors are already clogged and need to be cleaned. Or this indicates low gasoline pressure as a result of a clogged gasoline filter or pump. Press down the gas pedal sharply. The injection time should increase to 20 ms. Ideally, accurate diagnosis of injectors is only possible using a test bench. |
| FSM | Idle speed sensor performance indicator. Ideally, this parameter should not exceed 50-60. If you press the gas pedal sharply, it can increase to 160-180. |
| ALAM 1 | Indicates the voltage level recorded on the oxygen level monitoring device. When the car engine is warmed up, this indicator should increase from 0.007 to 0.7 V. If this indicator differs, then something is wrong with the circuit. |
| LUMS_W | This coefficient indicates the rotation of the crank pulley. Ideally, it should vary around 4 revolutions per second. If it is slightly larger, then this already indicates a misfire in the engine cylinders. This means that you should pay attention to checking the spark plugs (whether they are working, filled or not), as well as the condition of the high-voltage wires. |
| QT | Gasoline consumption coefficient. With the engine running and idling, it should not exceed 0.9 liters per hour. |
On-board computer error table
If the check engine light comes on or problems are noticed in the operation of the vehicle systems, then you can quickly find out the cause using the on-board computer. or high-quality vehicle diagnostics at a service station. The article provides explanations of error codes.
Error Explanation of the error code: 0102 Low signal level of the mass air flow sensor 0103 High signal level of the mass air flow sensor 0112 Low level of the intake air temperature sensor 0113 High level of the intake air temperature sensor 0115 Incorrect signal of the coolant temperature sensor 0116 Incorrect signal of the coolant temperature sensor 0117 Low level of the sensor signal coolant temperature 0118 Coolant temperature sensor signal high 0122 Throttle position sensor signal low 0123 Throttle position sensor signal high 0130 Oxygen sensor signal incorrect 10131 Oxygen sensor signal low 10132 Crankshaft sensor signal high 10133 Oxygen sensor slow response 10134 No signal oxygen sensor 10135 Oxygen sensor heater fault 10136 Oxygen sensor ground short 20207 Oxygen sensor signal low 20208 Oxygen sensor signal high 20200 Oxygen sensor open 20201 Oxygen sensor heater fault 20201 Mixture too lean 0172 Mixture too rich 0201 Injector control circuit open 10202 Open injector control circuit 20203 Open injector control circuit 30204 Open injector control circuit 40261 Short to ground injector circuit 10264 Short to ground injector circuit 20267 Short to ground injector circuit 30270 Short to ground injector circuit 40262 Short to 12V injector circuit 10265 Short to 12V injector circuit 20268 Short to 12V injector circuit 30271 Short to 12V injector circuit 40300 Many misfires 0301 Misfire in cylinder 1 0302 Misfire in cylinder 2 0303 Misfire in cylinder 3 0304 Misfire in cylinder 4 0325 Open circuit of knock sensor 0327 Low sensor signal level detonation 0328 High signal level of the knock sensor 0335 Incorrect position sensor signal crankshaft position sensor signal error 0340 Phase sensor error 0342 Phase sensor signal low 0343 Phase sensor signal high 0422 Low converter efficiency 0443 Canister purge valve circuit malfunction 0444 Canister purge valve shorted or broken 0445 Canister purge valve short to ground 04 80 Cooling fan circuit malfunction 10500 Invalid speed sensor signal 0501 Incorrect speed sensor signal0503 Interruption of the speed sensor signal0505 Idle speed controller error0506 Low idle speed0507 High idle speed0560 Incorrect on-board network voltage0562 Low on-board network voltage0563 High on-board network voltage0601 ROM error0603 External RAM error0604 Internal RAM error 0607 Knock channel malfunction 1102 Low oxygen sensor heater resistance 1115 Faulty circuit O2 Sensor Heat1123 Idle Rich1124 Idle Lean1127 Part Load Rich1128 Part Load Lean1135 O2 Sensor Heater Circuit 1 open, short1136 Light Load Rich1137 Light Load Lean1140 Measured Load differs from the calculation1171 Low level of CO potentiometer1172 High level of CO potentiometer1386 Detonation channel test error1410 Control circuit of the canister purge valve short circuit to 12V1425 Control circuit of the canister purge valve short circuit to ground1426 Control circuit of the canister purge valve open circuit1500 rpm Break in the control circuit of the fuel pump relay 1501 Short circuit to ground of the control circuit fuel pump relay 1502 Short circuit to 12V of the fuel pump relay control circuit 1509 Overload of the idle speed regulator control circuit 1513 Idle speed regulator circuit short circuit to ground 1514 Idle speed regulator circuit short circuit to 12V, open 1541 Fuel pump relay control circuit open 1570 Incorrect APS signal 160 0 No connection with APS1602 Loss of on-board power supply voltage on the ECU 1603 Error EEPROM1606 Rough road sensor incorrect signal1616 Rough road sensor low signal1612 Reset error ECU1617 Rough road sensor high signal1620 EPROM error1621 RAM error1622 EPROM error1640 Test error EEPROM1689 Incorrect error codes 0337 Crankshaft position sensor, short to ground 0338 Crankshaft position sensor, open circuit 0441 Air flow through the valve is incorrect 0481 Cooling fan circuit malfunction 20615 Starter relay circuit open 0616 Starter relay circuit short circuit to ground 0617 Starter relay circuit short circuit to 12V 1141 Oxygen sensor 1 heater malfunction after the neutralizer 230 Fuel pump relay circuit malfunction 263 Injector driver malfunction 1266 Injector driver fault 2269 Injector driver fault 3272 Fault injector driver 4650 CheckEngine lamp circuit malfunction
Versatile alternative
Of course, thanks to their various mounting locations, Multitronics on-board routers can compete with the States. Powered by a 32-bit processor, multitronics are precise and fast in operation. If a car enthusiast has the opportunity to buy such an on-board computer, then the car will be under excellent control thanks to functions such as:
All of the above functions of the State on-board vehicle have been added to the multitronics. In addition, the latter have easy setup for operation and a convenient user interface. But due to all this, the price will be much higher than that of a compact and more suitable State Grant.
Installing an on-board computer allows you to monitor problems in the operation of the internal systems of the car. The most popular device model STATE GRANTA x1 is already used by many motorists.
Owners note the ease of use of the device and its high quality. It includes 30 useful functions, which are controlled using two buttons.
Diagnostics using additional tools
To diagnose cars, including the VAZ 2110, various equipment is used, which is connected to a special connector. Thanks to this equipment, which is not particularly complicated or expensive, you can get a complete picture of the condition of the car.
The service station uses a personal computer to which data from phase sensors is transmitted via a special cable.
Adapter for car diagnostics
Bluetooth devices have appeared on the market that allow diagnostics using a smartphone, tablet or laptop.
They work according to the scheme. The device is connected to the connector, the ignition is turned on and the diagnostic process begins. The data comes from phase sensors to the ECU. From it to a mobile device on which specialized software must first be installed.
This makes it possible not only to obtain more data, but also to present it in a more visual form. This method allows a driver, even with little experience in operating a car (in our case, a VAZ 2110), to obtain all the data about his car.
But most drivers prefer to carry out diagnostics at a service station. So that you are aware of the data that the on-board computer produces through RAM from the phase sensors, we will present the transcripts of common errors.
Decoding combinations
If problems arise with electrical equipment, they must be corrected immediately. Error code 1602 will indicate that not everything is in order in this matter.
Sometimes error 1602 can simply be reset and does not appear in the future. Socialists call such data “good.”
Error 1602 sometimes appears if:
But if error code 1602 appears all the time, you need to check the entire network. Perhaps there is a break. If error code 1602 constantly appears, you can try cleaning the battery terminals. Check if they are securely fastened. Didn't help, error 1602 still appears? Check the circuit. You need to start from the positive terminal of the battery. Start with the electrical fuse and fuse link.
TPDZ. Sometimes it happens that the cause of error code 1602 is an alarm that can block the controller circuit and affect the readings of the phase sensors. In such a situation, you need to file a claim with the company that handled the
If the error appears periodically, then you need to:
Another error that may occur is 0300. 0300 appears in cases where the RAM detects frequent misfires.
If error code 0300 is displayed constantly, then you need to check the following components:
You cannot ignore the appearance of error 0300. In the future, this may lead to deterioration in the performance of other nodes.
It is not difficult to master car diagnostics, in particular the VAZ 2110. It will extend the service life due to timely detection of faults detected by phase sensors.
The State X1 on-board computer, which is not at all large in size, is capable of performing a variety of climatic, route and diagnostic functions. It is installed on cars of the VAZ family - Kalina, Niva, 2123, 2110 and others.
1 What Staff X1 can do - information about computer functions
In addition, State X1 has three additional functions that appeal to domestic motorists. The Tropic mode involves automatic control of the car’s cooling system, the Plasmer is responsible for drying the spark plugs and their subsequent warming up to a temperature that allows a cold start of the engine without problems, the Afterburner resets when switching fuel from gas to gasoline and vice versa.
A small nuance. The Afterburner function works exclusively with high-quality brands of gasoline (95 and above). Installation of the State X1 is carried out without the slightest difficulty in the plug available on the instrument panel.
You will need instructions for installing the BC into a specific VAZ car model. The installation principle is the same. You need to remove the trim from the dashboard, and then alternately connect the same-color factory wires with the on-board computer wires. State X1 does not require special settings. You install the BC, turn on the ignition, start the device, and it immediately goes into trip computer mode. If you need to switch to diagnostic mode, press the CORR button. The BC switches to alarm (emergency) mode independently.
2 Diagnostics with a scanner - are the components of your car working normally?
On-board computer operation
3 Self-check - decipher error codes
Every motorist should have a universal device for diagnosing his car.
You can read, reset, analyze all sensors and configure the car’s on-board computer yourself using a special scanner...
Checking the on-board computer
Do you still think that diagnosing a car is difficult?
If you are reading these lines, it means you are interested in doing something in the car yourself and really saving money, because you already know that:
And of course you are tired of throwing money down the drain, and driving around the service station all the time is out of the question, then you need a simple CAR SCANNER ELM327, which connects to any car and through a regular smartphone you will always find the problem, turn off CHECK and save a lot of money.
We ourselves tested this scanner on different machines and it showed excellent results, now we recommend it to EVERYONE! To prevent you from falling for a Chinese counterfeit, we publish here a link to the official website of Autoscanner.
An on-board computer is a device that helps the driver when operating a vehicle. Today we will talk about the domestic device State Kalina X5 M. The computer is designed specifically for this VAZ model, which makes it easy to connect and use.
What is remarkable about the on-board computer STATE X1 Granta and how is its installation useful?
The cost of BC STATE X1 Grant is in the range of 1000-1500 rubles. Any owner of a domestic car who wants to monitor the condition of the engine and other transport systems will be able to purchase it. You can buy the device from official dealers or private auto stores. Installation takes literally 20-30 minutes.
Installing the device allows you to obtain some functions for turning on additional equipment and obtaining information on the operation of car systems. It is recommended to buy BC STATE X1 Granta for timely adjustment and repair of vehicles when errors are identified.
Includes a pair of buttons and a bright display that allows you to view detected error codes.
A special feature of the device is the presence of convenient “Tropic” and “Plasmer” functions. The first is responsible for turning on the fan to create optimal travel conditions. The second helps to dry and warm the candles. Convenient and understandable STATE X1 Lada Granta VAZ 2190 fits perfectly into the interior of the cabin and practically complements it.
What errors can the BC STATE Granta X1 indicate during operation?
The instructions for the device contain a table of errors and their explanation. For example, the combination P0717 indicates problems with the turbine speed, and P0712 indicates low oil temperature.
In the convenient and practical STATE X1 Granta, error codes are transmitted from the main controllers. They relate to the operation of the engine, and to the operation of the automatic transmission, additional control systems and mechanisms.
Correct installation of the STATE X1 Grant allows you to profitably equip your vehicle and protect it from unexpected breakdowns on the road. Installation can be carried out in a specialized workshop. But even a novice driver will be able to get the job done quickly and accurately. No special installation equipment is required.
How to install BC STATE X1 on Grant with your own hands?
Easy to connect STATE Granta X1 G allows you to carry out work in your own garage. To complete it, the owner will only need the mounted device itself and wires. Everything you need is included with the device. Therefore, after purchasing the device, you can immediately begin installation using the following instructions:
1. Remove the front panel button cover.
2. The computer wire is connected to the diagnostic connector located under the glove compartment on the right.
3. The connected wires are led out through the hole from the plug.
4. The computer unit is connected to the wires and installed in the hole.
5. Connection wires are hidden under plastic.
Each driver will be able to carry out the specified work. For the STATE X1 Grant device, installation requires a minimum of knowledge on transport arrangements. Therefore, even the newly-made owner of the Grant can perform it.
Self-installation does not require extra cash costs and can be performed at any time convenient for the performer. The operation of the device is checked immediately after installation.
For the on-board computer to be truly useful, you should carefully read the attached description. You should always carry with you a list of codes and their decoding to instantly identify problems and solve them.
The instructions attached to the STATE X1 Granta will allow you to always be aware of identified errors. Most of them are solved in the workshop, by diagnosing the systems and carrying out their repairs.
- Original German autobuffers Power Guard Autobuffers - save money on suspension repairs, increase ground clearance +3 cm, quick and easy installation...
Lada Granta is a modern domestically produced car, which has been highly popular in our country since it left the assembly line. At the same time, many owners of this car note the low level of information content of the dashboard, especially the lack of an engine temperature indicator. The best solution to the problem is to install a route or on-board computer; you can do this yourself.
3 Self-check - deciphering error codes
BC State X1 allows you to diagnose the functioning of individual vehicle components without the use of scanners, laptops and other electronic devices. In this case, checking the car is done like this: press the daily mileage reset button on the dashboard and immediately turn on the ignition (you don’t need to start the engine itself).
After such actions, the BC will begin diagnosing the instrument panel. Then you need to turn on the windshield wipers (just press the corresponding button - it is located on the activation lever of the specified device) and watch how various fault codes appear on the State display. Explanations of common errors are given below:
Note! Any decrypted code tells us about a real malfunction. Therefore, you definitely need to contact a car service or solve the problem yourself if you have the skills to perform simple repairs on your car.