LED strip angel eyes
Of course, the main disadvantage of the previous option is the large discreteness, which means the low brightness of the angel eyes. Of course, the number of diodes can be increased, but it should be taken into account that then the resistors will be located too close to each other and the LEDs, which increases the risk of overheating.
You can get rid of this drawback by using LED strip with a high density of LD elements. In addition to the tape, which can be purchased at lighting stores, we will need:
- sheet material 5-8 mm thick;
- blade used in hacksaws;
- opaque white film used as a diffuser;
- the so-called ballerina - a device for making large diameter holes;
- transparent adhesive composition;
- soldering equipment;
- special heat-resistant tape (polyamide or aluminum foil);
- heat-shrink tubing;
- a bundle of wires, preferably with terminals.
To begin, we mark the sheet of plexiglass, determining the outer and inner diameter of the ring placed on the headlight. We start cutting out from the outer contour, using a ballerina. In our case, an electric jigsaw cannot be used, since it leaves the edges of the cut melted, and we are not happy with this.
We cut out the inner contour of the circle in exactly the same way; it is not necessary to grind the outer end. Cover the top of the ring with light-scattering film. The same effect can be achieved by walking over the surface with medium-grade sandpaper - this will make it matte.
Now you can attach the LED strip to the glass base by first soldering the wires and insulating the soldering area with silicone sealant. You can cover the end of the circle with heat-resistant tape and check the operation of the circle by connecting the terminals to a 12 V power source. Angel eyes made from LED rings are ready!
How to install and connect yourself
These manipulations can be performed in various ways . In different cases, certain tools and auxiliary materials will be required:
- screwdriver;
- metal scissors;
- construction hair dryer;
- glue;
- mounting clamps;
- Double-sided tape;
- silicone sealant;
- paint-tonic;
- brush.
Installing DRLs on the bumper
- Having decided on a place on the bumper, you will first need to install mounting brackets for the DRL units on it.
- It is best to fasten the brackets using self-tapping screws - this type of fixation is considered the most reliable.
- After this, the DRL unit is mounted in the cavity of the engine compartment. It is recommended to place it as close to the battery as possible. The block can be secured with either double-sided tape or mounting clamps.
- Along the edge of the body it is necessary to stretch the cable from the block to the bracket on the bumper.
- The LEDs are mounted on the bumper, fixed with brackets, and the wire is connected to the block.
The scheme is considered the simplest and can be done by any driver
The installation of daytime running lights on the radiator grille is carried out in the same way: you will need to prepare a clamp for the LED, install the DRL on it and run the cable to the control unit under the hood.
Installation in headlights
Some car owners do not feel the desire to make holes for mounting brackets on the bumper of their car. In addition, the location of the radiator grille is not always suitable for mounting daytime running lights on it. Therefore, one of the most common cases of installing DRLs can be considered their installation in fog lights.
The operating procedure is as follows:
- It is necessary to disassemble the housing of the fog lights - for this you will need to soften the sealant that is applied to the glass. You can use a hair dryer.
- It is recommended to tint the headlight cover immediately, as the DRL light will be brighter than from a regular halogen lamp.
- While the glass with the tinting paint applied to it is drying, you will need to disassemble the headlight itself: remove the lamp, wires, holders, etc.
- From an aluminum sheet you need to cut a plate to the size of the DRL LED strip.
- The backing for the running lights must be secured to the fog light housing with special glue.
- Next, the strip with LEDs itself is also glued to the aluminum strip. It is allowed to use two strips at once in one headlight.
- After the glue has dried, the headlight glass is installed in place using conventional sealant.
- Pull the wires from the headlight into the engine compartment, where the control unit will be installed.
You will need to correctly mount the diodes in the headlight housing and correctly connect the device
In a similar way, DRLs are installed in turn signals or side lights. You will need to dismantle the “filling” of the headlight, tint the glass and insert the DRL strip onto the aluminum base.
Switching on through dimensions or low beam
The second version of the DRL connection diagram involves using the power circuit of the side light bulb. To do this, the positive wire from the running lights is directly connected to the “+” from the battery. In turn, the negative wire is connected to the “+” of the side light, which is currently electrically neutral. As a result, the following current flow path is formed: from the “+” of the battery through the LEDs to the size, and then through the light bulb to the body, which serves as the minus of the entire circuit. Due to the low current consumption (tens of mA), the LEDs begin to glow, and the lamp spiral remains extinguished.
This circuit solution has several disadvantages:
- running lights remain on when the engine is turned off, which is contrary to current regulations;
- the circuit will not work if LEDs are also installed in the dimensions;
- the circuit will not work correctly if the DRLs contain powerful SMD LEDs, the rated current of which is comparable to the current of a light bulb;
- For safety reasons, an additional fuse must be installed.
This connection method can be improved by connecting the positive wire of the LED module not to the “+” of the battery, but to the “+” of the ignition switch, thereby eliminating the first drawback.
Connection via 5-pin relay
Now it's time to learn how to connect running lights via a five-pin relay. The scheme is the most universal, and was assembled to eliminate the disadvantages of previous options.
First, about connecting the relay for DRLs:
- 30 – to the positive terminals of LED modules;
- 85 – to the positive wire of the side lamp;
- 86 – on the car body;
- 87a – to “+” from the ignition switch;
- 87 – do not connect (isolate).
The circuit with a five-contact relay works as follows. When you turn the key, +12 V is supplied to the DRLs, thereby turning them on. If you turn on the side lights or headlights, the relay will open contact 87a and close inactive contact 87. As a result, the DRLs will go out and the side lights will turn on. The circuit fully complies with the requirements of GOST and traffic regulations and can work with side lights even based on LEDs.
However, the circuit still has one negative point - the DRLs will turn on immediately after turning the ignition switch. That is, if you turn the key in the ignition but do not start the car, the DRLs will light up.
Despite the existing drawback, the circuit is quite successful, but in order to correctly connect the DRL via a five-pin relay, you will need to supplement the circuit with a voltage stabilizer.
This switching option is interesting because the path of current flow through the running lights is independent. This allows you to install light sources of any type and power in headlights and DRLs.
How to connect a voltage stabilizer (optional)
In the electrical on-board network of the car, the voltage “walks” from 12 to 16 volts. And LEDs do not tolerate such changes well. We soldered a resistor to each LED to regulate the voltage. But for more reliable protection you need a special stabilizer. It’s easier to buy a ready-made version and arrange it into a connection between the “angel eyes” and the on-board network of the car.
Factory version of the voltage stabilizer
If you are an “advanced” electrician, you can solder a simple stabilizer yourself. The L7812CV chip is used as a basis. See the photo below for the connection procedure.
The connection diagram is quite simple
According to this scheme, you need to connect the negative contact of the LED to the ground of the car, and the positive contact to the output of the stabilizer.
Video: connecting a voltage stabilizer for LEDs
The procedure for making and installing “angel eyes” is not easy. Before starting work, evaluate your abilities and capabilities to avoid possible additional costs. Consider whether your actions are legal and what consequences they may lead to. Neatness and cleanliness are required for successful completion of optics tuning. But everyone will notice your efforts.
Hello, dear friends! At one time, angel eyes on BMW cars made a splash on the market. It was optics of amazing beauty, especially in the dark. But even now fashion has not disappeared, and many people want to make angel eyes with their own hands.
In practice, there is nothing particularly complicated here. You will have to tinker, but the result will certainly please you. You can start from different instructions and manufacturing options. Some people use sites with videos that can be watched in parallel with taking notes in a notebook. Also on the Drive2 resource, motorists share their own experience of making peepholes, like those on a BMW.
I suggest you consider 3 interesting options. 2 of them are homemade and one more can be purchased online. The kit usually includes an ignition unit or a stabilizer, depending on the light source used.
Scheme options
So, you can connect in several ways.
- The DRL turns on as soon as the ignition key is turned. The lights do not go out until the car engine stops. It is considered the simplest method, which does not involve the use of an on-board network. It is enough just to connect the negative from the lights to any place in the car body, and connect the positive from the lock to the output of the high-voltage module, always through a fuse.
- The same scheme, only the DRLs go out immediately as soon as the low beam is turned on. To implement this connection option, you need to adhere to the diagram described above, with the only difference being that the negative is connected to one of the positive wires of the low beam lamp. As soon as the low beam on the car is turned on, a positive impulse will appear on the minus DRL and the lights will go out. The DRLs will light up again as soon as the high beams are activated or the headlights are turned off.
- Connection diagram, which involves automatic connection of the DRL as soon as the car engine starts. It is considered the most reliable option for self-integrating LED daytime running lights. To implement this scheme, the minus of the DRL is connected to the car body, and the plus is connected to the relay contact.
Simple circuit with 4-pin relay
There is a simplicity in circuit number 1, implemented through a 4-pin relay. However, this option does not always satisfy the requirements of GOST, since the DRLs will shine separately from the head optics. The lights are not turned off by a push-button mechanism, everything happens automatically.
The photo above shows exactly this circuit, connected via a 4-pin relay. It implies the following procedure:
- when the engine starts, an impulse is sent from the generator to the relay, and the LEDs light up;
- As soon as the headlights are turned on, the DRLs turn off.
This connection method is also possible without using a generator. Then, instead, the voltage source will be the battery, the positive of which should be connected to the 30th contact in the photo.
It is also possible to connect the plus from the parking brake. In this case, as soon as the handbrake is activated, the daytime lights will go out - that's the button.
Circuit with 5-pin relay
It involves the use of 4 contacts. Ideal connection option for Priora cars. The difference from the above diagram is not only in the number of relay contacts. This circuit does not provide for the use of output 87. An alternative to ground is output 86.
The circuit with a 5-pin relay provides for the use of DRL control. The push-button mechanism is built between the generator and the 30th relay contact.
The operation of the DRL is as follows:
- the internal combustion engine is started, thereby the impulse from the generator goes to the 30th contact of the relay, and from there to the plus of the DRL;
- the lights come on, the minus is connected to any part of the car body;
- when the dimensions are used, the coil is activated, the 30th contact is integrated with the 87th, the pulse no longer arrives - the DRL is turned off.
With reed switch
In a circuit using a reed switch, three important automotive systems are simultaneously activated: the generator, battery and relay.
The photo above shows a detailed connection diagram for the option using a generator. The plus is integrated, as can be seen from the diagram with point 30. The relay contact, marked with point 87, is integrated with the battery positive. Another relay contact, marked with number 85, is connected to the vehicle ground through the DRL.
Attention. This scheme implies the mandatory use of a reed switch - a device capable of changing the state of a connected electrical circuit when exposed to a magnetic field.
The contact marked on the diagram with point 86 is connected to the reed switch. From the reed switch there is a connection to the plus of the generator.
Thus, the scheme implies the following. As soon as the internal combustion engine starts, the driver activates the reed switch with a button, the relay is activated, and the DRL turns on. The reed switch must be packed in thermopolymer and securely fixed to the generator.
Advice. It is important that the reed switch is fixed exactly in the place of the generator where the relay would operate.
Without reed switch
A variation of circuit number 3, only without using a reed switch. In this case, the contact marked 86 is integrated with the oil pressure lamp in the instrument panel. Thus, the option of turning on the DRL after the engine is started is supported.
It is noteworthy that this scheme is much easier to implement with your own hands than the option with a reed switch.
Video: how to connect DRL from a generator
As you can see, connecting the DRL to the vehicle’s on-board network is carried out using several circuits. The plus is taken from the output of the generator, less often from the battery.
Forget about fines from cameras! An absolutely legal new product - Traffic Police Camera Jammer, hides your license plates from the cameras that are installed in all cities. More details at the link.
- Absolutely legal (Article 12.2);
- Hides from photo and video recording;
- Suitable for all cars;
- Works through the cigarette lighter connector;
- Does not cause interference to radios and cell phones.
Which angel eyes are better?
The question is ambiguous and difficult to answer. If you do not take into account manual assembly, then it is better to trust professionals who have already assembled similar headlights more than once. You can find a person who can make angel eyes to order very efficiently and quickly on any automotive forum or in social network groups dedicated to this topic.
It is recommended to contact people who have installed such lights themselves. They know how to select the right tubes, LEDs and take into account other nuances in order to achieve the maximum glow effect at minimal cost. In addition, they can show by their own example what the purchased angel eyes will look like.
Prefer to make your own headlights? Make sure to select a heat-resistant tube and LEDs with the appropriate light output. Angel eyes with a weak luminous flux will be practically invisible against the background of the main headlights. Very bright LEDs, on the contrary, will only blind oncoming vehicles and make it difficult for them to move on the road.
The main mistakes when making DRLs with your own hands
First of all, you need to figure out what kind of device it is. Daytime running lights are not dimensions! They need to be tested not at night, but during the day.
The lights must be visible from a great distance. Contrary to popular belief, when assembling DRLs from an LED strip with your own hands, you need to use the most powerful strip available. With such dimensions as the average running lights, it is quite difficult to exceed the permissible brightness using an LED strip.
Don't forget about cooling, but don't install too large radiators. Do not forget that the flow of incoming air when the car is moving practically replaces active cooling. Therefore, the radiator area can be half as large as under normal conditions for passive cooling of luminaires.
Angel eyes based on plexiglass rings
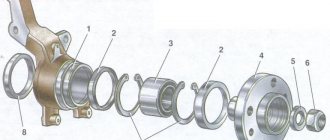
In order to make luminous rings for headlights or foglights using the first method, we will need:
Transparent rod can be purchased at a construction supermarket - these are used in blinds. Any can that matches the diameter of the reflector will be suitable as a cylinder. If the headlights are not round, then the process of bending the rod will be more difficult - you will have to make a template of a complex shape yourself from scrap material.
First, measure the circumference of the future ring. Then a piece of the rod of the required size is cut off, and holes for the LEDs are drilled in its ends. Now the rod can be bent.
To make the plexiglass soft, it is heated with a hair dryer. To make a ring, a softened rod is wrapped around a template and waited until it becomes hard again.
Now you can install the LEDs in the pre-drilled recesses at the ends. You can attach it using transparent glue. It is dripped into the recess and an LED is inserted.
For better dispersion on the resulting product, you need to make notches 0.5 mm deep at equal distances (the easiest way is to use a hacksaw blade or a needle file). In order not to suffer from painstaking work, you can cut a thread on a still straight rod using a die of suitable diameter.
How to connect running lights to a VAZ 2109
Content
Reboot your system now. reboot your device.
USB-MS switch. enable and disable the “card reader” mode (Double click “menu” To turn off the mode, press the “menu” button again)
Backup restore. backup and restore menu. It has the following sub-items: ->Reserve. Back up your device's internal memory, including the firmware, all user data and settings, and any applications installed on the phone's memory. ->Backup adnroid_secure. additionally backs up the .adnroid_secure folder from the SD card. This option should be used if you want to experiment with firmware (the version of which is different from the one installed on your computer) using the same SD card. ->Nand Backup Ext Backup. backup of the device’s internal memory; create a backup of the secondary partition on your SD card (still read below). Use this item only if your SD card has this partition, otherwise there will be an error. ->Nand Backup Ext Backup Adnroid_secure. composition above ->Nand backup link2sd. Additional data storage is performed on link2sd. All copies are created in a folder. "Nandroid" on SD card. The number of copies is not limited. The name is created based on the current time. ->Nand Recovery. restore backups. ->Backup your own Google system files. Backup Google system files from /cache/google folder. ->Recover Google file system files. restore Google system files from /cache/google folder.
Flash ZIP menu: ->Flash of lightning from Sdcard. When flashing zip files, the files can be placed in any folder on the SD card, but the program has one significant limitation. there is no scrolling in the list, so for files with firmware it is best to create a folder under “001_Flash” located in the root of the card. ->Activate suspension to confirm. Enables/disables ZIP files during flashing, allows unsigned software to flash.
Wipe the file destruction menu. ->Wipe ALL user data. makes a complete device reset (Hard Reset) from the functions of the standard program. Erases all user data, including applications installed on the SD card. ->Only erase data/data. deletes the contents of the “/data” folder, ->Erase/SD-Ext only. Deletes all data from the secondary partition of the SD card. ->Wipe only /sdcard/.adnroid_secure. deletes all data from the “.adnroid_secure” folder. This folder contains applications that are transferred to the SD card using standard operating system tools. ->Just clear the cache. deletes the contents of the /cache folder, ->Wipe Dalvik cache only. Removes all cache created by the Dalvik virtual machine. ->Wipe battery statistics. deletes battery usage statistics, resets battery calibration. ->Wipe rotation settings. Resets the position detector calibration. After completely flashing the device, it is recommended to erase ALL user data.
Sdcard section. Menu dedicated to formatting an SD card. ->SD partition. After formatting the card, you will need to select the following features: Swap size. paging file size, it is recommended to set it to 0Mb (selected using "amount" and "Volume-") because it is useless. Ext2 Size The size of the additional partition with the “ext2” file system on the SD card. ->SD repair: extra. recovery of an additional partition. ->SD: ext2 to ext3. Converting the file system of an additional partition from ext2 to ext3. ->SD: ext3 to ext4. Also.
Check crankshaft position sensor? Or its contacts are in the connector. In particular, it generates impulses for the ignition system.
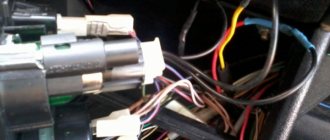
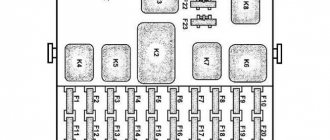
Now we connect the daytime running lights to the circuit using a power relay. Location of daytime running lights on the car. Possibility of placing DRLs on the VAZ 2109 together with fog lights.
In the fuse box. lower connector Ignition switch connector (under the control column, next to the knees) they often oxidize
See center armored wire
Those wires that go to the commutator and to the coil can check to see if there is spark on the center wire going to the distributor or if the sensor is still in the distributor.
Is there ground on the engine?
Daytime Running Lights. Correct connection. The topic is in the Ukraine section. I want to connect the DRLs to closed ones, so that when the closed DRLs are turned on, they will rot. VAZ 2109 1993 is very simple. I changed the positive to the fan sensor and the negative DRL to the positive.
The appearance of Trambler and it is no coincidence that it crumbles
Look at the Hall sensor in the distributor.
And does the distribution really work? Remove the distributor cap, turn the starter and see if the slider returns. your timing belt may be broken
With this connection, the running lights turn on automatically when the engine is started and dim when the dimensions are turned on. How to connect daytime running lights to VAS 21103.
There are many options, many of which will not even be I notice in 30 seconds 100. will help you
The crankshaft sensor needs to be replaced, without it the car won't even stall when starting. It is worth checking the wires from it for hot unlocking. And, most likely, the pinion pin was cut off when the engine stalled and the transmission immediately detected engine resistance.
You need to create a wiring diagram, it is not visible like wiring. This is for you that psychics need them at a distance to see objects. And it’s better not to worry, but I’ll call a car service, I don’t think I’ll take much.
Remove the cover that covers the wires from the fuse box, there should be a socket on the body, white wire, if there is one, connect the sizes. When the ignition is on, the DRLs are turned off, and when the dimensions are turned off, they are turned off.
The rear lights turn on for no reason and they are constantly on in the damaged VAZ 2109 car. Help with advice
Change your gender and become her friend
Lada 2109 Logbook SkarLED Daytime running lights. We just hung the disk on a VAZ 2109 and drove it without closing it. we combined the dimensions with the headlights, the neighbor's DRLs are still flashing, we haven't found out
The stick may be in contact somewhere. Try turning the reverse gear on/off several times, it may get stuck.
LED bulbs were not installed anywhere??
Well, if this is the case for no reason, then either the power sensor or the flashlight board has changed.
The wire on the sensor is short to the bottom of the box
No wonder God gave you a symbol
List of forums Repair and maintenance of VAZ 2108, 2109, 21099 cars and their younger brothers in electrical and optics. How to connect DRL? To page 1, 2 Next Previous topic Next topic.
I think this is the average placement of navigation lights on VAZ-2109, 2108. This is a very common thing. I will explain that the essence of the connection is that the running lights should turn on when the ignition is turned on, since it is connected to another.
From the fuse box (dimensions or low beam)
Every day, to which almost every motorist is now connected. This is excellent lighting that helps improve road safety.
Wherever you connect, they will be raunchy and communal! if so, buy us tuning lights!
The pepper may be clean, just check the compression if it doesn't slip off or is normal
Also, if daytime running lights are used, then DRLs. In this case, you can connect the DRLs to the side lamps in the same way if incandescent lamps are used as such, and not LEDs!
May slip off. And keep in mind that 1.3 valve bends. So if a lot has slipped through, then it’s a failure.
Most likely, the sensor room in the distributor was killed. It's a pain in this lineup.
Naturally, put the conditions on the mark and pull. this is a start
Not only when the peroxide is not a tooth and more inflammation is lost, the valves can bend, but the joke was that there will be a spark, just not at the right time, look where the mass goes
The generator is covered and does not charge the battery. Or did I have it
I think this is the average placement of navigation lights on VAZ-2109, 2108. This is a very common thing. I will explain that the essence of the connection is that the running lights should turn on when the ignition is turned on, since it is connected to another.
12V on coil pin B? later, is there contact between the distributor and the switch? You need to look at the spark right on the woman's wire. The belt and other crap have nothing to do with it (if it slides, then it has to do with the monitor), if the timer returns spark, it should
READ VAZ 2110 Battery Charge Lamp Is On
It is necessary to check according to the diagram whether power is supplied to the switch and the trawler. Even if she slipped, the spark would still not come.
Most likely, in some places the contact in the low voltage ignition circuit has simply disappeared. you need to reconsider the whole scheme. if the distributor and commutator are working)
The spark and the strap are connected exclusively in one spin timer or not. To check for spark, there is no need to spin the engine, just close and tighten the distributor. And if there is no spark to find the reason. But the belt (if it is loose) must be checked using timing marks, tensioned and compressed. To know exactly what is good with you. fortune
Are you here. Home Correct connection of daytime running lights DRL to a VAZ. Tuning VAZ-2109. selection of photographs. How to connect an audio signal through a relay?
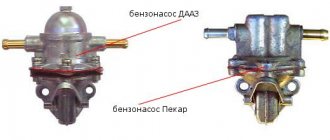
So. Nineteen so fucked with this gas pump. There were no changes, so I wrapped it in a damp cloth and went to where I needed it))
I usually install imported ones from other countries, at first it was a German one, very long (it was a car from Germany), later I bought a Slovenian one and there were no problems and we occasionally heated up to 40 years. In time. Oh, I almost forgot, try unscrewing the gas tank cap, in the heat this is natural from time to time, but it is possible. If the valve on the neck does not work, a vacuum is created and the pump cannot be pulled out, this has happened several times.
It is not enough for the pump not to pump. Adjust the fuel pump drive. Maybe you've lost your pusher?
If replacing the fuel pump with a Pakarovsky one did not help, then perhaps the problem is in the accelerator pump. There is one membrane that can cause this kind of crap. Try installing a working pump.
Why rearrange it, it’s not easier to carry water, pour it, cool it
Setting up a VAZ 2109, how to connect DRLs. How to connect the DRLs so that when you start the engine they hang, and not from the button. tuning-vaz.org blog tuning-vaz-2109 51957.html November 15, 2014
Grind the valve in the gas pump. And don't change your flea. The sale is far from standard. But in general, the fuel system requires a painstaking option.
Often it is not the gas pump itself, but its insufficient performance, due to which the incoming fuel cools when heated, and a plug of steam escapes, and as a result the machine stops. Entrance. use the manual and carefully read https://car-exotic.com/vaz-cars/vaz-lada-2106-engine-53.html how the gas pump works, including the common thing, the gas pump shaft pusher, once again the performance of the pump depends depending on the size of its coverage, this coverage is quite difficult to adjust and requires special equipment and an indicator (arrow). Of course you can knock out the straight edge (but hard) and you will also need a set of shims that go between the fuel pump and the carbolic gasket. Now if you are doing passport conditions. you don't know the sorrow of this. Or use a gas pump from a foreign car, then you will completely forget about this dilemma when frying.
Do-it-yourself tuning of VAZ cars. Settings secrets. VAZ Tips for car repairs. We connect the daytime running lights according to the diagram using a power relay. For the DRL to work properly, we need a normal relay.
contact Group
Check the crankshaft sensor, ignition module.
Uspenskaya. The starter takes a lot, the ignition relay turns off.
Don't go anywhere without a ignition and you'll be happy!
Check DPKV operation
I believe that this is the best placement of navigation lights on the VAZ-2109, 2108. It is very simple. I will explain that the essence of the connection is that the running lights should turn on when the ignition is turned on, since it is connected to another.
At pin 30 of the ignition relay, it should be 30V when the ignition is on. When the starter is on, the ignition switch should be in the operating position. Please check. If the ignition switch (contact group) is faulty, lost.
DRL on VAZ 2109 Correct installation of navigation lights, lights up when the engine starts without any switches or auxiliary units. Relay 4-pin, connection. How did I connect the relay?
Is there gas? Is the gas pump working? The ignition module may die again. Floating contact of the crankshaft position sensor. The injector wiring harness was rubbing into the fuel pipe. So. You must drag and drop the diagnosis. You can't list everything
Most likely the injector is crap as soon as it starts and stops. If something died, it wouldn't start at all. It should run on one cylinder, provided the hall sensor is working (if there is one), then it will start and start the gas pump (you can check by turning the ignition key), if it hums, it means it is working. The rest is to check how many points and what gives you. Unscrew the fuel line and see if there is fuel pressure, check for sparks at the spark plugs.
How to connect DRLs (daytime running lights) to a VAZ via a 5-pin relay
The gas pump may not provide the required pressure.
Although if starting means there is a spark look at the I xs fuel system, there is an idle speed sensor or electric valve on the injector, if there is one it could be covered or the wires will come off and the car will idle, it will start and will remain idling.
I didn't have that much pressure on the gas pump (in my case, because the girl was sitting in the back seat wearing pug shoes, she put the cord under the mat and the pump worked, then no, oh, I found this a long time ago and ours connected the sump to the pump and while the food I'm looking at is blinking)))
How to connect daytime running lights DRL to a VAZ via a 5-pin relay. Installing an LED strip in the brake lights of a VAZ 2109. I am tuning a VAZ 2108 Running lights 06/06/2015.
The generator roller fell off.
The other day I unexpectedly came across, in my opinion, the best and most familiar idea of introducing daytime running lights on the VAZ 2109. Like everyone else, I hasten to share this with you, our dear readers.
Look at the crankshaft position sensor in the generator area at the test point. It will not run if transactions are completed. Disease of the 9th family.
Check for spark and gas. Check the belt carefully. If the spark is weak or not, look at the Hall sensor, switch, coil. We need to start.
If the belt is a whole distribution of turns. then the large pulley on the knee bends and the pin sometimes fails.
If your gas pump is bent, it won't click, try turning the ignition on after a second or 2, if you hear a barely audible click, that means the pump is pumping gas, if not, lift the rear end. they didn't move, then the pump died
Do it yourself VAZ 2109 43 do it yourself VAZ 2109 photo 31 by installing a homemade vase 2109 30 that connects the running lights from the VAZ 2109 26 do it yourself repairs to repair vases with your own hands. Video 25 how to connect daytime LEDs to 210 vases.
First, check the fuses and power to the brain, if the check does not light up, the brain does not work or they tremble, if the check light is on and does not go out when the starter is turned on, it is a DKV.
Blinnnnn. I wrote this. And you just need to turn the carburetor.
How to connect daytime running lights to a VAZ 2109 23. Installing running lights on a VAZ 2109 7. Repairing the running gear of a VAZ 2109 6. Do-it-yourself diagnostics of the running weight of a 2109 6.
Carburetor for adjustment, no need to change spark plugs (just set the gap)
There is a problem with the fuel supply. In a carburetor, the needle and float feed can be adjusted. The candles could not suddenly fail. But checking for spark on them won't hurt. Also check the wires for breaks.
Replace the spark plugs exactly. New ones are needed for the winter, fully charge the battery. You may need to push the wires in more tightly, and switching to new ones won't hurt.
Bleed the idle current and check the idle air valve. If you are not inactive, you have already written everything
Sequence 2,4,3,1 counterclockwise and new spark plugs will be needed, it’s still winter
Normal circuit for connecting daytime running lights via a relay. I connected other wires according to the diagram when the size is turned on, and accordingly, with low or high beam, the DRL should go out.
The VAZ 2109 injector does not start, checked. showed that the car consumes 10 kg of air and is not located on the engine,
If you have questions about connecting daytime running lights in general or to a specific car model, please ask. How to connect DRL to the carburetor of a VAZ 2104?
READ How to Check VAZ 2115 Injectors
Big !! ! We will change the DMRV, but our brains may be faulty!!)))
The mass air flow sensor (DMRV) is faulty. Try starting with the sensor connector removed. [link blocked by decision of the project administration]
))) on a cold engine (during warm-up), the consumption is 18.25 kg of air. you have another reason, first check the spark in all cylinders and whether gasoline is injected into the injectors
And that gave you this test. ? 1. Check the fuel supply to the ramp. ! 2. Check the spark on the cylinders. 3. Check the starting speed, if the battery is low, the speed may not be sufficient. 4. replace the spark plugs. If all of the above are true, the engine will start after replacing the spark plugs even if the DMVR is faulty. That's all it takes. subsequent diagnostics. they will take the characteristics from the sensors and find it wise.
Remove the sdmrv connector. it was like that. The enthusiastic truth begins to poorly connect the cabins right away.
I decided to install DRLs on my VAZ 2114. While searching for daytime running lights on DealExtreme, I purchased a kit for 8.4. I connected the relay to the switch and inserted the wires through the mounting block into the engine bay. January 4, 2011
Along the crankshaft sensor. DMRV not at the same time. I'm off the floor with DMRV though, it starts at least 1500. Can you fill the spark plugs? Can you hear the gas pump when you turn on the ignition? How did you determine that there was no airflow to the engine? ? They usually measure force (voltage) in DMRV (not wound), bullets, reading literature, or hang the noodles for you.
Problem with the VAZ 2109 generator (car, 1998. Next). When the light and heater are on, the charge drops to 12. music, 11.5, changing brushes, dio
There are several ways to connect navigation lights; I liked the way the navigation lights were connected via a relay from the sensor. This explodes and destroys the LEDs. The Krenka stabilizer produces an equal voltage of 12 volts. DRL.
Have you tried to tighten your belt?
Try changing the relay. Generator voltage regulator for operation.
A regular generator partition will solve the problem or install a new one if the dough is squeezing
The genk has problems with the windings, you get a new gen for money and everything will be fine
What did you measure? if you are careful, then everything is correct. if there are two options on the battery, 1. Low battery capacity 2. There is no normal contact between the genealogy back cover and the crankcase. checked with a voltmeter. Well, at least the gene. You can’t take exactly the same generator; there are options that are better than 75-80 amperes.
Customize your own tuning VAZ 2108 Running lights 06/06/2015. how to connect daytime lights via a relay.
Better take the “starting volts” which produces 80A at idle. with headlights and headlights on, radio and amplifier. Only the diode bridge is excellent. Have you checked the weight loss, engine housing weight? And losses from the terminal to the battery. regulator relay?
Most likely, purchasing a 65 A generator will solve the problem. You simply did not have enough generator power. Here it is at full load and can’t handle it
If changing the chocolate does not help, disassemble the impedance in the gene windings, most likely, one of the windings is fucked
If it idles, then there is no problem, but the generator. nothing, it is trivial on any car, trivial to explain, the gene does not cope with low speed under high load, and the more consumers are turned on, the worse it is, so they install daytime running lights, they are located on the outside and are very little massive, especially when driving around the city , this is what you need, and when the neighbor turns on the plus dimensions, the load is large, and the generator cannot cope with idling, and the battery dies
How to connect daytime running lights | There are a huge number of DRL wiring diagrams, some of them are very simple, others require some experience with a soldering iron.
The first problem is no or weak mass between the engine and the body
The brush relay is on, “experts” Advisors, it was necessary to change the armature or burn one of the stator windings. a new “genetic” usually solves the problem, the current bearings are not too lazy to lubricate, otherwise the factory workers. LOVE!
Mate, this car is over, forgotten about 10 years ago, buy something else all the time and life will become easier, well the money won't be spent this way. state
How do you feel about the idea of introducing DRLs on the VAZ 2109? The other day I unexpectedly came across, in my opinion, a good and mediocre idea, an overall excellent idea of introducing daytime running lights on the VAZ 2109.
The copier is finished. and drive with Zaporozhye suspension.
What kind of high pressure gas pump or what? How do you want to attach it to the Solex? Nothing works, no pressure regulator will help.
=)) The float valve needle cannot withstand high pressure. And the electric pump presses from 3 to 6 atm. Don't be lazy, measure the fuel pressure at the carburetor inlet. Typically this should be 0.2-0.4 atm (turbulent flow 3-5 meters up). The spell must be cast to provide the correct pressure. Well, actually check that the float chamber valve is OK.
Place a faucet in the path to the carburetor.
It is better to start adjusting the carburetor from the float chamber. Here we can check and adjust the fuel level. To do this, follow these steps: Start the engine and let it run for 2-3 minutes, then turn it off. Remove the air filter from the carburetor. Disconnect the fuel line. Carefully turn the 5 screws so as not to damage the floats, remove the carburetor cover, turn it over and place it on a level platform. Using a caliper, measure the distance from the edge of the float chamber housing to the fuel level in them. This distance should be 25.5 mm. If it is different, you should return it to normal by bending the floating bracket tab. (You will most likely need to repeat the above procedures a couple of times to achieve the desired result.) Also, when the lid is removed and the bottom is upside down, check that the ribs on the connecting surface are parallel. Regulation is created by influencing the mounting of the floats. The next step in the VAZ 2109 carburetor version is setting up the starter device. The starting device is installed on the carburetor removed from the car. Before performing this operation, it is necessary to check the aperture of the starter device. To do this, loosen the 4 screws and remove the cover. A damaged diaphragm must be replaced. Then start making adjustments. To do this, follow these steps: Rotate the throttle lever to close it. Use a screwdriver to disable the trigger. Measure the gaps between the slider and the chamber wall. Check the calibration data for your specific carbon model. If there is a discrepancy, we begin an adjustment. After unscrewing the lock nut located on the accelerator pump housing, unscrew the adjusting screw using a screwdriver. When twisting, the gap increases in the opposite direction. miniature. Then a freezing gap of the first chamber throttle is performed. The air damper must be closed. The startup interval should be as specified in the calibration table. For example, for a carburetor model 2108 it is 1 mm, and for a 21083 it is 1.1 mm. If there is a discrepancy, adjustment is made by turning the throttle valve adjusting screw. The last step in the VAZ 2109 carburetor is adjusting the idle speed. We do this by using the carburetor, air filter and warming up the engine. This procedure is most ideal when there is a tachometer and a gas analyzer. But if there is no gas analyzer, we make adjustments according to the following scheme: When the engine is idling, we screw the screws completely to the consistency properties, then turn it off 3.4 turns (if there is a plastic plug, it will need to be removed); Start the engine, remove the suction, turn on the headlights and fan; Using a consistency screw, we show engine speeds up to 750-800 per minute; The properties of the screw set the highest speeds; Next, install screw No. 900 rpm; Using the property screw, turn the speed to 800 rpm; We continue to tighten the propeller until the engine speed is balanced and then turn it off at 0.5. 1 turn; Now we set the required speed using the screw number: summer. 800. 900, in winter. 900. 1000 rpm. https://mashinapro.ru/363-nastroyka-karbyuratora-vaz-2109.html
My God! a diagram or better yet a photo diagram of how to connect the daytime running lights through the ignition switch so that they light up when starting. And in order for the DRL to light up after starting the engine, it must be connected to the generator circuit, and not to the ignition switch.
READ Release Bearing VAZ 2109 is noisy
I have one big one for the injector, I go in the winter and go home to drink tea, but I don't sit at the throttle
But you haven't tried to get a mechanical gas pump from a VW or an Audi carburetor. After all, there should be a window on the block.
And I have a Jetta carburetor. 85th year Not an aunt on the body, vigor, good attraction. fully lives up to the meaning of its name “rocket”, Nehren crumbles a loaf, this machine costs 3 modern ones. What is called a classic? It was she who gave birth to all the pots in the world, it was they who licked her. But the Russian licked it, because of the anal. All pools are rusty from birth and last three years. And this beauty is already 30 years old and she will live the same way. Reasonable, beautiful.
And you need it. I read it and remembered myself and my old golf. So come on, you want me to come over and give him a sledgehammer so you don't have to throw that pimp out so much?
I tried to do something similar. eight carbohydrates also overflowed, although there was a return. but for a long time it did not go deeper and remained in ordinary fur. gasoline pump. and you can try to increase the diameter of the hole in the carbon hose fitting. You look at it and see that it's not just a calibrated hole. increasing at least double drilling.
Website for tuning VAZ, Lada VAZ 2109 cars Tuning daytime headlights in the VAZ-2109 Headlights. Why just waste energy? But many DRLs look amazing on nines who don't even want to look at them.
1. Check the tags (to clear my conscience :)) 2. Check (replace) ECX
How to connect fog lights yourself, daytime lighting through a relay to a separate button. colonel. Andrey helped. Connecting PTZ VAZ 2109 to the highest panel.
First part of the question. If the engine stalls, there is no fuel flow to the cylinders or no spark. If it idles, it will blow up the email. valve.
Replace the mounting block and harnesses.
How to connect daytime running lights with your own hands? Installation of SHO-ME DRL-507 daytime running lights on a VAZ. Connection diagram for DRL Daytime running lights after installation.
Why change the wiring before it's too late and you start calling for help?
A good electrician, with the same failure, he (a good electrician) helped me, the fagot almost burned it and changed all the braid and fasteners.
DRL on VAZ 2109. Uploaded March 5, 2015. Correct installation of navigation lights. 4. How to connect a 5-pin relay for DRLs. Downloaded on August 16, 2014. Connecting DRL in this mode 1. Turn on the ignition, the DRL will light up.
Land Rover mileage 20,000 km, purchased at a dealer's office less than a year ago
Is the wheel broken? Are you breaking the beaten path? But you don't have to change everything right! You need control in your hand, a diagram in your teeth and a dance from the “oven” Do not understand electrical circuits, trust the work of those who understand. Work, damn it, 10 minutes.
How to connect daytime running lights DRL and how. turn on the headlights automatically. Traffic regulations now require drivers to turn on their headlights even during the day.
Since the size and light circuit may pass through the ignition switch, first check the connector pins on the ignition switches and the pin group itself. Can simply write down the corresponding contact.
What did the fuses look like? even under the steering wheel there is a control for the backlight of the device, you can pull it out and hold the wires so that it is always lit to the maximum
VAZ 2109 injector, starter rotates, injection, there is a spark. enough, but something prevents him from starting. what could it be??
Are the timing belt timing marks set? look at the fuel pump!
How to connect daytime running lights yourself. Connection to daylight switching circuit. Photo diagram of connecting the DRL to the car, club-picanto.ru.
Try removing the battery terminal. in 10-15 seconds. An injector error may occur. This method will remove this error from memory.
Try removing the chip on the crankshaft position sensor and reinserting it. This happened to me when I changed the strap and now the chip wouldn't connect, but I tried it right away because I didn't change anything else
We look at the timestamps and try to reset the battery terminal for 10 minutes and try to change the px from a running machine
You need to connect to the machine and see if there are any errors. The idle speed control may be faulty. I can't figure out what can delete the terminal. If there are current errors, they can only be discarded by eliminating the error location
The timing belt and crankshaft are broken, the flywheel is still marked, look at it, the gearbox above the starter has a rubber stop, look there
DRL on VAZ 2109. Downloaded on March 5, 2015. Correct installation of navigation lights. 4. How to connect a 5-pin relay for DRLs. Uploaded August 16, 2014 Connecting DRL in this mode 1. Turn on the ignition, the DRL will light up.
The internal combustion engine that connects the running lights of the VAZ 2110, the Vinny forklift and the trunk of the VAZ 2110. The speedometer of the Mitsubishi Lancer jumps. charger gmc savana
Shit lamp, I don’t see any other options
The event may be inflated for some time. may have missed some throws. Do not use remote lights instead of headlights.
Obviously you need somewhere with wiring (or connecting something extra). Thanks to the huge load currents, everything can be cut off. By the way, I don’t understand what burned out: the lamps or the previous ones? When will you learn to write questions correctly? Well asked question. there is half the answer.
Lamps. China?)))))) How much voltage is in the on-board network? Jumping at 300V?))))
But combining daytime running lights with your own hands is not very difficult, and below we will explain how to do it. DRL or DRL daytime running lights are additional lighting.
The VAZ 2109 carburetor may stop working, as if an electrician had lost, and after 10-20 minutes it will start and continue driving
Either the contact is coming off the idle speed sensor, or the sensor itself is failing (the sensor screws into the carburetor) and you can see the ignition switch contacts, something may be wrong
How to connect fog lights yourself, daytime lighting through a relay to a separate button. colonel. Connecting PTZ VAZ 2109 to the highest panel. authorities, sir. Installation of LED strip in brake lights of VAZ 2109.
How do I connect?DRL
Buy the MD-1 as a sparkling stall = pop out and turn on the MD-1 switch = show what's missing. And, surprisingly, the I/O wires. if the electronic valve = retards at XX = at speed, it does not retard (holding the pedal) PS/I wire = symptoms = cool goes fine, burns, sometimes disappears, comes out of the tail, cools down for 15 minutes = continues. There is one more place = ground on the switch (2 feet darkened and went to get ground under stud mounting coil = probably oxide) but closest to PS 2 wire = agree below = hot pump performance may disappear = extended diaphragm, rod rod wear = check = hot carbon supply, end of cylinder and starter rotation = jet
Unscrew the air, look at the diffuser, if everything is good, remove the cap of the high voltage wire, put on the spare spark plug and start the spark plug. If there is a spark, then slam the door, kick the wheel and go 100.
The pump stops supplying fuel due to valve wear.
Check the supply of the gas pump and what pressure it produces \ should be at least 3 kgf \ cm \, perhaps the hoses are clogged with purge, and the electrician will warm it up if the electric valve does not press during ignition.
VAZ 2109 chassis 1 265 VAZ 2109 chassis 275 Repair VAZ 2109 chassis 180 Chassis headlights for VAZ 2109 179 Chassis VAZ 2109 100-day chassis.
How to Wire Daytime Running Lights There are a huge number of DRL wiring circuits, some of them are very common, others require some experience with a soldering iron. VAZ 2109 video.
Unscrew the spark plugs, turn the engine so that the piston of the 1st cylinder is at TDC, then the caliper measures the piston stroke, as in the engine book “the piston has not reached the limit in mm. " and return the timer.
At 4 gears 60 km/h gas to the floor, if the detonation is early, the detonation will not be later. Detonation should last 2-3 seconds. this is the norm.
In 09, such ignition, which cannot be scientifically established, remains a hacking method, I set the toll
Source
Product advantages
Among the main advantages of DRLs with indicators, experts and car enthusiasts note:
- high energy efficiency;
- good lighting brightness (450 Lumens and above);
- the ability for flexible running lights to take absolutely any shape at the owner’s request;
- improving the appearance of your car;
- presence of 2 modes;
- the ability to install LED lamps not only inside the headlights, but also on other parts of the car;
- the ability to shorten LED products to the required length without losing their functionality;
- resistance to high and low temperatures, moisture, dust, vibration;
- use in a set as a repeater or separately from turn signals;
- long service life (up to 80 thousand hours).
Flexible daytime running lights Optima Flex DRL-9-60
This will allow you to catch the admiring glances of pedestrians and other motorists. The brightness of LEDs on the market can differ by two times, and their price also differs. You can install these products yourself, strictly following the instructions.
There are many options for installing DRLs on the front of the car. From my own experience, I can say that if you decide to really be more noticeable on the road, then you need to set it higher. If for you DRL is just an excuse for Mr. Traffic Policeman, then it doesn’t matter where you attach it.
Installing running lights at a car dealership when purchasing a new car is very expensive. They offered to install the Duster for 15 thousand rubles, the price of the Philips kit in the store is 3 thousand rubles. If the DRL is well equipped, installation and connection will take 15-20 minutes.
Abroad they are designated as DRL - an abbreviation for “Daytime Running Lights.”
- 1. Types of daytime running lights
- 2. Rules for installing navigation lights
- 3. Eye of the eagle
- 4. Modular models
- 5. DRL from fog lights
- 6. Some varieties for PTF
- 7. LED strip
- 8. LED neon tube
- 9. Video analysis of the headlight
- 10. DRL monoblock, classic
QUESTION ANSWER
— How to choose the best form of DRL?
Generally speaking, this is a matter of taste. But we must keep in mind the requirement of GOST 41.87–99: the total area of the luminous surface of the DRL must be at least 40 cm². For rectangular lanterns it is easy to measure it with a ruler, but round ones should have a diameter of at least 50 mm.
Let's offer a couple of simplest solutions. In the case of low-power DRLs, you can get by with just one diode, see diagram 1:
For higher-current flashlights, pay attention to diagram 2: you will need only one additional automotive relay with normally closed contacts. In any case, the craftsman’s task is to find in the on-board network a wire that is supplied with power when the ignition is turned on, and another one that goes to the headlight or low beam bulb
If you purchased a product with an electronic unit, you only need to make a tap from the light bulb. And connect the remaining two wires directly to the battery terminals. Do not confuse the polarity - it is indicated in the instructions.
- Which case is better - metal or plastic?
DRL housings are made of either aluminum alloy or plastic. So they won't rust. But there is one subtlety: although LEDs have high efficiency, they heat up quite strongly, and overheating sharply reduces their service life. Therefore, you need a good heat sink, and not a “thermos” with a plastic shell. Of course, if the current consumed is small - say, tens of milliamps - then there is practically nothing to dissipate. But truly bright DRLs already consume many hundreds of milliamps, so a plastic casing is unacceptable for them. However, manufacturers know about this. And if they offer plastic, then there is nothing to count on the luminous intensity corresponding to GOST. Most likely, it's just a beautiful trinket with lights.
— Will traffic police inspectors find fault with self-installed DRLs?
The question is not easy. On the one hand, the traffic rules directly state that it is inadmissible to drive with DRLs instead of low beam headlights. Another document, the regulations, just as directly prohibits making any changes to the car’s lighting equipment. But we are not replacing standard headlights with something else, we are just adding a new set. In general, the situation is ambiguous.
— Where and how to properly attach the DRLs?
There are clear standards in this regard in GOST R 41.48–2004, and in accordance with them you will have to choose a location. Most likely, you will install it in the bumper or in the grooves of the radiator grille. Different DRLs are attached in different ways, so first figure out where they can be placed.
So, the outer edge of the DRLs should be positioned no further than 400mm from the edge of the car, and there should be a minimum of 600mm between the inner edges of the two DRLs (400mm if your car is less than 1300mm wide). The installation height of the DRL above the ground is set very freely: from 250 to 1500 mm, that is, you can also screw it onto the hood. But not at the windshield - there should be no visible reflections from the same hood!
— How to measure the intensity of light?
To accurately measure light intensity, special and rather expensive equipment is required. But you can approximately estimate it using a regular lux meter. To do this, you need to measure the illumination of the surface at a certain distance from a light source of known strength and then repeat the same for the devices under test. This illumination is proportional to the intensity of light. In our case, this approach is justified: all DRLs were divided into two groups: in one, the light intensity complies with GOST standards with a margin, in the other, with an even larger “margin,” it falls short of it.
Flexible daytime running lights can be installed on any car model. They consist of a tube made of silicone, in which white or yellow LED lamps are located. The complete set of DRLs is as follows:
- 2 strips of flexible lights, 60 cm long. Each wiring has a control unit;
- mounting kit
How to make angel eyes like a BMW
“Angel Eyes” is a unique horse from a German manufacturer, loved by so many motorists. However, if you like this mesmerizing glow, you don’t have to buy an expensive foreign car. This can be done on almost any car.
It is important that it has round front optics. For example, domestic VAZ 21213 or VAZ 2106 have it.
But, of course, the design will be even better suited to foreign cars, including the same old BMW models that so lack the shine of their successors
In any case, the beauty and effectiveness of the new headlight bezel may attract the attention of traffic police officers. But if they stop you on the road, it will be purely out of interest - the driver will not face a fine for this
DRL control unit
The most reliable and simplest option is to connect DRLs without a relay, but using a special running lights control unit. It ensures that the DRL turns on after starting the engine, guarantees safe operation, protects against overloads and can be installed on cars with any type of lamps, including LEDs.
Unfortunately, among the variety of industrially manufactured DRL units, the vast majority do not comply with GOST and have mediocre build quality.
This applies, first of all, to products from AliExpress, which do not meet the requirements in almost all respects.
Among all the diversity, only 2 options can be noted: the Russian DayLight+ DRL control unit and German products from Philips and Osram. The DayLight+ control unit was developed by Russian radio engineer Fedor Isachenkov, taking into account all the features of the vehicle’s on-board network and has a number of positive aspects:
- there is built-in voltage stabilization;
- full compliance with GOST;
- the maximum long-term load power is 36 Watts (significantly less is required for DRLs);
- simplest connection diagram.
In addition to the points described above, the DayLight+ unit is universal and is suitable for all cars with an on-board 12-volt network, and also has good build quality and a high degree of protection from moisture and dust.
German products from Philips and Osram also have all the above-described advantages of the DayLight+ unit, however, German control units are supplied only together with daytime running lights and are more expensive.
Getting ready for work
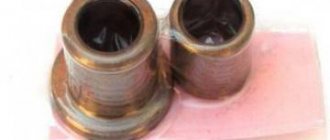
Plastic sticks
In order to decorate your vase (models from 2101 to 2115 and 21099), you will need to prepare a certain set of materials and tools.
To make “angel eyes” for a vase, you will need the following materials:
several plastic sticks. They must be equal in length to the dimensions of the optics on the machine. Therefore, to create tuning we will need four plastic sticks with a length of approximately 40-45 cm;
- heat-resistant sealant suitable for working with optics;
- four LED bulbs or strip. If using tape, give preference to the SMD 5050 model with 60 diodes per meter. The choice of LED glow color is determined only by your imagination. The best solution would be to match the color of the car with the color of the LEDs;
- four spare glasses for headlights. You need to buy them just in case, since it’s unlikely that you can remove the old ones intact and without chips;
- cable;
- resistors;
- 9 volt battery;
- a can or any round object that has the same diameter as the headlights;
- plexiglass with a sheet thickness of 10 mm.
The tools you will need are a glue gun, a hair dryer and pliers. You also need a drill with a set of drills and disk attachments.
How to choose and where to install DRLs on a VAZ-2114
As noted above, daytime running lights are designed to improve the visibility of the car from the front during daylight hours; their use is regulated by clause 19.5 of the Road Traffic Regulations (TRAF). Not all car models are equipped with this kind of optics, when DRLs are initially pre-installed in the headlights during factory assembly. Similar models include the VAZ-2114.
In this regard, VAZ-2114 car owners have to independently equip their vehicle with these lighting devices: with their own hands or using the services of specialized organizations.
Option for placing daytime running lights on the VAZ-2114
The choice of DRLs on the market for additional automotive optics is quite extensive and is represented by various light sources. These are lighting devices with LEDs, incandescent lamps and halogen light sources.
When choosing such equipment, the selection criteria are the following indicators:
- The type of light source that determines the technical characteristics of the DRL (electrical power, brightness, operating voltage, etc.).
- The degree of protection according to the existing IP system standard determines the possibility of using a lighting device in harsh operating conditions (dust and moisture permeability).
- Shape and dimensions - DRLs must fit into the design of the car and meet the requirements of regulatory documents.
- Manufacturer's brand - guarantees trouble-free use during the warranty period.
- Availability of warranty period of use.
- The method of installation on a car determines the complexity of the work performed and the need to make changes to its structural elements (cutting out elements, installing brackets, etc.).
For your information! LEDs are the most economical and efficient light sources. Devices equipped with incandescent lamps are cheaper, but quickly break down and have low luminous intensity. Halogen analogues have better technical characteristics, but are more expensive.
For successful operation of DRLs, you should choose models with a degree of protection of at least IP65.
Rectangular shape is the most suitable option for the VAZ model under consideration
The most common shape for DRLs used on the car model in question is rectangular, but round optics can also be used.
Expert opinion
Alexey Bartosh
Specialist in repair and maintenance of electrical equipment and industrial electronics.
Important! When choosing the shape of the DRL, you should remember that the required reflective surface area for such lighting devices must be at least 40.0 cm2.
On the VAZ-2114, daytime running lights are installed on the car’s bumper, and the method of attaching them depends on the model of the lighting device, which is selected individually by the car owner.
Depending on the model, DRLs can be attached to the car body using self-tapping screws, a special tie, or Velcro tape.
"Angel eyes" and their color
Colors of “angel eyes”, and in what cases they can be installed on a car:
- yellow, red, green, orange, purple - allowed to be used as tuning on show cars;
- white, blue - can be used in everyday use, as lighting and dimensions.
In other words, the operation of “angel eyes”, other than white ones, does not comply with the rules governing the use of lighting devices. Their presence gives the traffic police the right to issue a fine, officially warn the driver, and be sure to confiscate non-standard lighting equipment. This ban also applies to multi-colored “angel eyes,” that is, to those whose color can change.
A little about connection
In general, installation and connection largely depend on the specific vehicle and its design features. But some general and very important points are worth highlighting.
To begin with, elements such as angel eyes act as an additional lighting device as part of the vehicle. Therefore, their presence falls under the requirement for DRLs. As you understand, these are daytime running lights.
And according to the rules, they should be turned on simultaneously with starting the engine, and turned off when stopping. Plus, the DRLs are required to turn off when the headlights turn on. This tells us that the connection of the eyes should be carried out according to the connection diagram for daytime lights.
One of the options involves using 4 female terminals and one five-pin relay. The minus from the eyes goes to the body, and the plus goes to the relay.
Hi all. As promised, today I’ll tell you how to make “angel eyes”
at home, using available tools and materials. The article will be useful to those who love to make things with their own hands. Go!?
We all know what angel eyes are, and who owns (the chip belongs to BMW) this invention that is so popular with millions of motorists around the world. But, unfortunately, not everyone has the opportunity to buy a BMW, but they want to have beautiful tuned optics. What to do in this case? Everything is very simple, you need to “flex your brains” and make angel eyes with your own hands
To work you need to prepare:
- "Straight arms" :-). I’m joking, of course, but without the slightest experience in handmade crafts, you most likely won’t succeed... Therefore, before taking on this work, you need to realistically assess your own abilities.
- Plexiglas tubes (transparent PVC tubes). You can buy these online, at a hardware store, or at a decor store. Some craftsmen get creative and use strips of plexiglass or PVC as a plexiglass tube, which they cut into square strips, after which they are sanded into a round shape with sandpaper of different grain sizes. As an option, some use LED strip, but that’s a completely different story... I think someday I’ll tell you about this option for creating angel eyes.
- Soldering iron, four 12V resistors, bright LEDs rated at 3.5 volts. The color of the LEDs is at your discretion.
- A template or layout according to which the tube will be bent. The diameter of the template should match the diameter of the place where you are going to install the angel eyes. Here you can use anything: from a coffee can to a drainpipe of the required diameter...
- Electrical tape, heat shrink, soft copper wire. The length of the wire will be different for everyone, it all depends on the method of wiring and the location of the connection.
- Pliers, a household hair dryer, a metal blade or a special miniature cutting wheel for a screwdriver or drill.
- Sandpaper of different grains, file or needle file.
Options for running lights for VAZ classics
Currently, there are quite a few models of DRLs from both domestic and foreign manufacturers on the car lighting market. Therefore, it is always possible to choose the right optics in accordance with the tuning of the car and in a given price range.
Daytime running lights on the VAZ 2107 are also presented among others, here are some of them:
- Vympel series, model “DRL-L8 3528 SMD” (Russia/China).
Specifications:
| Voltage, V | Number of LEDs | Length, mm | Width, mm | Height, mm | Weight, kg |
| 12,0 | 8 | 12,0 | 19,0 | 2,0 | 0,17 |
The average cost in retail trade as of the third quarter of 2021 is 400.0 rubles.
- Vympel series, model “DRL-НТ3-18W” (Russia/China).
Specifications:
| Voltage, V | Number of LEDs | Length, mm | Width, mm | Height, mm | Weight, kg |
| 12,0 | 3 | 196,0 | 55,0 | 145,0 | 0,39 |
The average cost in retail trade as of the third quarter of 2021 is 700.0 rubles.
- Vympel series, model “DRL-HP-L9” (Russia/China).
Specifications:
| Voltage, V | Number of LEDs | Length, mm | Width, mm | Height, mm | Weight, kg |
| 12,0 | 9 | 276,0 | 150,0 | 48,0 | 0,72 |
The average cost in retail trade as of the third quarter of 2021 is 1300.0 rubles.