High beam on VAZ-2114
On any car, high beam headlights are simply necessary, since only thanks to it you can see obstacles, potholes, sharp changes in the road surface, and animals that suddenly appear on the roads in advance, before you come into contact with them. However, you need to know that high beams can play a cruel joke when a snowstorm, heavy rain or fog appears.
Remember that high beam headlights will not help you, but will rather impair visibility when traveling in fog, heavy rainfall or snowstorms.
Differences in high beam switches
On different cars, that is, representatives of the domestic and foreign markets, the methods of switching the light may differ, therefore, both a beginner and an experienced driver who has switched from a foreign to a domestic car may have some questions about this.
Before turning on the high beams, you must make sure that your car's headlights and low beams are turned on; they are located on the right hand side, on the dashboard "apron" and are marked with special symbols.
The buttons are marked with a red marker.
Next, when the main lighting is working, you can move on to additional lighting. To do this, you just need to press the steering switch on the right side “away from you” until you hear a characteristic click. Thus, it will be indicated that the light has turned on, and the blue control lamp will light up on the instrument panel.
Brief blinking of the main beam occurs using the same lever, only by fixing it “towards you”.
On foreign-made cars, as a rule, all control of the car's light is carried out on one steering column switch (usually on the left side - approx.) by rotating it along its axis.
Continuation of the story
Is tinting of headlights and taillights allowed? Terms of deprivation of licenses - what are they and for what violations? What is the fine for parking? Why is a license deprived and for how long? Is it possible to overtake along a solid marking line? What is the penalty for crossing a solid line? —> — 01/12/2016: Re: When and at what time to turn on the low and high beams,...... Sources used:
- https://autoflagman.ru/7214-lights
- https://zarulposle30.ru/kak-vklyuchat-svet-na-avtomobile/
- https://howcarworks.ru/question/when-and-at-what-time-to-turn-on-low-and-high-beams-fog lights
Advice
Using the lever, which is located to the left of the steering wheel, you need to pull it towards yourself, then the light will come on.
A motorist must think not only about his own comfort, but also about others, especially when turning on the high beams on the road. It’s one thing when you’re alone on it, and quite another when they start blinking back at you))
I try to use it only for its intended purpose, especially closer to night. Convenient and practical for me in terms of location.
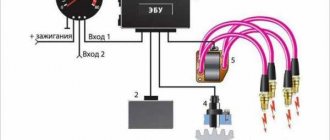
1 – headlights; 2 – mounting block; 3 – headlight switch; 4 – ignition switch; 5 – external lighting switch (fragment); 6 – fog lamps in the internal rear lights; 7 – fog light switch with control lamp; 8 – indicator lamp for high beam headlights in the instrument cluster; K8 – headlight high beam relay; K9 – relay for low beam headlights; A - the order of conditional numbering of plugs in the headlight block; B - to power supplies
Scheme for switching on the side lights of VAZ-2113, 2114 and 2115
External lighting switching diagram:
1 – side light lamps in headlights; 2 – engine compartment lamp; 3 – mounting block; 4 – engine compartment lamp switch; 5 – ignition switch; 6 – external lighting switch (fragment); 7 – indicator lamp for external lighting in the instrument cluster; 8 – side light and brake light lamps in the external rear lights; 9 – license plate lights; 10 – instrument lighting regulator; 11 – brake light switch; 12 – on-board control system unit; K4 – relay for monitoring the health of lamps (contact jumpers are shown inside the relay, which must be installed in the absence of a relay); A - to power supplies;
Scheme for switching on direction indicators and hazard warning lights for VAZ-2113, 2114 and 2115
Diagram for switching on direction indicators and hazard warning lights:
1 – direction indicator lamps in headlights; 2 – mounting block; 3 – ignition switch; 4 – alarm switch; 5 – side direction indicators; 6 – direction indicator lamps in the external rear lights; 7 – instrument cluster with turn signal indicator lamps; 8 – direction indicator switch; 2 – relay-interrupter for direction indicators and hazard warning lights; A - to power supplies
In connection with the entry into force of new traffic regulations requiring mandatory driving with DRLs or low beam headlights or fog lights on, the question arose of how not to get caught if you forget to turn it on.
On my car, when the headlights are on low beam, after the car is turned off and the driver leaves it, the lights and dimensions go out, and after the engine starts, they light up. The battery is good. But my brother has a VAZ 2115, and the dimensions remain on until you turn it off. If you arrive at work in the morning and forget to turn it off, then by the evening the car may not start - the battery will be damaged.
At first we thought about how to make it like mine, but, as an analysis of the VAZ wiring diagram and subsequent tinkering with a multimeter showed, this is not possible. Let's go out of our way, if you can't turn it off automatically, you need to turn it on automatically! The idea of turning on the light when the ignition is turned on was not considered, because our winters are cold and a burning light while the starter is spinning in an attempt to start the engine is evil! Initially, we planned to link the engine to start using an oil pressure sensor or a battery charge indicator, but for a number of reasons we abandoned such schemes. And they came up with, IMHO, a good analogue.
So, the rules require that the DRLs be turned on when the car is moving, and if so, then they are not needed when the car is parked! I don’t know who it is, but my brother and I always put the car on the handbrake when parked, so we decided to get attached to it. Here's the diagram:
It works as follows: when the ignition is turned on and the handbrake is raised, relay 1 is activated and contacts K1 close to empty, there is no light. We start the car, before starting to drive, as usual, we lower the handbrake, interrupting the circuit on relay 1 and K1, returning to the normally closed state, supplies voltage to the light and, through the diode, to the dimensions. At the same time, relay2 is activated and with its contacts K2 supplies power to the dimensions and light, bypassing relay1. That's it, until you turn off the engine the light will stay on.
The diode is needed so that when you suddenly need to leave the car with the lights on, only the lights are on, and not the lights and lights together.
Relay 2 is needed in case you are standing at an intersection and have raised the handbrake.
To implement the circuit you will need: one 5-pin and one 4-pin relay (you can only use 5-pin), relay blocks with wires, a diode with a current of at least 3 Amps, electrical tape or heat shrink, about 2- x meters of wire, wire cutters, shaped screwdriver, operation and repair manual.
Installation. We remove the Onboard Computer or the plug under it, push out the button for turning on the dimensions and lights through the resulting hole, remove the floor tunnel and the side panels of the dashboard console. We connect the wires of our circuit with the wires of the buttons (the size wire is brown, the light is green, the ignition is blue and brown, you will find the handbrake yourself) We attach the relay in a place convenient for you (I secured both relays next to the handbrake, on the bolt securing the heater air duct to the rear passengers).
PS, so as not to cut the wires, you can remove the terminals from the button connector and connect there.
PPS now your car has a new feature: if you turn on the ignition and, without releasing the handbrake, turn on the light with the button, you can turn it off only by turning off the ignition
Fog lights. On VAZ 2110 vehicles, in the optional version, fog lights can be installed on the front bumpers. The headlights are switched on by switch 27 (see Instrument panel) using an additional relay type 113.3747 installed in a shoe attached to the rear side of the mounting block. The fog lights can only be turned on if the exterior lighting switch 26 is turned on.
Page 20
Do not allow the fuel tank to empty! Otherwise, the electric fuel pump may fail.
8 – control lamp is on
side light readings.
Lights up green when the exterior lighting is turned on.
9 – emergency warning lamp
emergency condition of the service brake system.
Lights up red when the fluid level in the brake hydraulic reservoir drops below the “MIN” mark.
When the control light comes on
movement of the lamp is prohibited until the causes of the decrease in the liquid level are eliminated.
10 – control lamp
turning on the high beam headlights.
Lights up blue when the high beam headlights are turned on.
11 – display reset button
12 – mileage indicator.
The top line of the indicator indicates the total mileage of the car, and the bottom line is the daily mileage.
distance meter. Reset the daily counter readings by holding button 11 pressed for more than 5 s with the car stopped.
Resetting daily readings
The counter also occurs when the terminal is removed from the battery.
13 – control lamp
“check the engine.”
Connected if the vehicle is equipped with a fuel injection system. A short-term lighting of the lamp when the ignition is turned on indicates a self-test of the system and, if there is no malfunction, it goes out. If any defect is detected in the system, the lamp flashes or stays on.
14 – control lamp
turning on the alarm system.
Lights up with a red flashing light when the hazard warning lights are turned on.
15 – time indicator and
temperature.
Switching between the time display and the ambient temperature display is carried out briefly.
by simultaneously pressing button 11.
When the ignition is turned on
ambient temperature above +2
C always appears
clock indication. When the ambient temperature drops below +2
With indicator for 3s
displays the clock readings and then switches to the temperature display, which is displayed in flashing mode for the first 10 s.
As the temperature rises
outside air above +3
reducing it again to +2
– in case of indication of the clock in-
The indicator automatically switches to temperature indication, the readings of which are displayed in flashing mode for the first 10 s;
– in case of temperature indication
its normal mode is interrupted by a ten-second flashing mode.
Setting the hours and minutes
is displayed in the time display mode by rotating button 11 towards the signs “h” – hours and “m” – minutes.
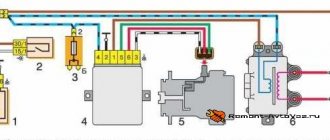
Headlight switching diagram for VAZ-2113, 2114 and 2115
Scheme for switching on headlights and fog lights:
1 – headlights; 2 – mounting block; 3 – headlight switch; 4 – ignition switch; 5 – external lighting switch (fragment); 6 – fog lamps in the internal rear lights; 7 – fog light switch with control lamp; 8 – indicator lamp for high beam headlights in the instrument cluster; K8 – headlight high beam relay; K9 – relay for low beam headlights; A - the order of conditional numbering of plugs in the headlight block; B - to power supplies
Adjusting headlights VAZ 2110
Check and adjust the headlights on an equipped vehicle with a full tank of fuel, a set of tools and a spare tire.
1.Check and, if necessary, check the air pressure in the tires.
2. Place the vehicle perpendicular to a smooth wall (eg garage) at a distance of 5 m. Place an additional load of 75 kg on the driver's seat. Mark the screen on the wall as shown in Figure 1. The longitudinal plane of symmetry of the car should run along line 0 on the screen.
3.Take your car to the height of the headlights to the floor. This will be the distance h on the screen (for a new car h = 600 mm).
4. Turn on low beam.
5. Turn the rotary switch to position “I” (driver and front passenger).
6.Open the hood and adjust the position of the light spot for each headlight on the screen, if the position of the light spots on the screen does not match the picture, with screws 1 (horizontal plane) and 2 (vertical plane) manual beam adjustment.
Second adjustment method
To configure the lighting sources using the second method, you will need the same platform, wall and chalk. Pre-prepare the car:
- inflate tires evenly;
- check how well the suspension is;
- distribute the load evenly across all wheels;
- Fill the tank completely with fuel.
Adjusting headlights at a service station
Then proceed according to the following scheme:
- Mark the spots on the wall that define the centers of both headlights.
- Lay a line through them.
- Below, 12 centimeters, draw a segment parallel to the first.
- Set the light control to o.
- By controlling a pair of adjustment screws, we adjust the beam to such a position that its upper limit is very close to the lower line.
- The lateral border of the beam is located at the intersection of the lower straight line and the vertical axis of the lantern.
Setting up fog lights on VAZ 2114 and 2115
Replacing the lamp
So, if the low beam on a VAZ 2114 does not work, then most likely the reason lies in a burnt-out lamp. Most often this happens if the lighting elements have been replaced a long time ago. Although, new lamps often burn out, which is due to the large number of low-quality products on the auto parts market.
Of course, before replacing a light bulb, you will first have to deal with its choice. The VAZ 2114 uses double-thread paws of the H4 standard, which are responsible not only for near but also for high beam lighting.
Advice! If a lamp burns out on the road, instead of low beam headlights on 2114, you can turn on fog lights, if, of course, they are available.
Lamps on the market may differ in their operating principle, on which many of their characteristics depend. Below we will take a closer look at all their types:
Lamp burnout
The VAZ 2114 uses a H4 type halogen lamp as a head light source. Such a lamp has two filaments of different power inside the bulb. As standard, the low beam filament has a power of 55W, and the high beam filament has a power of 65W. It is the power that depends on the brightness of the lamp, as you can understand, since the high beam filament has more power, which means it will emit a stronger luminous flux. Therefore, the high beam turns out to be brighter than the low beam.
Since the low beam filament has less power, it is made a little thinner, and taking into account the new traffic rules, cars must drive with low beams on if they are not equipped with DRLs.
Since the VAZ 2114 did not have running lights from the factory, it is necessary to move around with light, which greatly affects the durability of the lamps. The filament quickly overheats and fails.
Examination
The lamp can be checked by a simple visual inspection. To do this, you need to remove the lamp from the headlight and inspect its filament for breaks. Also, quite often, when a lamp burns out, a part of the filament appears inside the bulb, which dangles chaotically inside.
Lighting control
Please adhere to the appropriate traffic regulations when using lighting devices.
When driving a vehicle on a rainy day, the window glass will quickly cool down and the temperature of the glass inside the vehicle will quickly decrease, so the moisture remaining in the air will accumulate and create condensation. In this case, water will appear on the inside of the window glass. The reason for the appearance of condensation on the inner surface of the headlight glass is the same. In other words, the amount of water in the air will increase as the temperature rises and if the temperature drops, the water will accumulate and create condensation known as fog.
If condensation appears on the light fittings of a vehicle, then after turning on the high and low beams, the condensation that appears on the glass of the headlights will begin to dissipate and disappear after 1 hour - this is normal. If not, there may be water inside. Contact the appropriate service station for repairs.
When replacing a light bulb, carefully check the installation of each part of the light bulb to ensure proper installation and good insulation! Otherwise, serious consequences may occur due to water or dust getting inside!
High pressure water jets should not be used to clean the engine compartment, especially the light fittings. Otherwise, due to the high jet pressure, parts of the light fittings may become loose and come off, and the vent, wiring and electrical connectors may become wet.
As a result, the water that will be inside the light fittings or steam will not dissipate, which will lead to the creation of a large amount of condensate.
Turn the outer ring of the steering column switch lever 1 to a position where mark 2 aligns with the corresponding symbol.
Low beam headlight
Turn the outer ring of the steering column switch lever 1 to a position where mark 2 aligns with the corresponding symbol. The corresponding warning light on the instrument panel will light up.
High beam headlight
If the low beam is already on, then to turn on the high beam, pull the lever of the steering column switch 1 towards you. The corresponding warning light on the instrument panel will light up.
REASONS FOR LACK OF LIGHT
So, we have found out where the headlights and their unit are installed and how they are located in the car, now we will figure out why the low beam does not light up.
The main reasons are:
- Lamp failure;
- Burnout or failure of fuses;
- Oxidation of contacts on wires;
- The power button is broken.
The lamps that are equipped with the VAZ 2114 from the factory assembly line are ordinary halogen lamps, with two filaments inside. In fact, the same light bulb is a source of both low and high beam - just one or two filaments are lit at once. Other machines may use different lamps for each type of light, and the diffuser may be movable and controlled by a computer. The solution is simple - replace the light bulb with a new one; we’ll talk about how to do this without breaking anything else.
Article on the topic: How to remove the headlight on a VAZ 2110 and replace the glass with your own hands
OTHER PROBLEMS
The fuse also burns out just as often, which is why the low beam headlights do not light up. A standard fuse is a plastic case on two copper legs that are inserted into the block. Inside the housing there is a wire made of semiconductor material, which, if the current or voltage is too high, simply burns out and the voltage surge does not affect the headlights. The fuse is simply replaced with a new one.
Wires are also checked for oxidation quite simply - near the fuse box, you need to carefully inspect all the pads and relays, remove rust, and if there are disconnected cables, fix them in place. To check the button you need to find any other one and connect the control wires to it. If the headlights come on, then you just need to replace the button with a similar new one.
The VAZ 2114 headlight unit is connected to several buttons at once, since there are also turn signals there, it is advisable to diagnose everything at once; perhaps the problem lies in a banal open circuit somewhere in the routing of wires from the fuse block to the buttons.
K9 – low beam relay, don’t forget
Fuse blown
Two fuses F12 and F13 are responsible for protecting the low beam power circuit in the “fourteenth”. Each of them is responsible for a separate headlight. When using a car for a long time with the headlights on, the wiring begins to heat up, this is especially aggravated in the heat, which increases the resistance of the wires and, consequently, the current in them, and the increased current leads to a blown fuse.
The fuse must be replaced with the same rated current as was previously installed. From the factory, the rated current of the low beam fuse is 7.5A.
High beam on VAZ-2114
On any car, high beam headlights are simply necessary, since only thanks to it you can see obstacles, potholes, sharp changes in the road surface, and animals that suddenly appear on the roads in advance, before you come into contact with them. However, you need to know that high beams can play a cruel joke when a snowstorm, heavy rain or fog appears. Connecting keys for VAZ 2109 from 2114 [BFS]
The following two tabs change content below.
All my life I have been surrounded by cars! First, in the village, already in the first grade, I was rushing around on a tractor through the fields, then there was JAVA, then a penny. Now I am a third-year student at the Polytechnic Faculty of Automotive Engineering. I work part-time as a car mechanic and help repair cars for all my friends.
Remember that high beam headlights will not help you, but will rather impair visibility when traveling in fog, heavy rainfall or snowstorms.
REPLACING LIGHT BULB
Replacing low beam lamps on a VAZ 2114 is, in principle, similar to a similar procedure with any other car, since any headlight unit consists of the following components:
- Frame;
- Light diffuser;
- Lamps;
- Reflector.
Despite the external differences, in most cars the principle remains the same.
REPLACEMENT PROCESS
In order to successfully replace the light bulb, we need the following tools: an awl, screwdrivers and detailed instructions, which are written below. There is nothing complicated in this operation, so by doing everything in order and carefully, you can do everything quickly and with your own hands, without overpaying for such a simple procedure to the technicians at the service station.
So, the step-by-step instructions look like this:
- Turn off the ignition, remove the key from the lock and open the hood;
- Having decided which side of the block we need to unscrew, we approach it and remove the protective box from it. It is bolted on both sides;
- Now you need to carefully remove the contact group from the reflector;
- Next, we find the spring clamps and carefully release them;
- We take out the lamp;
- We insert a new one into the vacant space and assemble everything in the reverse order.
Article on the topic: Replacing level and emergency oil pressure sensors on a VAZ 2114
Before replacing the glass flask, it is advisable to wipe it with alcohol, that is, degrease it. If this is not done, fingerprints and dust will remain on the inside. The lamp itself needs to be placed correctly; there is only one position for it.
An ordinary VAZ 2114 halogen low beam lamp, which is installed on the car from the factory, costs about 200 rubles, so if you don’t spend money on the services of a service station, then the repair is not that expensive.
Differences in high beam switches
On different cars, that is, representatives of the domestic and foreign markets, the methods of switching the light may differ, therefore, both a beginner and an experienced driver who has switched from a foreign to a domestic car may have some questions about this.
VAZ - 2114
Before turning on the high beams, you must make sure that your car's headlights and low beams are turned on; they are located on the right hand side, on the dashboard "apron" and are marked with special symbols.
The buttons are marked with a red marker.
Next, when the main lighting is working, you can move on to additional lighting. To do this, you just need to press the steering switch on the right side “away from you” until you hear a characteristic click. Thus, it will be indicated that the light has turned on, and the blue control lamp will light up on the instrument panel.
High beam button
It is also highlighted with a red marker.
Brief blinking of the main beam occurs using the same lever, only by fixing it “towards you”.
On foreign-made cars, as a rule, all control of the car's light is carried out on one steering column switch (usually on the left side - approx.) by rotating it along its axis.
Differences in high beam switches
On different cars, that is, representatives of the domestic and foreign markets, the methods of switching the light may differ, therefore, whether a beginner or an experienced driver who switched from a foreign to a domestic car, there may be some questions about this.
VAZ-2114
Before turning on the high beams, you must make sure that your car’s headlights and low beams are turned on , they are located on the right hand side, on the “apron” of the torpedo and are marked with special symbols.
The buttons are marked with a red marker.
Next, when the main lighting is working, you can move on to additional lighting. To do this, you just need to press the steering switch on the right side “off” until you hear a characteristic click. So, it will be indicated that the light has turned on, and the blue control lamp will light up on the instrument panel.
High beam button It is also highlighted with a red marker.
A short-term blinking occurs during this switch, only by its fixation “on itself”.
- Installation on VAZ 2108 and 2109 with a low torpedo instrument cluster from 2115
On foreign-made cars, as a rule, all control of the car's light is carried out on one steering column switch (most often on the left side - approx.) by turning it along its axis.
What light to use in conditions of poor visibility (in fog)?
The conditions of insufficient visibility are also defined in the Rules, so there is no ambiguity here. These conditions include driver visibility of less than 300 meters in fog, twilight, rain, snow, and the like. In general, if the visibility of the road is approximately less than 300 meters, the only time it is night, then these are conditions of insufficient visibility.
In conditions of insufficient visibility, you need to turn on:
- Connecting fog lights to the legendary “Nine”
- dipped or high beam headlights when moving (see above in the description of lighting at night, in what conditions you cannot use high beams);
- side lights when stopping and parking - low beam headlights, fog lights or rear fog lights together with side lights can also be turned on in conditions of poor visibility (as opposed to the dark).
- fog lights - only in combination with low or high beam headlights (and on roads of any illumination, as opposed to the dark).
- rear fog lights (this is the only condition in which they can be used).
In conditions of insufficient visibility, you cannot use:
- fog lights without low or high beam headlights;
- daytime running lights.
What light should I use in the tunnel?
Traffic regulations regulate the mandatory inclusion of headlights in tunnels (clause 19.1). The rule here is simple: the conditions for using certain lighting devices are the same as in the dark.
So, we have found out where the headlights and their unit are installed and how they are located in the car, now we will figure out why the low beam does not light up.
The main reasons are:
- Lamp failure;
- Burnout or failure of fuses;
- Oxidation of contacts on wires;
- The power button is broken.
The lamps that are equipped with the VAZ 2114 from the factory assembly line are ordinary halogen lamps, with two filaments inside. In fact, the same light bulb is a source of both low and high beam - just one or two filaments are lit at once. Other machines may use different lamps for each type of light, and the diffuser may be movable and controlled by a computer. The solution is simple - replace the light bulb with a new one; we’ll talk about how to do this without breaking anything else.
OTHER PROBLEMS
The fuse also burns out just as often, which is why the low beam headlights do not light up. A standard fuse is a plastic case on two copper legs that are inserted into the block. Inside the housing there is a wire made of semiconductor material, which, if the current or voltage is too high, simply burns out and the voltage surge does not affect the headlights. The fuse is simply replaced with a new one.
Wires are also checked for oxidation quite simply - near the fuse box, you need to carefully inspect all the pads and relays, remove rust, and if there are disconnected cables, fix them in place. To check the button you need to find any other one and connect the control wires to it. If the headlights come on, then you just need to replace the button with a similar new one.
The VAZ 2114 headlight unit is connected to several buttons at once, since there are also turn signals there, it is advisable to diagnose everything at once; perhaps the problem lies in a banal open circuit somewhere in the routing of wires from the fuse block to the buttons.
K9 – low beam relay, don’t forget
Common faults and their solutions
If, after replacing the bulbs, the low beam on the VAZ 2114 still does not light up, then there may be several reasons for this:
- Faulty fuses;
- Faulty headlight switch button;
- Broken wiring.
Below we will look at how to troubleshoot these problems.
Replacing fuses
The fuses are located in a special block, which is located on the left side near the windshield. To replace them yourself, you need to open the plastic cover and find fuses F12 (responsible for the left headlight) and F13 (responsible for the right headlight).
If the light comes on after replacing the fuses, you need to leave it on for a while to make sure the new fuses don't blow. If they quickly melted, you need to look for a problem in the wiring of the VAZ 2114.
Note! Under no circumstances should you close the contacts in the fuse box directly, as this can lead to more serious electrical problems or even a wiring fire.
Replacing a button
If replacing the fuses does not help solve the problem, you need to “ring” all the electrics related to the operation of the headlights. Of course, for this you will need a low beam electrical circuit for the VAZ 2114 and a special device (multimeter).
Often the problem lies in the button. In this case, replacing the low beam button on the VAZ 2114 will help solve the problem.
It is done quite simply:
- First of all, it should be noted that the low beam button on the VAZ 2114 is doubled with the high beam button. To pull out this block, you need to pick it out, for example, with a knife. The operation must be performed carefully so as not to scratch the panel.
- Next, you need to disconnect the block from the old button and connect it to the new one.
- The new switch unit must then be installed in place.
Advice! When replacing a button, you can immediately install a key backlight diode, which for some reason is not provided by the factory. This modification of the low beam button on the VAZ 2114 will allow you to see when the low beam is on and when it is off, which is very convenient during daylight hours.
If the button is working and the wiring of the machine is in order, then most likely the relay is faulty (K9 in the diagram), which needs to be replaced with a new one.
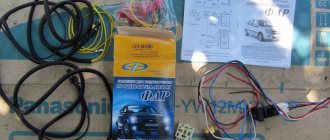
Installation of electrical equipment and fog lights on the VAZ-2114
General view of fog lights
In order to understand why the fog lights failed, you need to know a little about how the electrical equipment of the car as a whole works, as well as the connection diagram for this unit in the general electrical circuit.
So, let's look at the basic electrical equipment diagram of the VAZ-2114:
General diagram of the vehicle's electrical equipment including PTF
And also, diagrams for direct connection of fog lights.
Reasons for failure
Now that all the electrical connection diagrams for the fog lights have been disassembled, you can proceed directly to determining the reasons for their inoperability or failure:
- Fuse blown.
- The light bulbs burned out.
- Oxidation of contact connections.
- There is no contact to ground.
- The button doesn't work.
- No power.
- Incorrect connection.
- Relay is broken.
PTF lamps do not light up (troubleshooting methods)
Now that all the reasons have been identified, we can proceed directly to considering the issue of solving the problem. For diagnostic operations you will need a tester, but for repairs you will need a set of screwdrivers, keys and some spare parts.
Now, let's look at how problems need to be solved in different cases.
Fuse blown
Fuse diagram in the mounting block
The most common problem among electrical equipment. A blown fuse breaks the electrical circuit, but at the same time protects the parts from a short circuit. It is worth noting that each headlight has its own fuse, so you need to check those marked F8 and F9 in the mounting block. The nominal current passing is 7.5A.
If both fog lights on the car go out at once, then you don’t have to go into the mounting block and it’s a different problem.
Burnt out light bulbs
Another common reason for fog lights not working is the bulbs burning out due to a short circuit or natural wear and tear.
New PTF lamp and socket close up
To check the serviceability of the part, we install a new lamp in the seat, and if it lights up, then the matter is definitely a failure of this particular element. As in the previous case, two lamps cannot burn out at once.
Oxidation of contact connections
Due to poor sealing, the PTF contact has oxidized
Often, another problem is that the connectors connecting the fog lights directly to the headlights become oxidized and do not make proper contact, which can cause flickering or loss of light.
In this case, the treatment method is to clean the contact group of the connectors.
No contact to ground
Ground wire from battery
The reason for the failure of the fog lights is that there is no reliable contact to ground.
This is due to the fact that the wire is exposed to the open air and is exposed to external factors, which can lead to corrosive damage. So, the method of treating a malfunction is to strip the contact connection between the wire and the ground.
REPLACING LIGHT BULB
Replacing low beam lamps on a VAZ 2114 is, in principle, similar to a similar procedure with any other car, since any headlight unit consists of the following components:
- Frame;
- Light diffuser;
- Lamps;
- Reflector.
Despite the external differences, in most cars the principle remains the same.
REPLACEMENT PROCESS
In order to successfully replace the light bulb, we need the following tools: an awl, screwdrivers and detailed instructions, which are written below. There is nothing complicated in this operation, so by doing everything in order and carefully, you can do everything quickly and with your own hands, without overpaying for such a simple procedure to the technicians at the service station.
So, the step-by-step instructions look like this:
- Turn off the ignition, remove the key from the lock and open the hood;
- Having decided which side of the block we need to unscrew, we approach it and remove the protective box from it. It is bolted on both sides;
- Now you need to carefully remove the contact group from the reflector;
- Next, we find the spring clamps and carefully release them;
- We take out the lamp;
- We insert a new one into the vacant space and assemble everything in the reverse order.
Before replacing the glass flask, it is advisable to wipe it with alcohol, that is, degrease it. If this is not done, fingerprints and dust will remain on the inside. The lamp itself needs to be placed correctly; there is only one position for it.
An ordinary VAZ 2114 halogen low beam lamp, which is installed on the car from the factory, costs about 200 rubles, so if you don’t spend money on the services of a service station, then the repair is not that expensive.
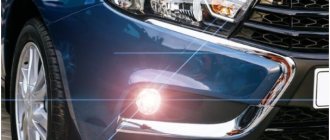
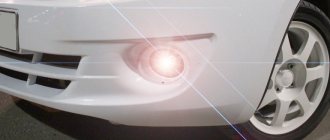
What are fog lamps for?
The main task of the PTF is to illuminate the space in front of the car. Correctly adjusted “fog lights” can illuminate a section of road 10–15 meters long. This distance is quite enough for safe movement by car in poor visibility conditions. The switching on and off of such lighting devices must be fully controlled by the driver.
Adjustment of fog lights is carried out during their installation. The procedure does not take much time, but requires care and precision. You can install the rear and front PTFs yourself.
Tips for motorists
According to these Rules of the Road, on any moving vehicle, including the VAZ-2114, the headlights must be turned on, along with which the side lights must also be turned on. In addition, they must be turned on when the car is stopped or parked on the road in the dark and in conditions of insufficient visibility. Therefore, they must always be in good working order.
The electrical circuit of the side lights of the VAZ-2114 is not so complicated and, if desired, any self-respecting driver will be able to find a malfunction associated with the failure of its operation. To do this, you need to know that terminal No. 1 of the side light switch is always supplied with positive voltage from the battery, bypassing the ignition switch. If the side light switch key is in the on position, then electric current flows to two fuses F10 (7.5A) and F11 (7.5A), which respectively protect the electrical circuits of the left (F10) and right (F11) side lights. The further path of the current lies to relay K4 (lamp health monitoring relay), and then to the front and rear side lamps.
When only one of the side light bulbs does not light, then we check whether it has burnt out. If it burns out, then we replace it with a new one of similar power, but if it is intact, then we will have to look at the condition of the contacts of the cartridge in which it is inserted. In the rear lights, due to moisture getting into them, oxidation is possible, both of the tracks and the pads through which voltage is transmitted to the terminals of the side light lamp.
What to do if the headlights are not adjustable?
If you are faced with the problem that the headlight cannot be adjusted when you turn the adjusting bolt, it means that the hydraulic corrector, which is located in its housing, has failed. Turn the regulator from inside, and if the beam of light does not change its height, then the mechanism needs to be replaced.
The price of the mechanism is on average 500 rubles, and it is better to immediately replace it and adjust the headlights.
Understanding the question “how to adjust the headlights on a VAZ 2114,” we can conclude that optics are an important element, especially at night. It not only makes the car visible, but also allows the driver to assess the traffic situation around him. When the optics are not adjusted correctly, the driver can dazzle other road users, creating an emergency situation on the road. It is recommended that light fixtures be adjusted once a year during vehicle maintenance (of course, if this mechanism is not being replaced, then the adjustment should take place immediately). Proper adjustment at home will help ensure safe driving in the dark.
POST REPAIR PROCEDURES
After the new VAZ 2114 low beam bulb is installed, it is necessary to check the assembled headlight unit for leaks. If it is not there, then the headlights will at least fog up, and at most dirt, dust and water will get inside them when it rains.
In addition, you should not experiment and try to install more powerful lamps in your headlights, since the fuse and wiring may not withstand the increased voltage, and there will be a constantly increased load on the generator. It is not even recommended to install additional headlights; it is better to contact a specialist and set up your family correctly - there will be more practical benefit from this.
Oxidation of contacts
The contacts on the lamp are often exposed to moisture, especially during the rainy season, which often affects their oxidation. An oxidized contact increases the conductivity resistance or may completely make contact impossible, due to which the voltage will not reach the lamp, and this will lead to the inoperability of the car's low beam.
Oxidized contacts must be cleaned and replaced.