Modern cars are much more comfortable than the models of the past; computer technologies serve to make drivers more comfortable. The clutch sensor on the Lada Vesta is needed to synchronize the rotation of the crankshaft and the gearbox input shaft. In this case, there are two types of devices, one is intended for a manual gearbox, and the second for a robotic gearbox.
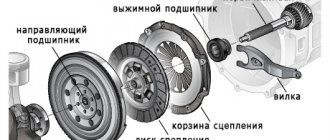
Why an additional system is required: special gears are responsible for synchronizing the speed of the power plant with the rotation of the gearbox input shaft. If the synchronizer of any gear wears out, you will not be able to change gear. The presence of a sensor helps eliminate synchronizers from the circuit, since the electronic signal is transmitted directly to the control unit, and the power unit raises or lowers the speed to the required level. The system also helps to cope with the jerking of the car when changing gears.
The sensor installed on the Lada Vesta has two position options:
- "Enabled"
- "Turned off".
The control unit adjusts the engine speed to the position automatically. With automatic transmission, the system works in exactly the same way, and the data is transmitted to the electronic unit. The robotic box allows you to take into account the speed of movement and some other factors.
Sensor location and dismantling process
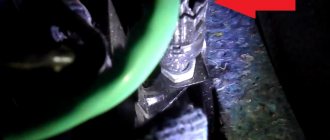
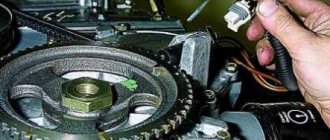
On the Lada Vesta, the sensor is located near the steering shaft, next to the pedal. If jerking or jerking occurs when changing gear, the car owner should check and adjust it.
To dismantle an element, you need:
- press the latch and carefully disconnect the block with wires;
- Rotate the component counterclockwise ninety degrees and remove it.
When installing the part in place, you need to make sure that the brake pedal is in the upper position; the actions are performed in the reverse order.
After installation, the pedal is carefully lowered, after which the block with wires is connected.
Location
The clutch sensor on a Priora car is located on the pedal assembly, you can see it by looking under the panel on the driver's side; wires go to the sensor from the green connector on the pedal assembly.
Access to replace or repair the sensor is only possible after removing the frill, since it is impossible to remove the sensor without removing the wipers and frill.
Checking the Clutch Sensor
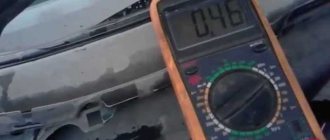
To check what position the sensor is in, you will need an ohmmeter. Next you need to follow this algorithm:
- the rod lock is moved to the extreme right position using a flat screwdriver;
- ohmmeter probes are connected to terminals 3 and 4;
- if the rod is in the free position, the resistance value should tend to infinity, that is, the circuit is in an open state;
- the circuit closes; if you press on the rod, the ohmmeter will show a resistance of about zero.
If the readings are incorrect, the sensor has failed and requires replacement.
Lada Vesta steering wheel reupholstery
Many owners of basic cars do the reupholstery of the Lada Vesta steering wheel with their own hands. The leather version looks solid.
To install a braid made of high-quality, expensive material, you will first need to remove the steering wheel.
See the sequence of actions above.
- If control keys are present, remove them.
- The braid is applied so that the seams match each other exactly.
- Along with the braid, the set contains clamps. They fix the position of the braid. Mark the position of the recesses.
- Using the knife included in the kit, easily make indentations on the surface. The recess size is 3-4 mm. Same depth. Several such slits are required to remove all the edges of the braid.
- Check the alignment of the joints again.
- Apply the adhesive composition to the back surface of the steering spokes, and in the same area on the inner surface of the leather braid.
- After 5-10 minutes we glue the surfaces. Using the same method, we connect all parts of the leather braid.
- Take a piece of thread from the kit no longer than 80 cm. Wind the thread into the groove of the seam. Thread will be needed to fasten the lower steering parts.
- Then a piece of thread 1-1.3 m long is required. It is needed to sew together the most voluminous section - the upper part from one iron rod to another.
- Use a needle to thread the thread through the holes, removing it to the front surface.
- Burn the ends of the thread with fire.
- Hold the ends of the braid with your hands and adjust the tension with a thread.
- Use a small screwdriver or knitting needle to secure the thread in each stitch of the selected stitch.
- Having stitched to the edge of the second metal rod, secure the thread in the same way.
- When the entire braid is stitched, tuck the edges of the material into the prepared holes.
Do-it-yourself reupholstery is not a complicated, but labor-intensive process that cannot be rushed and requires care.
Replacing and adjusting the sensor
If you need to replace a faulty part on a car with a manual transmission, just install a new one. If the gearbox is robotic, then in addition to replacing the element itself, adjustments will need to be made.
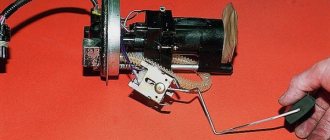
The dismantled sensor must be measured - the rod should protrude at a distance of 17 to 18 millimeters. There is a special marking on the rod itself. It also helps with navigation. Usually it is required that the rod extends three or four notches.
The rod can be adjusted by gently pulling the end. If during the process the rod completely separates from the sensor or it is necessary to pull the end three or more times to achieve the desired values, then the element is faulty and a new part must be purchased.
What does adjustment help with?
If the element is in working order and the adjustment is carried out correctly, positive changes will be noted:
- the movement of the machine will become smooth;
- the car will not jerk when changing gears;
- There will be no shaking when releasing the gas.
The adjustment process does not take much time and is easily carried out on your own without the involvement of specialists from car services.
If after installation the rod is not held at the specified distance, you can try to fix it using a small piece of plastic tube or a spring of a suitable diameter.
If after adjustment the car behaves as before, it is recommended to contact a service center and carry out diagnostics.
Clutch pedal position sensor VAZ
On the latest models of VAZ cars equipped with an electronic gas pedal, a clutch pedal position sensor is installed. Let's consider why it is needed, the principle of operation and possible malfunctions.
Where is the clutch sensor installed?
The clutch pedal position sensor on VAZ cars is installed directly on the clutch pedal bracket; it can be seen by looking under the steering column.
The clutch pedal position sensor is one of the elements of the engine management system with an electronic gas pedal. This sensor provides a more flexible control scheme for engine modes. It simplifies the process of starting to move, eliminates “drops” and jerks of the car when changing gears in the manual transmission, and also allows for a reduction in fuel consumption.
By providing information to the engine controller about the moment the clutch is engaged and disengaged, the clutch pedal position sensor allows it to reduce or increase engine speed at the right moment, as well as adjust the ignition timing.
The clutch pedal position sensor is an ordinary limit switch with two positions - “on” and “off”.
Its normal position is open, that is, it turns on only when the clutch pedal is pressed.
The following symptoms may indicate a malfunction of the clutch pedal position sensor:
- car "pecks" when changing gears
- a sharp increase or decrease in engine speed when the clutch is disengaged
Also, if a malfunction occurs in the clutch pedal position sensor, error 0830 “Clutch pedal sensor error” is recorded in the engine controller and the “Check Engine” light in the instrument cluster turns on.
Error 0830 is detected if the engine controller does not receive a signal from the clutch sensor:
- within 2 seconds after changing gear while driving
- after four gear changes at speeds above 10 km/h and engine speeds above 1000 rpm
The main reasons for error 0830:
- malfunction of the clutch sensor itself
- short circuit or open circuit
- Incorrect clutch pedal height
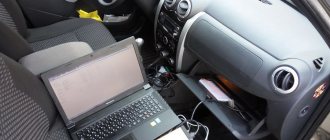
We encountered error 0830 while preparing the material “How to get there without a clutch?” We recorded video instructions on how to change gears without a clutch. After several gear changes without disengaging the clutch, the “Check Engine” light came on on the panel, which went out only after several dozen gear changes in normal mode.
Clutch sensor price
On many VAZ cars with an electronic gas pedal there is a connector for this sensor, but there is no sensor itself. It is not clear whether they forget to install it at the factory, or whether careless dealers remove it. The second option is also quite possible, since this sensor is still in great short supply. It costs an average of 350 rubles, but finding it on sale is almost impossible.
There are two types of clutch pedal position sensors for VAZ cars:
21214-3720020-02 for Lada 4×4 cars with electronic gas pedal
1118-3720015 for Kalina, Grant and Priora cars with an electronic gas pedal.
They are not interchangeable with each other.
It would seem like a simple sensor, but how much it can complicate the life of an ordinary car owner.
The widespread computerization of cars, adapting to consumer demand, non-stop pushes the best engineering minds to new discoveries. Every year, driving cars becomes more comfortable and safer - and all this thanks to all these innovations. Today we will talk about such an element as the clutch pedal sensor. There are two versions of the clutch sensor, which are not fundamentally different from each other - one is used in a robotic gearbox, the other in a manual one. What does the clutch sensor do? The answer is quite simple - the electronics send a signal to the control unit so that it, in turn, synchronizes the rotation of the engine crankshaft and the gearbox input shaft.
How to bleed the clutch on a Lada Vesta
To increase the efficiency of the clutch mechanism, a channel in the hydraulic drive is used:
- Near the manual transmission of the Lada Vesta we find the hydraulic drive fitting. Remove the protective cap.
- We put a hose on the fitting, the other end of which is lowered into an empty container to drain the waste.
- We recess the bracket and pull out the tube.
- After we have depressurized the system, liquid will flow from the hose.
- At the same time, check the fluid level in the expansion tank. We do not allow the level to fall below o. We make up for the missing amount.
- We pump the system until the liquid turns light brown and there are no air bubbles in the composition.
Approximate volume for prevention: 1.5 liters.
Adjusting the clutch on a manual Lada Vesta is somewhat simpler than the robotic version. If you have AMT, then it makes sense to contact a service station for diagnostics by specialists.
Conclusion
Adjusting the clutch pedal travel is easy. Even an inexperienced car enthusiast can cope with the task. Follow the above instructions strictly and success is guaranteed.
In case of mechanical damage to the sensor (DS), replace it with a new one. There are two models on the market: domestic and French manufacturers. Both parts are of high quality, with original catalog numbers. The final choice is up to the car owner.