The main task of the clutch is to temporarily separate (uncouple) the engine and transmission and smoothly connect them. These operations are necessary while driving to control a manual transmission: shifting gears, stopping, braking, starting the car.
If the adjustment of the free play of the clutch pedal is disrupted, the car stops moving normally, various problems arise - it becomes impossible to move away, gears are switched with a crunch, and the car may also slip and accelerate poorly.
How to adjust the clutch. General leadership
Checking the clutch cable clearance . Depending on the make of the car, the cable play on a mechanical clutch can be checked and adjusted in different ways.
There are three main ways:
- changing cable length when the clutch lever is operating;
- measuring the distance between the adjusting nut and the fork;
- measuring the distance between the adjusting nut and the cable stopper.
Some vehicles can use either of these methods. But the measurement must be carried out between the points given in the car manual or in the operating instructions.
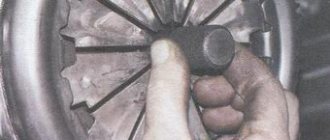
Checking and adjusting the clutch fork . The vehicle must be securely raised on ramps or stands. We also use the handbrake to lock the wheels.
- We find the clutch cable coming down from the clutch pedal and protruding through the clutch control lever. There are threaded bushings with two nuts that are located on the protruding end of the cable.
- The clearance has a difference between the measurement when the shift lever is at rest and when it is in the inward position.
- To measure it, hold a ruler near the cable between the control lever and another reference point, such as the edge of the clutch housing.
- Gently press the lever all the way, align the ruler with its end and measure the distance between the lever and the reference point.
- Pull the lever outward and measure the distance again. We find the difference between the two measurements and compare it with the specified data from the manufacturer.
- If the gap needs to be adjusted, loosen the union nut on the threaded bushing, which is popularly called a lock nut (on some VW cars this is a wing nut).
- Next, turn the adjusting nut forward or backward to decrease or increase the gap, checking the measurement as necessary.
- Tighten the locknut and press the clutch pedal several times. Check the gap again and adjust if necessary.
On some vehicles with underbody protection, it can be very difficult to reach the locknut and turn it if necessary. In this case, you will need a special wrench that has a socket and a universal disk to perform this procedure.
Gap measurement . We measure the distance between the operating lever clutch and a reference point, such as the edge of the clutch housing. The first operation is carried out with the control lever at rest, and then when it is in the pressed position. The difference between these two measurements is the amount of free play of the lever on the cable. This is the gap in the clutch cable.
Another way to check and adjust . We find the place where the clutch cable protrudes beyond the fork and the nuts on the threaded bushing.
- Use pliers to unhook the release spring from the clutch fork.
- We take the threaded end of the cable (if necessary, you can take pliers) and tighten it to the possible level, which will allow you to raise the clutch pedal to the limit.
- You can measure the distance between the adjusting nut and the inner edge of the clutch fork coupling with a ruler. This is the clearance measurement.
- We compare the data obtained with the figure specified in the vehicle’s operating instructions.
- If there is a need for adjustment, this can be done as described above.
Checking and adjusting the clutch cable . This method is used on some older cars.
- In the fully raised position, use a block of wood to jam the clutch pedal.
- Having found the location of the clutch cable, we find where the outer cable is pressed against the edge of the housing.
- The locknut and adjustment nut are located at the end of the cable, next to the retaining bracket.
- Hold the outer part of the cable and pull it back until it stops, which will expose the inner cable.
- Using a ruler, measure the length of the exposed part of the cable between the end of the cable and the adjusting nut. This is the clutch cable clearance measurement.
- We compare the obtained data with the data specified by the manufacturer and, if necessary, adjust.
- Loosen the lock nut and turn the adjusting nut either back or forward to obtain the optimal value.
- Tighten the locknut and measure again.
Checking and adjusting the hydraulic clutch . Many hydraulic couplings are self-adjusting, but some designs allow manual adjustment to compensate for friction plate wear.
- If the fluid coupling is adjustable, the pushrod on the slave cylinder will be threaded and equipped with a lock nut.
- We lift the car securely onto the ramp or axle stands.
- We climb under the car and find the clutch slave cylinder and its adjustable pusher.
- Use pliers to unhook the release spring from the fork. Push the clutch fork forward until it stops.
- Holding it in this position, use a ruler to measure the distance between the end of the working cylinder body and the clutch fork.
- We release the fork, and then measure the distance again while it is at rest.
- The difference between these two measurements is the clutch clearance. We compare this with the number given in the car manual and adjust it if necessary.
- The locknut and adjusting nut are located on the threaded end of the pusher. Loosen the locknut.
- We turn the adjusting nut screw towards the working cylinder to increase the clearance, or towards the clutch fork to reduce it. When the measurement is correct, tighten the locknut.
- We check it again and, if necessary, adjust it again.
How to adjust the clutch on a VAZ 2110, 2111, 2112
1). Place the car on a level surface and apply the parking brake. Open the hood and disconnect the negative terminal from the battery.
How to change and adjust the cable yourself?
We figured out why the pedal creaks, now let's talk about adjusting the clutch on the VAZ 2114.
When there are problems in the functioning of the system, they must be eliminated. One of the most common problems is a broken cable. Therefore, if the pedal fails, then before properly adjusting and tightening the cable, it must be changed.
If you are experiencing problems with your pedal squeaking, check out the video that demonstrates the procedure for lubricating the device. Filmed by VikiNow.
To adjust the tension and replace the cable, you will need the following devices and tools:
- the cable itself;
- Litol lubricant;
- set of open-end wrenches;
- ruler;
- pliers.
To repair the cable, you need an assistant:
- Open the hood of the car and remove the bolts securing the battery terminals.
- You need to disconnect the connected cable from the pedal itself. Using a 17mm wrench, unscrew the nuts securing the bottom of the product. Then remove it from the retainer and remove it from the plug installed in the engine compartment.
- Further steps are carried out in the car interior. Move the carpet away from the driver's seat. There is carpet under the pedals, it needs to be removed. This will allow you to find the place where the cable is attached to the pedal; the clamp must be disconnected from it. There will be no problems, since this element is simply removed from the hook.
- After which the cable itself is removed from the seat. To do this, the device must be pushed away from you towards the engine compartment. When the product is difficult to push out, most likely its fastening has soured. Then lubricate the retainer with WD-40 and work it out a little, moving it in different directions. If you have an assistant, while you are developing the cable, he can pull it from the side of the engine compartment, this will speed up the procedure.
- After dismantling the product, a new one is installed. Before this, the bushing that secures the cable is removed from the clutch pedal. If its condition is poor, it is worn out, it is advisable to replace the bushing. The retainer itself is lubricated with Litol before installation.
Channel Sdelaj Sam! Pljus interesting! A video has been released showing the procedure for replacing a product with your own hands.
After repairs, the cable is adjusted in height. If you do not adjust the stroke adjustment and adjust it, you will have difficulty changing gears. Before tensioning and adjusting the cable, it is recommended to test drive the machine. It will allow you to figure out how to properly tighten the pedal - raise or lower it.
Position tension diagram:
- If the car begins to move at the end of the pedal stroke, open the hood and locate the cable attachment location. There are two nuts here that can be unscrewed with a 17mm wrench. To reduce the free play of the pedal, that is, lower it, the bolt located inside the bracket is unscrewed. The outer screw must be tightened with a wrench.
- If, when starting to move, you realized that the free play should be increased, that is, raise the pedal, then the inner screw on the metal clamp should be tightened, and the outer one should be loosened. If there is rust on the free play adjustment nuts, it must be removed using WD-40. If there is no fluid, motor oil or brake fluid is used.
- If the adjustment is successful, check the free play with a ruler. If the actions are performed correctly, its length will be from 12.5 to 13.5 cm. This distance will be directly from the pedal itself in the car to the floor.
The VikiNow channel published a video showing the process of changing the cable and further adjusting its free play.
Checking work
If everything was done correctly, then you should make sure that the task was completed correctly. To do this, you need to press the pedal all the way several times, then measure the free play again. After pressing, it may go astray. If this happens, adjust the stroke again. Ideally, the clutch should engage in the middle.
How to check whether all actions were performed correctly:
- The VAZ 2114 car is installed on a flat horizontal surface.
- The handbrake lever is activated.
- The machine engine starts, the shift lever is moved to the first gear position.
- Try to start, but don't press the pedal. When all the setup steps have been completed correctly, the machine’s engine will stall. If the car starts to move, the mechanism needs to be re-adjusted. In this case, all the steps described above are performed again.
The clutch drive adjusting nut is located in the engine compartment of the car on the drive cable sheath, inserted into a special bracket mounted on the gearbox housing. It is protected from unscrewing by a lock nut located there.
Holding the adjusting nut with one 17 mm wrench, use another 17 mm wrench to loosen the lock nut a few turns.
Adjusting the clutch cable VAZ 2114
We rotate the adjusting nut clockwise with one key, holding the locknut with the other - this is to increase the clutch pedal travel (the pedal will rise) or counterclockwise to decrease its travel (the pedal will lower to the floor)
How much to reduce or, conversely, increase the pedal stroke is determined based on the results of the check described above.
Lightly tighten the locknut
Press the clutch pedal several times and check again
If the resulting figure does not fit within the norm, we carry out the adjustment again. And so on until we achieve the required result.
After completing the adjustment, tighten the locknut
How to adjust the clutch on a VAZ 2108, 2109, 2199
1). When the pedal is released, you need to use a tape measure to measure the distance from the floor to its lower edge. It should be within 18-20 centimeters.
2). Next, press the pedal with your hand all the way to the stop and measure the distance from the floor, again to the bottom edge. It should be within 6-7 centimeters.
3). From the first result obtained, 18-20 cm, we subtract the result of the second measurement, 6-7 cm. As a result, we get 13-14 cm. For cars of the VAZ 2108 and VAZ 2109 brands, this value is considered normal.
4). If this value differs in one direction or another, you will need to readjust the clutch. That is, we either tighten it up or weaken it.
5). We hold the adjusting nut with one wrench, and with the second we slightly loosen the lock nut.
6). By rotating the adjusting nut clockwise, we increase the pedal stroke, and therefore it should move downward.
7). We take measurements and if the result is satisfactory, we tighten the locknut and the work can be considered complete. But if not, then you will need to do this operation again.
Video
How to adjust the clutch on a Lada Kalina?
1). Open the hood and remove the air filter. To do this, unscrew the bolts securing the air filter housing to the hood. Then disconnect the mass air flow sensor. Next, unscrew the clamp and remove the air filter housing.
2). Pull out the cable by the threaded end to the maximum possible distance. In this case, it will be necessary to overcome the resistance exerted by the spring attached to the PS.
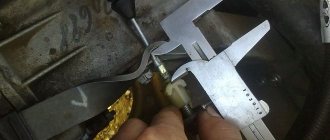
3). Holding the cable in this position, using a caliper we measure the distance between the plastic leash and the fork lever. It should be 2.7 cm.
4). If the distance does not match, then using an open-end wrench, we either tighten or loosen the tension nut.
5). Next, we survive the clutch pedal again and take measurements again. If it was not possible to achieve the desired result the first time, you can repeat it again.
6). After the distance has been adjusted, install the air filter in place.
Video
How to adjust the clutch on a VAZ 2107
To adjust the clutch of the VAZ 2107, you need to drive onto a pit or overpass. But, if this is not possible, then we install the car on supports using a jack, observing all safety measures.
1). The free play must be adjusted so that the distance from the top position of the pedal to the stop is 0.4 - 2 millimeters. Otherwise, you will need to make adjustments. Using a 10mm wrench, unscrew the locking nut slightly and by rotating it set the required gap.
2). If the VAZ 2107 engine system provides for fuel injection, then you will need to remove the protective shield.
3). Before applying the lubricating mixture to the threads of the pusher, clean it from dirt.
4). We check the stroke of the pusher, since the stroke of the release bearing depends on it. Push the fork back all the way, the pusher stroke should be four to five millimeters. Since significant force is required, it is better to disconnect the spring from the lever.
5). The stroke of the pusher is adjusted using a 17 key. It is also necessary to restrain the pusher adjusting nut from turning, but using a “13” wrench, loosen the lock nut.
6). Fixing the pusher using the “8” key, using the “17” key we set the required 4-5 millimeters.
7). We fix the locknut.
 . We check the pedal travel, which should be approximately 30 millimeters from its top position until it turns off. If necessary, you can perform the operation again.
— , , .
| 2110/2111/2112 | + 08:53, 15 448 |
| 2112 2110 | 04:57, 15 96 |
| 06:47, 14 78 | |
| + 07:36, 10 56 | |
| 2110 (1380) | 18:55, |
| 2110 2110-1602210 | 16:51, 2 AUTOOPORA |
| 2110 00000003891 | 23:05, AUTOPROGRESS.MSK |
| 2110 () 21100160221000 | 20:43, AUTOPROGRESS.MSK |
| 2110 . ( ) | 07:51, 21 MGM |
| 2110 (AT) (10) | 07:49, 21 MGM |
| 2110 (-) (10) | 07:46, 21 MGM |
| 2110 () (10) | 07:44, 21 MGM |
| lada carlota (2108, 2109, 2115) 110 TRW/Lucas. GCC3123 | 13:37, —… |
| 2110 () Belmag. BM1380 | 07:25, —… |
| 2110. RR05751 | 01:44, —… |
| 2110 () LADA. 21100160221000 | 01:32, —… |
| 2110 ( ) . 21100160221000 | 01:26, —… |
| 2110 . 00000003891 | 23:16, —… |
| 2110 ( ) LADA 21100160221000 | 11:54, 21 Jc-Market |
| 2110 () (20) | 22:31, 17 Autoclub02 |
| 2110 () (10) | 22:31, 17 Autoclub02 |
| 2110 (-) (10) | 22:31, 17 Autoclub02 |
| 2110 (AT) (10) | 22:31, 17 Autoclub02 |
| 2110 21101602210 | 19:09, 174 |
| 2110-1602210 2110 21101602210 | 19:09, 174 |
| 2110RR05751 | 03:11, 22 -PN1 — … |
| 2110 ( ) 21100-1602210-00 | 03:10, 22 -PN1 — … |
| 2110 () BM.1380 | 03:08, 22 -PN1 — … |
| 2110 3891 | 03:07, 22 -PN1 — … |
| 2110 () 21100-1602210-00 | 02:37, 22 -PN1 — … |
| 2110 | 19:51, Autoko - ... |
| 2110 | 19:33, Autoko - ... |
| 2110 21101602210 (132321) | 20:56, «… |
| 2110 21101602210 (132318) | 20:56, «… |
| 2110 21101602210 (132320) | 20:56, «… |
| 2110 21101602210 (132319) | 20:56, «… |
| 2110 | 07:55, |
| 2110 | 07:55, |
| 2110 () | 07:55, |
| 2110 (-) (10) | 08:13, 21 Arfacar |
| 2110 . ( ) | 08:13, 21 Arfacar |
| 2110 (AT) (10) | 08:13, 21 Arfacar |
| 2110 () (10) | 08:13, 21 Arfacar |
| 2110 () BM1380 | 02:19, 38 |
| 2110 LADA 21100160221000 | 02:01, 38 |
| 2110 "" LADA 21101602210 | 00:26, -TODUX |
| 2110 () LADA 21100160221000 | 23:12, -TODUX |
| 2110 00000003891 | 22:55, -TODUX |
| 2110 ( ) 21100160221000 | 22:53, -TODUX |
| -2110. LADA 21101602210 | 22:49, -TODUX |
How to adjust the clutch on a Gazelle?
How to adjust the clutch on a Lada Priora?
There are two ways to measure the required position of the cable.
The first method is to orientate along the clutch pedal, the movement of which should be within 125 - 123 millimeters. But the second method is to measure the length of the cable coming out of the casing. When released, it should be 27 millimeters.
In most cases, drivers use the first option, which is explained by greater reliability. It is the procedure for the first option that we will describe in detail.
1). Using a 17mm wrench, unscrew the locknut that secures the cable casing in the box socket.
2). Next, in order to achieve the required pedal travel in the mentioned range, unscrew or tighten the second one.
3). Using a threaded plastic end cap, we correct the sag of the cable. We fasten without tightening the nuts and check for softness of gear engagement. If the clutch is adjusted correctly, the nuts can also be fixed.
How to adjust the clutch on a Lada Granta?
How to adjust the clutch on a VAZ 2114, 2115
1). Tighten the handbrake and remove the battery for safety.
It wouldn't hurt to know
What do most owners of new Lada Priora do? Naturally, they treat the body with Movil or something similar against corrosion; they don’t have any more problems at the initial level. However, there were complaints about squeaking when pressing the clutch pedal; sometimes it was present when the engine was warm, sometimes only when it was cold - the essence is that there is a problem.
Of course, everyone immediately starts reading the “primer book” on how to correctly adjust the clutch on their Priora, which sometimes helps, but the fact of the matter is that sometimes. After this, owners can try several more methods, after which the squeak may disappear:
- Replace the drive cable, some drivers praise the “tenth”.
- Check the presence of a spring in the automatic tension mechanism; sometimes the effect can be achieved after replacing the standard part with a spring with greater elasticity.
- A certain percentage of car enthusiasts get rid of the crackling noise by lubricating the fork and the plastic cable nut.
- Lubricate the installation site of the plastic bushing on the pedal bracket with lithol.
- Remove the boot from the fork lever and lubricate the gearbox input shaft with graphite grease from a can.
It is worth considering another effective method, shown in the video, which is used by experienced car enthusiasts. Its essence is as follows:
- Disconnect the mass air flow sensor and remove the air filter.
- Remove the clutch release rod plug.
- Release the cable from the clutch fork.
- Pour 30-40 ml of gear oil from a syringe.
- Move the fork back and forth 10-15 times.
- Reinstall the cable, plugs and filter.
How to adjust the clutch on a Niva?
Conclusion
Although the adjustment work is not a difficult task, it requires some attention and patience. However, with the right approach, success will not keep you waiting. Good luck with the renovation.
A vehicle often requires adjustments to various controls and systems. For example, you may need to adjust the clutch pedal, which greatly affects the quality of driving a car with a manual transmission. This adjustment is quite easy to do without visiting service centers, and does not require any special knowledge or tools.
Clutch cable arrangement
According to experts in mechanical engineering, one of the important components in a car with a manual transmission is the clutch cable. It is in a special shell that protects it from mechanical impact, and connects the fork with the pedal. For example, you pressed the pedal, the cable transferred the force to the linkage, which helped the fork change position and also contributed to the release of the clutch.
Foreign manufacturers rarely equip vehicles with such a mechanism. They prefer to use hydraulics, which are less problematic in operation. For domestic automobile enterprises, the use of this device is common practice. Although such a system has a number of disadvantages that are known to all drivers of Russian cars.
During operation, the clutch cable requires periodic adjustment because the drive wears out during operation. For example, a break occurs or rust appears. In this regard, the owner of a car with a manual transmission should know what to do if the situation described above arises.
Next, you will learn how to adjust the cable yourself. Before that, let’s look at what this mechanism is. One end of the cable is attached with screws to the pedal. The second - to the special bushing located in the shield. At the same time, it is screwed to the pedal thoroughly, but not so tightly to the bushing that the device rotates on the axis without any problems.
When is clutch adjustment needed?
It is necessary to pay attention to the behavior of the car when changing gear. If, at the beginning of the movement, jerks or slight impacts are felt, or noise is heard when changing gears, then you need to check the free play of the vehicle's clutch pedal.
To do this, the engine starts and the clutch pedal is gradually released from the previously released state. If the car starts moving immediately after the pedal starts to be released, it will not have free play. If the pedal is released all the way, but the car does not move or begins to move only at the very end, then it means that the pedal travel limit has been exceeded.
Thus, if there is a violation of the clutch pedal free play adjustment, normal movement of the vehicle becomes impossible. Problems arise - you can’t get going, you can hear a crunching sound when changing gears, the car slips and has poor acceleration.
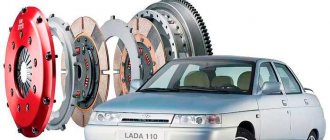
Clutch in a car and its purpose
The clutch serves to enable disconnection and subsequent implementation of a rigid connection between the internal combustion engine and the gearbox, that is, it is necessary to transmit torque from the engine to the gearbox shafts, from where the torque is transmitted further to the wheels.
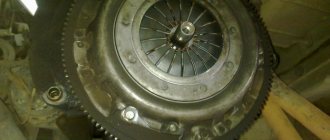
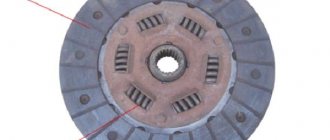
At the same time, the clutch in a car is a complex mechanism consisting of several parts. The main one can be considered the clutch disc, which interacts with the engine flywheel, as a result of which torque is transmitted.
When to press against the flywheel and when not, the driver himself controls by pressing the clutch pedal (turning the clutch on and off). If the disk is pressed, then torque is transmitted. When the pedal is depressed, the disc does not press.
The pedal has three positions:
- extreme upper;
- extreme bottom (disc pressed);
- average, when at a certain moment the disk and flywheel begin to interact.
Before and after the middle position, the pedal has free play. On different machines, the middle position may also be different. But the driver can adjust it to suit himself. In addition, adjusting the clutch pedal travel is important for driving safety and extending the life of mechanisms and individual machine parts.
How to determine the amount of free play?
Determining the amount of free play is carried out using a ruler or caliper, the main thing is that they fit in size:
- A clearly visible object with a sharp end, for example, a match, is attached to the middle of the pedal sole. This is done in order to facilitate the measurement process.
- The ruler is installed in the plane of movement of the pedal support pad so that changes in the location of the latter can be easily monitored using the scale marked on the ruler.
- Lightly press the pedal with your hand, and then carefully move it until a sharp jump in resistance to the force occurs. After this, use a match to mark the distance traveled by the pedal in millimeters.
After receiving the measurement results, it will be possible to determine whether the clutch pedal requires adjustment or whether it can be done without it.
Reference! For different car models, the value of this indicator will be different. For example, for a VAZ-2101 it will be 35-40 mm, and for modern class B cars this parameter should be in the range from 5 to 14 mm.
Thus, the specific amount of pedal travel for a certain type of car must be checked in the operating manual (the so-called “Murzilka”).
Adjusting the free play of the clutch pedal
Clutch drives can be either cable or hydraulic. Therefore, their adjustment is carried out in various ways.
Adjusting the drive with a cable
If the clutch in the car is mechanical, it is necessary to adjust the cable (cable drive). To do this, you need to get to the adjusting bolt located in the engine compartment. First, unscrew the lock nut, and then begin to rotate the adjusting nut. The result is checked with a new amplitude measurement (after pressing the clutch pedal 3 times).
The adjustment itself is carried out as follows:
- Using measuring instruments, they find out what distance separates the clutch release fork from the end of the damper. It should be no more than 8.6 cm. In this case, the error should not be more than 5 mm, either in the direction of increase or decrease.
- Find the distance at which the cable tip is located from the end of the damper. This figure should be about 6 cm, with the same error as in the previous case.
- If the distance does not correspond to normal, the cable is adjusted using an adjusting nut, which is turned in one direction or another until the desired result is achieved.
- Ultimately, the clutch pedal is pressed several times, and then new distance measurements are taken. If necessary, adjustments are made again. After this, the locknut is finally tightened.
Sometimes the cable fails completely and may need to be replaced. In a garage environment, this is not as difficult to do as it might seem to a beginner. All you need for this is to purchase a spare clutch cable, as well as a set of keys and screwdrivers.
To begin, remove the plastic parts of the car floor in the area of the pedals. This is necessary in order to have easy access during repairs to the place where the cable is connected to the pedal.
Then you need to perform the following manipulations:
- The tip of the clutch cable is disconnected from the release fork.
- Then I pull out the cable sheath damper from the mount, which is located in the gearbox housing.
- After this, the cable tip and the clutch pedal are disconnected.
- Pull out the clutch cable.
To install a new cable in place, all the above steps are performed in reverse order.
Adjusting the hydraulic drive
Before adjusting the hydraulic drive, you must first make sure that there is no air in the system. This is checked as follows: if there is no air in the system, when you press the clutch pedal it should not be soft, and after the foot pressure is removed from the pedal, it should return to its original position.
With a hydraulic clutch, the full travel of the pedal is adjusted from inside the car using a stop screw. In this case, the free play should be no more than 15 mm. The adjustment is made by rotating the master cylinder pusher rod. After all the settings have been made, you need to tighten the locknuts tightly.
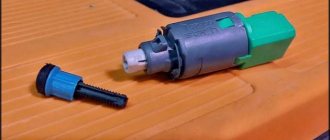
Transplantation
The cable loop suitable for K7 engines contains several parts. The assembly itself is disassembled, and the boss attached to the cable is sawed off.
Don't be afraid to saw the tip
The center of the boss can be drilled out, although the hole is present from the factory. The main thing is to make a countersink, otherwise it will be difficult to solder the cable.
Tip installation
The solder should be recessed into the recess.
Now let's learn how to deal with the T-shaped tip. In principle, the same technology is used:
- Drill out the cable fastening;
- We carry out countersinking;
- We fasten and solder the new cable.
All actions are explained in the photo.
Preparing T-Tips
Steel solders well. You just need to use active flux. Soldering iron power – 100-120 watts.
Step-by-step procedure for tensioning the clutch cable on a VAZ-2114
In order to change the length of the clutch cable, we only need a wrench.
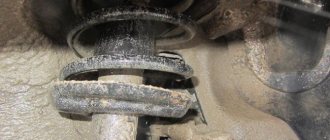
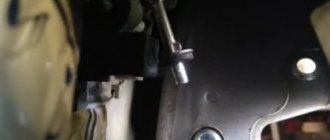
1. First of all, open the hood and look for the nuts on the gearbox housing located at the very end of the adjustment unit. Two 17mm bolts.
The clutch cable is marked with a red marker.
2. Next, loosen the locking nut, and then change the position of the adjusting nut, tightening or unscrewing it to the required length.
The nuts will unscrew easily with any pressure.
3. When the nut is screwed on, the clutch pedal will rise, increasing the length of its distance, and if it is unscrewed, the distance to the floor will decrease, pressing the pedal closer to the floor.
The arrow marks the nut for fixing.
There is no doubt that such work is much easier to carry out in the company of an assistant.
4. Upon completion of all adjustment work, the locking nut is tightened as close to the adjusting nut as possible.
When carrying out such procedures, make sure that the clutch cable itself is intact, that there is no damage or scuffing on its body and shell, and that it moves freely inside the elements supporting it. If something like this is discovered, then it is best to replace the cable with a new one, since the wear of the supported one will only increase, and it is impossible to talk about the reliability of the work performed.
Checking work
After you have completed this work, you need to check the correctness of the work performed.
- First, measure the travel of the clutch pedal.
- With the engine turned off, depress the clutch pedal several times and return it to its place.
- Next, we take a new measurement and clarify the received readings.
- If they have not changed compared to the first measurements, then the work has been completed, correctly, and the first stage of verification can be considered completed.
- And if they differ from the first indicators, it means that the locking nut was not tightened tightly, and the adjustment process must be carried out again.
There is one rule among car enthusiasts! A properly adjusted clutch should begin to engage approximately halfway through the pedal stroke.
The following test can definitively indicate the serviceability and correctly adjusted clutch:
- The car must be placed on a flat surface, the handbrake must be turned on, and the engine must be running.
- Next, we turn on the gear and try to start moving.
- If at this moment, when the clutch pedal is not pressed, the car stalls, this means that the adjustment was made correctly.
- And if this does not happen, the car is running in gear with the clutch pedal not pressed, then this will indicate clutch slipping, which will need adjustment.
Replacing the clutch mechanism
A complete replacement of the mechanism is required only if the friction device is critically worn or seriously damaged.
To remove the clutch you will need:
- drive the car onto a lift or inspection hole;
- remove the front left wheel, air filter and battery;
- unscrew the wires and cables coming from the gearbox;
- remove the gearbox and engine mount;
- next you will need to unscrew all visible bolts holding the box in place;
- carefully pulling out the gearbox, remove it and place it on previously prepared boards;
- On the dismantled unit, unscrew the clutch basket and all additional parts.
The new basket should be installed with a special guide, which will allow it to be secured evenly.
Design
The mechanical drive on the VAZ-2114, despite the fact that it has the least simple design, is in no way inferior in reliability to its hydraulic counterpart. Its system consists of a cable adjustable in length, sealed in a special anti-corrosion sheath, and the clutch pedal itself located in the car's interior, which, through free movement, is designed to transmit the pressing force to the clutch fork.
Despite the fact that such a scheme is simple, in general it is quite reliable.
Clutch diagram
A new product in the form of a clutch cable for VAZ-2114 cars helped to avoid all the problems that all owners of classics encounter. First of all, this refers to the leakage of hydraulic fluid from the system, and as a result, loss of control over the car. It would also require work to remove air from the clutch system after repair.
At the same time, periodic checking and adjustment of the clutch pedal has remained the same.
Why is it necessary to adjust the cable travel?
This procedure is necessary so that when the pedal, and with it the clutch cable, reaches certain values, the most squat pressing of the flywheel with the basket to the driven disk is made, at the moment when its operation is necessary. At the same time, thanks to the precise adjustment of this drive, the clutch is released at the moment the clutch pedal is released.
Note! During operation of this system, when the lever is in the neutral position, or when it is turned on, no extraneous sounds or crackles should come from the gearbox housing.
You can monitor the condition of the clutch, preventing such a situation from occurring, visually by positioning the clutch pedal relative to the floor of the car, using only a ruler.
Values
The optimal values should be from 125 to 140 mm , when measuring readings first with the pedal pressed and then with the pedal released. The maximum value that is allowed when measuring such indicators is 160 mm , and if they exceed these values, then this will mean severe wear of the friction linings, and therefore, after adjusting it, the clutch itself may soon need to be replaced.
We measure the result along the bottom edge of the pedal - in the photo the result is normal.
Causes of breakdowns and solutions to problems
Domestic automakers are not particularly reliable and durable in their parts and assemblies. It is not surprising that many car components quickly fail and are no longer suitable for further use. All this causes many car owners to have characteristic problems in the operation of the clutch mechanism on their car. However, you should not blame only car manufacturers for all the problems that arise, since many malfunctions are the result of careless operation of the car by the car owner himself.
| Cause | Solution |
| Insufficient pedal travel causes the clutch itself to “drive” | To eliminate this defect, it is necessary to regulate the mechanism drive itself. Car service station professionals can help solve this problem. |
| Clutch pedal sticking | This problem usually occurs when parts of the drive mechanism are damaged. This can be resolved by replacing the damaged part. |
The cable should be adjusted as often as possible. The fact is that such preventive work helps to avoid a number of problems and, accordingly, allows you to save a considerable share of the financial resources of car owners. Normal operation of the clutch mechanism is the key to safe operation of the vehicle.
The principle of clutch adjustment
If, after a preliminary check, you have determined that the clutch cable needs adjustment (that is, tightening - approx.), then do not be alarmed, since the process of such work is not complicated and will not require any additional effort.
Clutch cable tension is adjusted by tightening it under the hood
Such a process consists of simply changing the length of the cable and its sheath from the adjustment unit, due to which its indicators can change both to the smallest and greatest extent.
As you might have guessed, if the length of the cable is reduced, then the pedal stroke will be less, the same applies to increasing the stroke, all that remains is to achieve those cherished pedal stroke indicators of 12.5 centimeters.
Malfunctions and their symptoms in the clutch drive of front-wheel drive VAZs
If the clutch cable is in poor condition, or has already failed, this is immediately noticeable when you try to engage the clutch to operate the gearbox. The most common breakdowns are:
- break of the cable itself;
- ruffling of the clutch core body;
- failure of the drive fastener to the fork or pedal.
If the fastener or cable breaks, the pedal falls freely, and if the core becomes ruffled, on the contrary, pressing becomes very difficult. If these signs appear, it is necessary to urgently check the drive.