Many car owners of domestic cars, faced with problems with headlights, try to repair this part themselves, or install additional options. The optics for the VAZ 2110, currently on the market, will not only improve the appearance of the car, but also significantly improve driving safety.
Lighters offered by different manufacturers can fit into the concept of the tenth family and advantageously emphasize those points that make a car more attractive.
Finding high-quality optics for this model of domestic car is not so easy. Often these parts come to our market from China and Taiwan. This is especially true for xenon headlights and lamps. They are not distinguished by their quality of workmanship, and their durability, according to the results of inspections, is inferior to standard factory copies. High-quality illuminators cost a lot, but have a long service life.
You won't have to change them often by buying new ones. But if you don’t want to buy new optics, you can modify the one you have. You can do this yourself, because this work does not require any special knowledge or skills.
The headlights on the VAZ 2110 differ not only in technology, but also in manufacturer.
Do-it-yourself VAZ 2110 headlight repair video
It is extremely rare to replace a headlight on a VAZ 2110-2112 car, and in most cases this need arises in the event of an accident or other damage in which it is no longer possible to restore the headlight unit. You can remove the headlight yourself and to do this you will need the following tool:
- 8 mm head
- Extension
- Ratchet handle
Since cars of the tenth family, such as the VAZ 2110, 2111 and 2112, are identical with regard to the front part of the body, the procedure for replacing headlights will be the same.
Removing and disassembling the headlamp, replacing lamps
Disconnect the negative cable from the battery.
Disconnect the two electrical connectors of the headlight unit.
Using a 10mm wrench, unscrew the two bolts of the upper headlight mounting.
Remove the radiator grille.
Unscrew the lower mounting bolt.
Carefully pry off the decorative trim with a screwdriver.
We move the trim to the center of the car and remove it.
Using a 10mm socket, unscrew the nut securing the headlight unit to the bracket
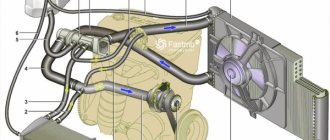
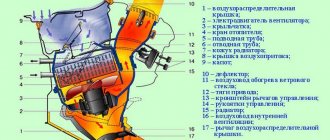
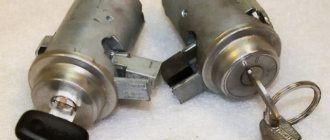
What does a hydraulic corrector look like and what does it consist of?
The device adjusts the angle of the light flux depending on the position of the car body. The shape of the regulator resembles a long tube, one end of which is located in the cabin, and the other is attached to the headlights. The design of the hydraulic corrector consists of:
- The master cylinder, which is installed on the instrument panel.
- Executive cylinders that regulate the position of the headlights.
- Connecting pipelines.
- Working fluid.
How the design details of the headlight hydrocorrector on the VAZ 2110 work
There are no complicated parts here; minor repairs can be done by yourself. This does not require a complex tool or special skills.
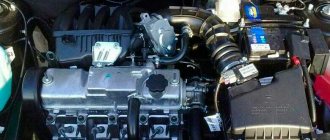
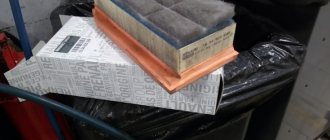
Types of lighting devices
Depending on the year of manufacture, the VAZ 2110 can be equipped with either Kirzhach or Bosch headlights.
Both of them are a block that includes high and low beam headlights, side lights, and direction indicators. No matter how much difference there is, there are some nuances:
- In Kirzhach, the glass is sealed, so both removing it and replacing it with a new one is more difficult. In addition, the low beam glass has a lens that makes the light output more focused, although limited; Left headlight block Kirzhach
- Bosch glass is secured with latches. They are sealed with rubber gaskets. Their low beam boundary is more blurred, since there is no lens in the glass. Right headlight block Bosch
It’s difficult to say unequivocally which headlight unit is better. But disassembling Boshevskys is definitely easier. In any case, it doesn't hurt to know how to do it in both cases.
To remove the headlight unit, you need to open the hood:
- De-energize the VAZ 2110 (this must always be done during repairs, especially anything related to electricity) by disconnecting the negative terminal from the battery;
- Remove the lining from the radiator;
- Disconnect the block with wires from the headlight;
- Press the latch of the hydraulic corrector cylinder and, turning it 90° to the right, remove it from the socket. There is no need to disconnect the hoses;
- Unscrew the three bolts securing the headlight unit, then move it back;
- After which, move the device to the side, towards the center of the car, until it disengages with the wing hook;
- Loosen the upper bumper bolts;
- Press the pad from below until its flange disengages from the buffer, then remove the pad;
- Unscrew the nut securing the headlight from below;
- By pulling the headlight unit towards you and disconnecting the block from the turn signal, you can remove it.
Having carried out the correct removal without breaking anything, you can replace it with new equipment. Or you can disassemble and perform tuning or independent repairs.
The disassembly goes like this:
- Unscrew the fastening screws (there are two of them);
- Disengage the two hooks on the turn signal from the headlight. Now you can disassemble it into two parts.
Preparing for adjustment
To get started, we recommend watching a video on adjusting headlights on a VAZ 2110. Training lessons will allow you to understand the nuances of the procedure in more detail and pay attention to the important points of the operation.
Everything is not as complicated as it might seem at first glance. First, prepare the car appropriately for adjusting the optics.
- Wash your car headlights to keep them as clean as possible.
- Examine the condition of the optic glass. In some cases you will have to polish it. The procedure is not complicated, but requires a careful and careful approach.
- Now check the reflector for defects or damage. If they are, it is better to immediately replace it with a new one.
- If the car has been in use for a long time, then the existing lamps are unlikely to be modern and highly efficient. Experts recommend using modern halogen bulbs, which do an excellent job of illuminating the road surface.
- Pay attention to the standard indicators specified in the owner's manual for your vehicle. Before adjusting the headlights on a VAZ 2110, you must: fill the fuel tank, inflate the wheels to the required levels, and check the spare wheel.
Having completed the preparation to obtain the necessary conditions, you can proceed directly to the settings.
How is the replacement carried out?
Replacing headlights on a VAZ 2110
As a rule, car headlights can serve for a long time without needing repair. But if there is an urgent need, you can replace the headlight without much difficulty. This is easy to do yourself, given that when performing repairs in the cold season, it is better to carry out it in a warm room so as not to harm the plastic decorative trim. In addition, many car enthusiasts, chasing beauty and wanting to make their car more attractive and unique, remove and replace headlights for tuning purposes. Properly selected accessories can fundamentally change the appearance of dozens. Tuning is carried out in various ways, the most popular of which is tinting the headlights. Headlights can not only be tinted, but also painted in a variety of colors, and the standard headlights can be replaced with others.
Replacing the headlight
Replacing headlights in a VAZ 2110
Replacing a VAZ 2110 headlight will require the following tools and materials:
Replacement of headlights is carried out with extreme care so as not to damage the fragile plastic. To dismantle it, you will need to remove the radiator trim.
Note. The most difficult operation in the process of removing a headlight is to remove the decorative trim, also called the “eyelash”. This element complicates access to the lower nut securing the headlight.
First, the negative terminal is disconnected from the battery for safety. After this, the 2 electrical connectors of the headlight are disconnected.
Note. If there is a fender liner, unscrew it from the bumper side. As a rule, it is fixed with two or three self-tapping screws.
Using a “10” wrench, unscrew the two bolts securing the upper part of the headlamp. Then two bolts are removed that secure the decorative radiator grille.
Replacing headlights on a VAZ 2110
- You need to lift it and insert your fingers into the gap between the grille and the bumper. Two latches are released on both sides. The decorative grille is removed.
- One bolt is unscrewed that secures the headlight unit from below. Unscrew or loosen the two bolts of the upper bumper mounting and pull it back a little.
- Using a screwdriver or your fingers, carefully pull the edge of the decorative trim away from the headlight. This is a very difficult task during the dismantling process.
- For more convenient work and to avoid damage to body parts or scratches, you should remove the front bumper and continue working without it.
Note. This is necessary so that you can reach the lower nut that secures the headlight. It must be remembered that plastic becomes brittle in the cold, so it is better to carry out this work in a warm room.
Replacing headlights from VAZ 2110
After this, in the opened gap you can see a plastic latch-tab, with the help of which the edge of the lining is fixed to the edge of the wing
Care must be taken to remove it from engagement with the wing; this does not require much effort.
Note. It is necessary to press the latch of the hydraulic corrector cylinder, turn it 90 degrees until it stops and remove it from the socket without detaching it from the hoses. All actions are performed with your fingers.
Then the three headlight fixing bolts are unscrewed and the headlight unit is moved back. The headlight trim is moved back, then towards the center of the car by almost 4 centimeters, so that its hook is released from engagement with the wing, and is pulled out.
Note. Before removal, it must be lubricated with silicone grease along the fixation arc to the bumper.
- Using a socket head at “10”, the nut of the headlight unit is unscrewed, with which it is fixed to the bracket, and removed.
- The hydraulic corrector clamp is pryed off with a screwdriver, turned and pulled out of the headlight housing.
- Reassembly is carried out in reverse order without using brute force. When installing the decorative trim in place, its lower edge is advanced with a screwdriver. The entire procedure for dismantling and installing the headlight unit takes only about 20 minutes.
Tuning headlights Kirzhach
The uniqueness of Kirzhach headlights is that with a little modification their glow can be significantly improved. By changing individual elements, experienced car enthusiasts expand the light output and make it brighter. To repair the Kirzhach VAZ-2110 (2112) headlight, first remove it, then disassemble it in the following order:
- Particular attention should be paid to removing the glass. It is glued to the sealant, so you first need to heat the sealant with a hairdryer, and then carefully remove the glass using a sharp knife.
- Unscrew the 3 bolts and remove the reflective gasket.
- There is no need to remove all the internals, or completely disassemble the modules. For modernization, we only need low beam units. We unscrew them using a screwdriver.
Repair of the VAZ-2110 (2112) headlight unit by modification can be performed in various ways:
- Moving the lens.Repairing headlights 2110 (2112) by shifting the lens towards the reflector will lead to a decrease in the curvature of the reflection area. Thus, the angle of incidence and reflection of the rays will change for the better. It should be remembered that excessive lens displacement can lead to overheating. An offset of 10 mm is optimal.
- First, we take measurements and mark the cut location on the module.
- We saw off and make cuts for fastening.
- We attach the lens to the module.
Such repair of the VAZ-2112 (2110) headlight will make the module shorter. Accordingly, the luminous flux will increase in width and height.
2. Sewing the modular ring . In the standard version, the edges of the modular ring, which are located under the lens, cover the light flux. If you repair VAZ-2110 (2112) headlights by grinding off the ring by 1 mm, you can increase the luminous flux by 10-15%. This procedure will not affect the strength of the module structure.
3. Changing the shape of the reflector. Repairing headlights 2112 (2110) by changing the shape of the reflector will increase the width of the luminous flux of the headlights. The reflector has a round shape and is made by stamping from sheet metal. If you squeeze it with your hand, resting it on the floor, you get an oval.
It must be remembered that the width of the flattened part should be no more than 93.2 mm. Otherwise, the light beam will be severely deformed. In order for all the fastenings to match, the reflector fastening should also be made oval.
All these modifications can be done either individually or in combination. In any case, after the modernization is completed, it will be necessary to repair the headlight adjustment of the VAZ-2110 (2112).
Remember that unqualified modifications can lead to disastrous consequences. If you are unsure of your capabilities, entrust the issues of modernizing your car to professionals.
Among the brands of standard headlights:
- Bosch headlights (reflectors only, no lens),
- Kirzhach headlights (with lens and reflector).
The most common malfunctions of this car part are:
- Damage to the hydraulic corrector, which is better replaced with an electric corrector,
- Trembling of light
- Incorrect adjustment of the light beam.
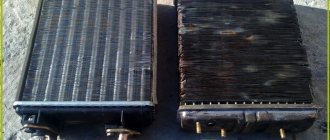
Removing glass
In fact, replacing headlight glass on a VAZ 2110 is not a rare event. It may be required if a large number of microcracks have formed on the glass, it has become cloudy or simply cracked due to an impact, collision or careless parking.
Changing glass
The removal procedure depends on the type of flashlight you are dealing with.
Replacing glass on Bosch optics looks quite simple. You need to press the latches, after which the glass can be easily removed.
But when installing a new one, do not forget to look at the condition of the rubber seal. This is a consumable item that is best replaced immediately. Additionally, craftsmen advise using a sealant. This procedure is not mandatory, but it improves the quality of installation and protects the interior of the headlight from the same condensation, for example.
But if you have Kirzhach, we sympathize a little. In this situation, it will be much more difficult to remove the glass. But this does not make the procedure impossible.
- Arm yourself with a flathead screwdriver and insert it into the corner of the glass. This will create a gap of sorts.
- With your other hand, take a sharp utility knife, thereby cutting off the sealant.
- If the sealant has hardened firmly, try heating it with a regular hairdryer. Hurry up with removal, as the composition will quickly harden.
- In any case, you will have to dig deeper into the headlight. Be careful not to damage the glass. If it is already cracked and needs to be replaced, you can resort to more aggressive glass removal methods.
- When installing new glass, use a softer sealant that is used in construction.
Replacing headlights is not as difficult as it might seem at first glance. Such repairs have their own nuances and features, but if you follow the instructions and be careful, you will definitely be able to do everything with your own hands.
Eliminating headlight shake
Some owners of the domestic VAZ 2110 noticed that the light trembles when driving. This problem appears more often in Kirzhach headlights, but in this part from Bosch this phenomenon occurs quite rarely. Reason: rattling of the reflector itself.
To eliminate light jitter you need to check:
- Is the reflector in place in the latch?
- Is the adjusting bolt rod in place?
- Does the hydraulic corrector rod rest against the seat;
- Is the thread slack (we swap the high and low beam lamps)
- Is the tube in the hydraulic corrector frayed?
Among the most successful ways to troubleshoot the problem:
- Replacing the hydraulic corrector with an electric corrector.
- Increasing the length of the hydraulic corrector rod, which will help tension the spring.
This popular method allows you to get rid of the twitching of the light by placing a cap on the hydraulic corrector rod.
Use as a cap:
- plastic dowel 8mm long,
- brake fitting cap,
- another plastic cap.
The operating procedure is simple:
- We take out the hydrocorrector from the illuminator.
- We tightly place the cap on its stem. It is important that it does not jump inside.
We insert the hydraulic corrector into the seat.
How to remove a headlight on a VAZ 2110-2112
I recently made a detailed video report on this topic, so below is an overview from my channel.
Video instructions for replacing headlights
This example was shown on the right headlight; of course, everything is done a little easier on it than on the left. But in essence, there is practically no difference:
Photo report of the work done on dismantling and installation
The first step is to remove the radiator grille by unscrewing the two bolts securing it from above:
And remove the grille, bending the fastening clamps from below:
Next, you need to unscrew one bolt securing the headlight from below, as shown in the photo below:
And two bolts on top.
After this, we free ourselves from the lower headlight trim, between it and the front bumper:
After this, disconnect all the power wires from the light bulbs from the inside, as well as the headlight range control tube, and then you can remove the headlight without any problems, since nothing else holds it.
Installation is carried out in reverse order. As for the price of a new headlight, for a VAZ 2110 it can range from 1000 rubles apiece. The price, of course, also depends on the type of headlight (lens or regular) and on the manufacturer (Bosch or Kirzhach).
The tinting of the front lights itself can be different:
- Painting the front optics mask,
- Glass painting,
- Glass film tinting.
The process of painting optics parts is shown in the video.
For those who do not want to paint or tint, you can purchase ProSport headlights for the VAZ 2110. They are already sold in black or chrome. All that remains is to install them in place of the old standard ones. However, they are not of high quality and bright light.
The second most popular tuning method is the installation of VAZ 2110 fog lights, which are a useful thing, but domestic cars are rarely equipped with them. The process of installing fog lights is not complicated, and you can do it yourself. There are fog lights for the VAZ 2110, both corrugated, scattering light, and transparent, shining in spots. The latter are considered fashionable, but they are worse in operation. To connect such optics you will additionally need to purchase:
- key,
- headlight frames,
- key indicator (yellow),
- relay,
- wires,
- terminal is narrow and wide “mother”,
- narrow and wide male terminal,
- ground terminal,
- plastic pads.
The diagram for switching on the fog lights is shown in the photo.
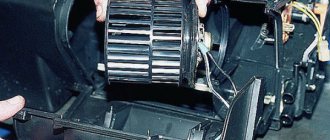
We repair the light fixture without disassembling it
You can snap the ball into place without removing the glass, through the holes of the light bulbs on the back side of the illuminator:
- We drill a hole exactly opposite the latch at the top of the headlight;
- Insert a screwdriver into the hole;
- Attach the collet to the corrector ball;
- We seal the hole we drilled;
- We attach a hinged loop from a furniture cabinet (hinges 5-6 centimeters long, with mounting holes and a cutout on top on which it is attached) to each broken corrector unit;
- We insert the canopy into the slot of the adjustment screw;
- We move the screw so that the slot is in a narrow place of the canopy;
- Holding the canopy, unscrew the screw until it stops with force. This is how the canopy is fixed, which needs to be placed in a horizontal position;
- Using an electric drill, using a 3 mm drill, we make a hole in the base of the light where there is a hole on the canopy;
- We screw a shortened screw into the hole so that it does not reach the high beam reflector. This slot secures the adjustment screw securely; it can be broken again.
Removing faults without disassembling headlights
Fixing the ball in plastic can be done without removing the glass parts, through the holes for replacing lamps on the back side.
Those. a hole is made opposite the latch on top of the device and a screwdriver is pushed into it, the adjusting part is snapped onto the ball and the hole is sealed. Next, take a loop to fix it on the furniture wall. It is about 5 cm in size and has holes for fixing on furniture, a groove on top for fixing the wall. The canopy is inserted into the groove of the adjusting screw, it moves and the groove ends up in a narrow area of the canopy.
Then the bolt is turned out strongly, but the canopy is held in place. In this way it is fixed and positioned horizontally.
A 3 mm hole is drilled in the base of the metal device in a place that coincides with the canopy hole, a not very long self-tapping screw is fixed there, it should not rest against the reflector. Basically, such a slot secures the screw securely and it will not break.
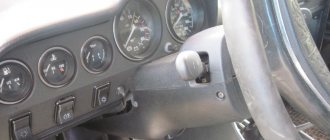
Features of domestic transport
The headlights on the VAZ-2110 are adjusted with two screws: 1 - horizontally, 2 - vertically.
Owners of foreign-made cars can be considered happy people, since their vehicles are crammed with electronics and automation, which simplifies the use of the car. Almost all settings there are carried out automatically using the on-board computer.
This also applies to headlights. Their angle is adjusted depending on the load on the car, tire pressure or the quality of the road surface. Therefore, such cars can rarely blind oncoming traffic, and the driver can see all the obstacles on the road in the dark.
There are no such adjustments on the VAZ-2110, and therefore the headlight angle must be adjusted manually . Experts advise carrying out such adjustments on special stands that are available at service stations. But when this is not possible, you can make the correction yourself. To do this you will need to call a friend for help.
Changing the type of optics (tuning)
Car enthusiasts often tune their car headlights to improve their appearance. High-quality tuning gives the car a fashionable look and beauty. If you choose the right accessory, the appearance of dozens will change completely . The most popular among car enthusiasts is tuning headlights in the form of tinting. It is carried out in a variety of ways that have virtually no effect on the brightness and quality of road lighting. Types of headlight tinting:
- Painting of the headlight mask;
- Glass painting;
- Glass tinting film.
The process of such tinting is best shown in a video. For those who don't want to paint or tint their headlights themselves, there are ProSport headlights. They are already sold in black or chrome. You just need to install them instead of the standard headlights. Only they cannot boast of high quality or bright light.
In any car, optics play an important role, since the driver’s safety depends on the quality of road surface lighting at night. Accordingly, because of this, many car enthusiasts change their headlights to provide better illumination. Find out more about what faults the factory headlights on a VAZ 2110 have and which headlights are best to choose from this material.
Fog light
A very useful device, provides light in bad weather environments. The factory version is supplied for the VAZ 2110 “Lux” configuration. In other versions you need to install them yourself. At the same time, the place in which they will be placed is determined. Most often, this is the bottom of the bumper, there are holes for fastenings.
- transparent - they give light in spots, they are a little worse;
- corrugated - scatter light well on the road surface.
They purchase frames, relays, a power button, and wires for them. The latter are placed under the hood from the instrument panel, they are connected to the connectors on the instruments, they are isolated, the instruments are fixed in frames and secured to the bumper, and the wires are connected. The button is mounted in the break of the supply wire. Then the devices are adjusted.
How to upgrade them
- The good news is that we won't need any more conductive tape, new or old. In any case, AvtoVAZ itself abandoned this “karmically” unsuccessful detail in the design of the rear lights of the VAZ 2114 or VAZ 2115 models.
- The bad news is that your car with such tape in the headlamp unit may present an unexpected and unpleasant surprise at the most inopportune time.
But there is a way out - to modernize with your own hands, and in fact to simplify the design of the rear lights.
Penny purchases
As you know, the best improvement is the one that:
- costs less than the original. And the proposed method will allow you to keep it within 250 rubles;
- simplifies the design. That’s how it will be, because it’s not for nothing that this method is used everywhere.
So, go to the nearest auto store and purchase:
- a set of single sockets for direction indicators;
- double sockets for brake lights and parking lights;
- male-female copper connectors;
- high-quality wire 2-3 meters.
Independent steps
Having removed the rear lights from the car, we begin to modernize them. To do this, you will need instructions that will show you how to remove the lighting fixture.
Don't forget that modern cars are full of plastic parts that can easily be broken due to carelessness.
Note! You will need a wiring diagram for the VAZ 2112 injector, and the good news is that it is posted at the beginning of the article.
Locksmith stage
We arm ourselves with cutting tools and begin the alteration:
- in the plastic panel of the headlight housing we mark places for cartridges;
- then we cut holes for them;
- We fix them with self-tapping screws.
Electric stage
An equally important process for connecting electrical components is as follows:
- We cut off a piece of wire and use it to make a common “ground”. To do this, we connect the “-” terminal of all cartridges in series, having previously secured the male-female connector to the wire;
- Cut the wire again and connect it to the “+” turn terminal;
- Using the next piece of wire we connect the “+” terminal of the side and brake lights in series;
- Referring to the diagram, we connect the connector block with the free ends of the wiring.
Tip: be sure to test the assembled circuit to identify a short circuit.
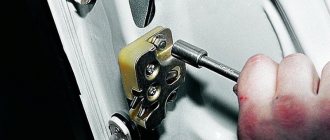
Replacing the headlight range control on a VAZ 2110
Every car enthusiast can change the headlight hydraulic corrector. The work process takes no more than half an hour. The only tools needed to replace the hydraulic corrector are a wrench with a size 21 head and a straight screwdriver. The rest is done by hand:
- Remove the adjustment knob located on the instrument panel. To do this, you need to pull it with medium force, slightly shaking it.
- Using the existing wrench, unscrew the nut under the handle (it pulls the master cylinder to the panel).
- Click on the rectangular button on the panel. It is located slightly below the hydraulic corrector adjustment. As a result, the door opens. Through the resulting opening from below, we can easily reach the free master cylinder.
- Open the hood. We find headlight units with integrated working cylinders. To remove them, unfasten the clamps. After this, each cylinder is turned counterclockwise and removed.
- Using a prepared screwdriver, unscrew the bolts that secure the tube clamps.
- We push the released elements of the hydraulic corrector into the cabin at the place where the connecting tubes come out. The seal present here is flexible, so it won’t hurt much.
- Installing a new headlight range control is carried out in the reverse order.
Have you noticed how simple it is? So, if the hydraulic corrector in your VAZ 2110 does not want to work, take half an hour and replace it. Agree, the ability to adjust the direction of the light beam at any time without leaving the car is, it seems, a small thing, but a pleasant one.
Author: Lagoda Vladislav Fedorovich
Higher education: secondary specialized. Specialty: Auto mechanic. Good knowledge of the design of foreign-made passenger cars. Work skills: replacing the timing belt of the cylinder head, chassis wheel alignment and maintenance. Repair…
- Dim Dimych says: I read that to install xenon together with a washer, you need an automatic headlight leveler. I couldn’t quite imagine what it was – please explain.
Yuri Kaplan says:
This is a device that adjusts the angle of the lights depending on the position of your car. By the way, a very useful thing - I installed a German Hella for myself for 18 and a half thousand, it does an excellent job. Driving has become much more convenient.
I can't understand what the operating principle is based on. Can you tell me more about this?
- Stanislav says: Good afternoon. The operating principle of the auto-corrector is based on conventional tilt sensors. Your car changes angle, the sensor reads it and sends a signal to change the position of your lights.
Repair of optics on classic 2106
If the light bulbs fail, repair of VAZ-2106 headlights is carried out in the following order.
- We de-energize the car.
- Use a flat-head screwdriver to remove the black plastic sidelight.
- Using a Phillips screwdriver, unscrew the screws securing the iron headlight rim so that you can turn it.
- Turn the rim clockwise to the removal position and remove it.
- After this, the headlight is removed.
- Carefully disconnect the power plug.
- Remove the clamp and take out the faulty light bulb.
- We install a new lamp and mount the headlight in the reverse order.
Design of headlight hydraulic correctors
As a rule, the following components are included in the design of a hydraulic corrector:
- master cylinder mounted on the dashboard;
- actuator cylinders mounted on the headlights;
- connecting pipelines that are fixed with clamps;
- working fluid with increased frost resistance.
Typically, hydraulic correctors are made in the form of a non-removable structure that cannot be repaired. Therefore, if, for example, the hydraulic corrector of the VAZ-2114 headlights fails, it is repaired by replacing it with a new set.
The manufacturer provides a maximum operating pressure in the normal state of the corrector. To direct the luminous flux of the headlight downwards, the pressure in the system is reduced, as a result of which the actuator cylinder rod is retracted and the optics are rotated downwards. Thus, most of the time the device is under increased pressure.
Quite often, when temperature changes occur, especially in winter, the structure of the seals is damaged due to the poor quality of the rubber, which leads to leakage of the working fluid. In turn, this leads to jamming of the cylinder pistons in one of the positions.
Structurally, all hydraulic correctors that are installed on VAZ vehicles are made according to a similar design, with the exception of some differences in size, layout of cylinder fastenings and pipelines. Today the following modifications of hydraulic correctors are supplied to the market:
- “2105-3718010” - for VAZ 2105-2107;
- “2108-3718010” - for VAZ 2108-21099;
- “2110-3718010” and “2110-3718010-10” - for VAZ 2110-2112;
- “2114-3718010” - for VAZ 2113-2115;
- “21213-3718010” - for 21213 “Niva”.
How to repair a device
During the DIY repair process, you will need to make some parts and consumables yourself.
Tools
From the tool you need to prepare:
- Screwdrivers.
- Metalworking machine.
- Plastic dowels that will serve as a cap.
- Washers.
- Anaerobic sealant.
Description of the repair process with photos
Repairs vary depending on the type of fault. In most cases, factory headlight mounts are replaced with homemade ones, and the cylinder rod is also lengthened .
- We cut the metric thread into 3 on the adjustment screws.
The adjustment screws have metric threads.
Remove the plastic fasteners from the hydraulic corrector bolt
Using 2 washers and a spring, we make a reliable mount for the hydraulic corrector
How to extend the stem
If you want to expand the lighting of the road next to your car, it makes sense to lengthen the rod. This will allow you to change the position of the headlight. You will need to use a plastic tip 7-8 mm long. We recommend using a regular dowel of a suitable diameter. It is secured to the top of the stem with glue or sealant.
Suggested options
As mentioned above, for car owners of the “dozen” the market offers only two options for headlights - domestically produced Kirzhach and original Bosch VAZ 2110 headlights. Of course, most consumers prefer German-made products, especially considering that their cost is lower than Russian optics ( author - channel Aleks B).
Which headlights are better?
Before removing and installing new optics, let's figure out which manufacturer to give preference to. Despite the fact that German-made products have always been famous for their quality, in reality, domestic experts recommend installing Kirzhach flashlights on the “tens”.
Let's see why this is so:
- It is clear that the purpose of the lights is to provide better visibility of the road surface when driving at night, while they should not blind oncoming drivers. These functions are performed normally by both Kirzhach and Bosch devices.
- Russian-made flashlights have a lens for near lighting and a reflector for distant lighting. As for German-made lanterns, they are equipped with two reflectors. The level of illumination of the road surface is generally identical in both cases, but the Bosch ones shine an order of magnitude brighter.
- In any case, lenses are better than reflectors because they provide a clearer line of light. In addition, their operation allows the use of xenon.
- Judging by the reviews of our compatriots, Bosch flashlights have poorer illumination, in particular in low beam conditions.
- German-made devices have an important feature - the road surface is illuminated much better in cloudy weather and rain, unlike Kirzhach. This is ensured by the fact that their design uses a larger reflector. However, due to this same feature, installing xenon in Bosch will be impossible.